 Subscribe
 Follow Us
jQuery plugin: Easy List Splitter
 13 years ago
 8319
8319 1321
1321
Easy List Splitter keeps the HTML to the minimum. No unnecessary elements or inline styles are added to the code. You’ll get a clean plain HTML with some classes that you can use as hooks to easily style your lists. Choose whether to order your list items vertically or horizontally. You can then decide whether to modify the default CSS or apply a new one.
Features
- Split any ordered (OL) or unordered (UL) list
- Define the number of columns in which you want your lists to be split
- Target more than one list on the same page and set different number of columns for each of them
- CSS is completely separated from the javascript. You can either modify the default one or create your own
- A class “last” will be added to each last UL or OL so that you can easily remove side padding or margin
- NEW: You can now choose whether to order your list items vertically or horizontally
- There is no need to modify your HTML. Just target your list element using any of the JQuery-selectors.
- No dependencies at all!
Planned additions
I’m totally open for suggestions. Here are some future additions that came out of the comments below:
- Preserve nested lists
- Allow for custom class on the wrapper div
Usage
Here is the HTML code for a simple list:
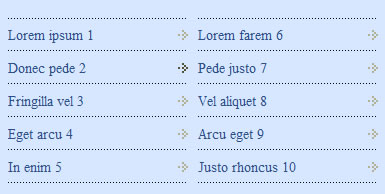
<ul class="my-list">
 <li><a href="#">Lorem ipsum 1</a></li>
 <li><a href="#">Donec pede 2</a></li>
 <li><a href="#">Fringilla vel 3</a></li>
 <li><a href="#">Eget arcu 4</a></li>
 <li><a href="#">In enim 5</a></li>
 <li><a href="#">Lorem farem 6</a></li>
</ul>
We need now to include three different files in the head of the document: the jQuery library, the EasyListSplitter plugin and our Script file from where we’re going to call the plugin.
You can target any list elements using the powerful JQuery-selectors. The plugin requires one argument only, the column number. Here is a sample that shows you how to activate the plugin using a class. Bare in mind that you can also target the list element straight away (eg. $(‘ul’)). If you don’t set the colNumber argument, the plugin will generate two columns by default:
$('.my-list').easyListSplitter({ colNumber: 3 });
Also, if you don’t specify the direction parameter, the plugin will order the list items vertically by default as follows:
list item 1      list item 4      list item 7
list item 2      list item 5      list item 8
list item 3      list item 6
With version 1.0.1 you can now choose whether ordering your list items vertically as above or horizontally, getting the following layout:
list item 1      list item 2      list item 3
list item 4      list item 5      list item 6
list item 7      list item 8
What you have to do is simply specify the direction:’horizontal’ parameter when you call the plugin:
$('.my-list').easyListSplitter({
   colNumber: 3,
   direction: 'horizontal'
});
Apply your CSS
Here comes the easiest part. The plugin has just split our list into three different lists. What we have to do to get a multi-column list is simply apply some CSS. You can either modify the default one or apply your own. Basically we just want to set a float property to all the lists and apply some margin.
You might also like
Tags
accordion accordion menu animation navigation animation navigation menu carousel checkbox inputs css3 css3 menu css3 navigation date picker dialog drag drop drop down menu drop down navigation menu elastic navigation form form validation gallery glide navigation horizontal navigation menu hover effect image gallery image hover image lightbox image scroller image slideshow multi-level navigation menus rating select dependent select list slide image slider menu stylish form table tabs text effect text scroller tooltips tree menu vertical navigation menu