 Subscribe
 Follow Us
Dropdown Blogroll With CSS Only
 13 years ago
 9654
9654 1688
1688
Dropdown menus are a great way of including a long list of links without cluttering up your page. The issue though is that they can be hard to style, but look quite ugly if you don’t. There isn’t a lot of flexibility with HTML’s <select> tags.
1 – Create the Image
The HTML we use later won’t have any traditional <select> codes, so by itself, it’s not going to look anything like a dropdown. We need to take care of that ourselves.
The image you create can look any way you want it to, but since this is a dropdown menu, a little arrow pointing downwards is your best option for easy usability.
The size of the image is also important. It can be any height you like, but the width will be the width of your dropdown.
This is what I have ended up with:
![]()
2 – Set up The HTML
Now we set up our HTML. This is where the power of this method comes into play, you are using simple HTML that you can later style in any way that suits you.
We need an unordered list to store all of the links. We will then precede that with a paragraph (or a ‘h’ tag if you prefer) to title it, and finally, we wrap the whole thing in a div.
Your final markup should look like this:
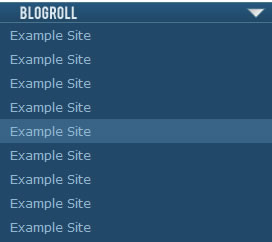
<div class="blogroll">
  <p>Blogroll</p>

  <ul>
   <li><a href="#">Example Site</a></li>
   <li><a href="#">Example Site</a></li>
   <li><a href="#">Example Site</a></li>
   <li><a href="#">Example Site</a></li>
   <li><a href="#">Example Site</a></li>

   <li><a href="#">Example Site</a></li>
   <li><a href="#">Example Site</a></li>
   <li><a href="#">Example Site</a></li>
   <li><a href="#">Example Site</a></li>
   <li><a href="#">Example Site</a></li>
   <li><a href="#">Example Site</a></li>

   <li><a href="#">Example Site</a></li>
  </ul>
 </div>
3 – Style The Menu
For now we are going to forget about the dropdown functionality, and simply design the dropdown as it will be when someone’s mouse is over the image.
The first step is to replace the paragraph text with the image we created earlier.
.blogroll p {
background:url(pbd-css-blogroll-rollover-img.png) 0 0 no-repeat;
width:274px;
height:21px;
text-indent:-9999px;
}
As you can see, we apply the image as the background first. We then set the dimensions of the paragraph to be the same as those of the image, and finally, we use text-indent to hide the “Blogroll” text from our HTML.
Next we have to style the list. Because our HTML is so simple, you will have no problem styling this any way you like. For instance, you can set a background on the dropdown, or add other types of HTML (Like images).
All I am going to do here is set up a plain list of all the links, and change the background color of each link on rollover. The CSS I’ve used is as follows: (Feel free to adapt for your own site)
.blogroll ul {
width:272px;
background:#214868;
border:1px solid #48758d;
border-width:0 1px 1px 1px;
padding:0;
list-style:none;
}

blogroll ul a:link, .blogroll ul a:visited {
display:block;
width:252px;
padding:2px 10px 2px 10px;
text-decoration:none;
color:#93b8d3;
font-weight:normal;
}

.blogroll ul a:hover, .blogroll ul a:active {background:#366386;}
The final thing to note is that we currently have a space between our image and our drop-down. We can remove this by amending our CSS:
.blogroll p, .blogroll ul {margin:0;}
4 – Create the Dropdown
Now it’s time to create the dropdown. The trick is very straightforward – We are going to use the div to hide everything other than the image until the user’s mouse is over it.
To start with, let’s hide everything other than our image.
.blogroll {
width:274px;
height:21px;
overflow:hidden;
}
And then we just use the :hover pseudo-class to allow the excess to be shown when the user scrolls over the image.
.blogroll:hover {overflow:visible;}
5 – Fix The Issue of Pushing Content Down
We are almost done. The rollover works, but when the menu appears, it pushes all the content beneath it down. This jumping content looks poor.
We are going to fix that by using absolute positioning to put the dropdown menu above all the other content. That way, there will be no jumping when the menu comes into play.
The first step is to amend the blogroll div to be positioned relatively (So that the dropdown’s absolute positioning can be anchored by this div).
.blogroll {position:relative;}
Now use CSS to position the menu right under the image.
.blogroll ul {
position:absolute;
left:0;
top:21px;
}
6 – Issues with IE 6
This menu won’t work with IE6 because it does not support :hover on anything other than links.
There are some workarounds to this using JavaScript. For instance, you could use conditional comments so that IE6 users use JavaScript to see the menu. Or you could try to teach IE6 to use :hover properly.
But given that the whole point of this was to avoid extra scripts, the best solution might be to simply hide the menu altogether. It’s not crucial content and if as few of your reader’s use IE6 as this site’s does, your best bet may just be this:
.blogroll {display:none;}
html>body .blogroll {display:block;}
You might also like


Tags
accordion accordion menu animation navigation animation navigation menu carousel checkbox inputs css3 css3 menu css3 navigation date picker dialog drag drop drop down menu drop down navigation menu elastic navigation form form validation gallery glide navigation horizontal navigation menu hover effect image gallery image hover image lightbox image scroller image slideshow multi-level navigation menus rating select dependent select list slide image slider menu stylish form table tabs text effect text scroller tooltips tree menu vertical navigation menu