 Subscribe
 Follow Us
JQuery simple Digg Style Sign Up Form
 14 years ago
 8031
8031 2203
2203
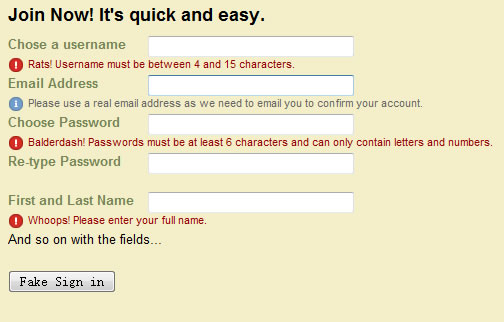
Digg.com is one of the most popular social networking sites, allowing you to discover and share the content all over the web. In this tutorial we are going to simulate their signup form, with unique features such as their dynamic tooltips that give you a hint on each field that is to be filled. The same approach will be adopted for displaying validation messages.
How this form works?
When an input field receives focus, a tooltip with a small blue icon is shown under it. On the other hand, if validation fails, an error message is shown in the same place. Both cases are shown
Let’s start
We are not going to recreate the entire form, but rather a few fields just to see how it works. Let’s take a closer look at the code sample. Each field row has a label, an input field, an info message and a validation message. Below you can see the HTML structure and CSS classes.
Note that, by default, both info and validation messages are hidden, which is set in tooltipContainer CSS class.
<fieldset class=“formContainer”>
    <h3>Join Now! It’s quick and easy.</h3>
    <div class=“rowContainer”>
        <label for=“txtFirstname”>Choose a username</label>
        <input id=“txtFirstname” type=“text” />
        <div class=“tooltipContainer info”>Minimum 4 characters, maximum 15 characters. This is your handle on Digg so don’t make it too personal.</div>
        <div class=“tooltipContainer error”>Rats! Username must be between 4 and 15 characters.</div>
    </div>
   // other rows here
</fieldset>
body{
    font-family:Arial, Sans-Serif;
    font-size:83%;
}
.formContainer
{
    background-color: #F5EFC9;
    border:none;
    padding:30px;
}
.formContainer h3
{
    margin:0px;
    padding:0px 0px 10px 0px;
    font-size:135%;
}
.rowContainer
{
    width:100%;
    overflow:hidden;
    padding-bottom:5px;
    height:34px;
}
.rowContainer label
{
    width:140px;
    float:left;
    color: #758656;
    font-weight:bold;
}
.rowContainer input[type=“text”]
{
    width:200px;
}
.tooltipContainer
{
    height:16px;
    font-size:11px;
    color: #666666;
    display:none;
    float:none;
    background-repeat:no-repeat;
    background-position:left center;
    padding:0px 20px;
}
.info
{
    background-image:url(‘info.gif’);
}
.error
{
    background-image:url(‘error.gif’);
}
Now let’s add some interactivity
So far we have a static HTML structure and hidden messages waiting to be shown. We have to write a few lines of code to make them appear/disappear. Of course, this can be accomplished by pure JavaScript, but let’s involve jQuery. The reason for this is quite simple – less coding.
Like I mentioned at the beginning of this tutorial, an info tooltip should be shown each time an input field gets focus and hidden when it loses it. Turn this into jQuery code and you get this:
$(document).ready(function(){
    $(”.formContainer input[type=text]”).focus(function(){
        $(this).parent().find(”.info”).css(“display”, “block”);
    }).blur(function(){
        $(this).parent().find(”.info”).css(“display”, “none”);
    });
});
Simple, isn’t it? Now, let’s see how to handle validation messages. We are going to create fake validation just for the purpose of this tutorial. We’ll use jQuery again.
function validateForm()
{
    $(”.formContainer input[type=text]”).each(function(){
        var text = $(this).attr(“value”);
        if (text == “”)
        {
            $(this).parent().find(”.error”).css(“display”, “block”);
        }
    });
}
In essence, what the code above does is it shows a validation message for each field that the user hasn’t entered text in. Please keep in mind that this is not real validation, it just simulates what would happen if validation failed. You would have to implement your own logic, eg. check for mandatory fields, email address format and so on.
Ok, after pressing the sign-in button, validation messages will be shown. Signup form on Digg.com hides these messages and replaces them with info tooltips when the user starts to type. So we are missing a piece of code that will hide validation messages that were previously shown.
Let’s do it the dirty way. We’ll extend our jQuery code that controls the appearance of tooltips to hide corresponding validation messages each time an input field gets focus.
$(document).ready(function(){
    $(”.formContainer input[type=text]”).focus(function(){
        $(this).parent().find(”.error”).css(“display”, “none”);
        $(this).parent().find(”.info”).css(“display”, “block”);
    }).blur(function(){
        $(this).parent().find(”.info”).css(“display”, “none”);
    });
});
This way we have recreated the Digg.com signup form.
Conclusion
You saw how to recreate the Digg.com signup form with simple CSS and just a few lines of jQuery code. However, there are a few pieces of advice I’d like to give you:
- Do not overwork the form – there is really no need for a tooltip that says “Enter your first and last name in the field that says First and Last name”. Instead, you can provide a message that shows a constraint, for example “Maximum 35 characters”.
- Use tooltip/validation color other that text color – try hitting the “Continue” button on Digg.com signup form before entering any text. The form becomes very hard to read and it’s difficult to distinguish where one field ends and the next begins.
You might also like


Tags
accordion accordion menu animation navigation animation navigation menu carousel checkbox inputs css3 css3 menu css3 navigation date picker dialog drag drop drop down menu drop down navigation menu elastic navigation form form validation gallery glide navigation horizontal navigation menu hover effect image gallery image hover image lightbox image scroller image slideshow multi-level navigation menus rating select dependent select list slide image slider menu stylish form table tabs text effect text scroller tooltips tree menu vertical navigation menu