 Subscribe
 Follow Us
JQuery Fancy AJAX Contact Form
 13 years ago
 29641
29641 5717
5717
Introduction
Providing a simple and reliable means of feedback from site visitors is a crucial part of any web presence. The most simple and common feedback channel are contact forms.
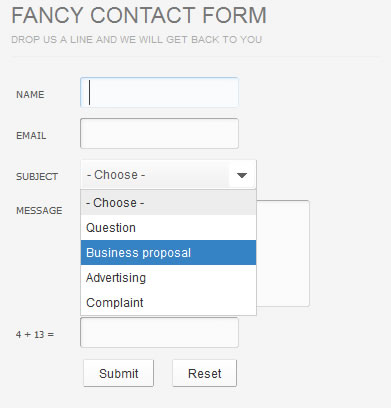
In this tutorial we are going to make an AJAX contact form which leverages modern web development techniques.
We are using PHP, CSS and jQuery with the help of the formValidator plugin for form validation and the JQTransform plugin, which will style all the input fields and buttons of the form. In addition we are using the PHPMailer class to send out the contact form emails.
For the page background we are using a fantastic dark wood texture by Matt Hamm.
The form degrades gracefully, which means it is perfectly usable even with JavaScript turned off.
*Edit: Also make sure you are running PHP 5. If this is not the case, you can switch the PHP version from your hosting control panel.
So lets start with the tutorial.
Step 1 – XHTML
First, we are going to take a look at the XHTML markup behind the form.
demo.php
<div id="main-container"> <!-- The main container element --> <div id="form-container"> <!-- The form container --> <h1>Fancy Contact Form</h1> <!-- Headings --> <h2>Drop us a line and we will get back to you</h2> <form id="contact-form" name="contact-form" method="post" action="submit.php"> <!-- The form, sent to submit.php --> <table width="100%" border="0" cellspacing="0" cellpadding="5"> <tr> <td width="18%"><label for="name">Name</label></td> <!-- Text label for the input field --> <td width="45%"><input type="text" class="validate[required,custom[onlyLetter]]" name="name" id="name" value="<?=$_SESSION['post']['name']?>" /></td> <!-- We are using session to prevent losing data between page redirects --> <td width="37%" id="errOffset"> </td> </tr> <tr> <td><label for="email">Email</label></td> <td><input type="text" class="validate[required,custom[email]]" name="email" id="email" value="<?=$_SESSION['post']['email']?>" /></td> <td> </td> </tr> <tr> <td><label for="subject">Subject</label></td> <!-- This select is being replaced entirely by the jqtransorm plugin --> <td><select name="subject" id="subject"> <option value="" selected="selected"> - Choose -</option> <option value="Question">Question</option> <option value="Business proposal">Business proposal</option> <option value="Advertisement">Advertising</option> <option value="Complaint">Complaint</option> </select> </td> <td> </td> </tr> <tr> <td valign="top"><label for="message">Message</label></td> <td><textarea name="message" id="message" class="validate[required]" cols="35" rows="5"><?=$_SESSION['post']['message']?></textarea></td> <td valign="top"> </td> </tr> <tr> <td><label for="captcha"><?=$_SESSION['n1']?> + <?=$_SESSION['n2']?> =</label></td> <!-- A simple captcha math problem --> <td><input type="text" class="validate[required,custom[onlyNumber]]" name="captcha" id="captcha" /></td> <td valign="top"> </td> </tr> <tr> <td valign="top"> </td> <!-- These input buttons are being replaced with button elements --> <td colspan="2"><input type="submit" name="button" id="button" value="Submit" /> <input type="reset" name="button2" id="button2" value="Reset" /> <?=$str?> <!-- $str contains the error string if the form is used with JS disabled --> <img id="loading" src="img/ajax-load.gif" width="16" height="16" alt="loading" /> <!-- the rotating gif animation, hidden by default --> </td></tr> </table> </form> <?=$success?> <!-- The $success variable contains the message that is shown if JS is disabled and the form is submitted successfully --> </div> </div> <!-- closing the containers -->
As you can see from line 8, we are submitting our form to submit.php. We are using this file to handle both the regular form submit (for visitors with JS disabled) and the AJAX form submit. This allows the code to be updated easily with no need to merge changes between files.
Later you can see that we use the $_SESSION array to populate the values of the input fields. This is done to insure that the data is not lost during page redirects, which occur when the form is submitted to submit.php during the regular form submit.
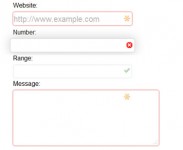
Another important aspect are the classes assigned to the input fields – classs=”validate[required,custom[onlyLetter]]”. These classes are used by the validation plug-in to define the validation rules for every input field, or text area. We are basically saying that the field is required, and only letters are allowed.
There is a number of available validation rules. You can see them at the plug-in’s homepage.
Now lets see how the plain form is fancyfied with the use of the JQtransform plugin.
Step 2 – jQuery
We are using two jQuery plugins – JQtransform for styling all the form elements, and formValidator, which will help us validate all the input fields on the client side.
It is important to remember to always validate the input data on the server side in addition to client side validation.
First we need to include all the required libraries.
demo.php
<link rel="stylesheet" type="text/css" href="jqtransformplugin/jqtransform.css" />
<link rel="stylesheet" type="text/css" href="formValidator/validationEngine.jquery.css" />
<link rel="stylesheet" type="text/css" href="demo.css" />

<?=$css?> <!-- Special CSS rules, created by PHP -->

<script type="text/javascript" src="http://ajax.googleapis.com/ajax/libs/jquery/1.3.2/jquery.min.js"></script>
<script type="text/javascript" src="jqtransformplugin/jquery.jqtransform.js"></script>
<script type="text/javascript" src="formValidator/jquery.validationEngine.js"></script>
<script type="text/javascript" src="script.js"></script>
The above code is from the head section of demo.php. We first include the stylesheets that are used by the two plugins, and then the jQuery library and the plugins. You might find line 5 interesting – this is a special set of CSS rules that we create with PHP to show a confirmation message, as you will see later.
Now lets take a look at our script.js.
script.js
$(document).ready(function(){
 /* after the page has finished loading */

 $('#contact-form').jqTransform();
 /* transform the form using the jqtransform plugin */

 $("button").click(function(){

  $(".formError").hide();
  /* hide all the error tooltips */
 });

 var use_ajax=true;
 $.validationEngine.settings={};
 /* initialize the settings object for the formValidation plugin */

 $("#contact-form").validationEngine({ /* create the form validation */
  inlineValidation: false,
  promptPosition: "centerRight",
  success :  function(){use_ajax=true}, /* if everything is OK enable AJAX */
  failure : function(){use_ajax=false} /* in case of validation failure disable AJAX */
  })

 $("#contact-form").submit(function(e){

   if(!$('#subject').val().length)
   {
    $.validationEngine.buildPrompt(".jqTransformSelectWrapper","* This field is required","error")
    /* a custom validation tooltip, using the buildPrompt method */

    return false;
   }

   if(use_ajax)
   {
    $('#loading').css('visibility','visible');
    /* show the rotating gif */

    $.post('submit.php',$(this).serialize()+'&ajax=1',
    /* using jQuery's post method to send data */

    function(data){
     if(parseInt(data)==-1)
      $.validationEngine.buildPrompt("#captcha","* Wrong verification number!","error");
      /* if there is an error, build a custom error tooltip for the captcha */
     else
     {
      $("#contact-form").hide('slow').after('<h1>Thank you!</h1>');
      /* show the confirmation message */
     }

     $('#loading').css('visibility','hidden');
     /* hide the rotating gif */
    });
   }

e.preventDefault(); /* stop the default form submit */
})

});
his entire script block is executed within the $(document).ready method, which guarantees that it is run after the page has finished loading.
Next we use the jqTransform() method that is defined by the jqtransform plugin. It converts and styles all of the form’s elements (input fields, text areas, buttons).
The select element is actually replaced by a set of divs and anchors. It surely looks great, but opens up some problems with the validation plugin which make us handle our own tooltip for the select drop-down.
After this on line 7 we bind every click on the buttons at the bottom of the page with a line of code that hides all currently displayed error tooltips by the validation plugin. This insures they are properly refreshed and do not stay on screen if the user enters valid data.
Later we initialize the formValidation plugin with the validationEngine() method and on line 24 define the form’s onsubmit event. A few things worth mentioning here – the custom tooltip on line 28, and the additional ajax=1 parameter on line 39. This parameter is used by submit.php to distinguish whether the request has been made through ajax or directly with the form submit.
Also notice that we use a special variable use_ajax, to prevent ajax interactions if the form fails to validate.
Step 3 – CSS
All of our CSS rules are defined in demo.css
demo.css
body,h1,h2,h3,p,quote,small,form,input,ul,li,ol,label{
 /* reset some of the page elements */
 margin:0px;
 padding:0px;
}

body{
 color:#555555;
 font-size:13px;
 background: url(img/dark_wood_texture.jpg) #282828;
 font-family:Arial, Helvetica, sans-serif;
}

.clear{
 clear:both;
}

#main-container{
 width:400px;
 margin:30px auto;
}

#form-container{
 background-color:#f5f5f5;
 padding:15px;

 /* rounded corners */
 -moz-border-radius:12px;
 -khtml-border-radius: 12px;
 -webkit-border-radius: 12px;
 border-radius:12px;
}

td{
 /* prevent multiline text */
 white-space:nowrap;
}

a, a:visited {
 color:#00BBFF;
 text-decoration:none;
 outline:none;
}

a:hover{
 text-decoration:underline;
}

h1{
 color:#777777;
 font-size:22px;
 font-weight:normal;
 text-transform:uppercase;
 margin-bottom:5px;
}

h2{
 font-weight:normal;
 font-size:10px;

 text-transform:uppercase;

 color:#aaaaaa;
 margin-bottom:15px;

 border-bottom:1px solid #eeeeee;
 margin-bottom:15px;
 padding-bottom:10px;
}

label{
 text-transform:uppercase;
 font-size:10px;
 font-family:Tahoma,Arial,Sans-serif;
}

textarea{
 color:#404040;
 font-family:Arial,Helvetica,sans-serif;
 font-size:12px;
}

td > button{
 /* A special CSS selector that targets non-IE6 browsers */
 text-indent:8px;
}

.error{
 /* this class is used if JS is disabled */
 background-color:#AB0000;
 color:white;
 font-size:10px;
 font-weight:bold;
 margin-top:10px;
 padding:10px;
 text-transform:uppercase;
 width:300px;
}

#loading{
 /* the loading gif is hidden on page load */
 position:relative;
 bottom:9px;
 visibility:hidden;
}

.tutorial-info{
 color:white;
 text-align:center;
 padding:10px;
 margin-top:10px;
}
Nothing out of this world here. Notice line 85. This makes the buttons at the bottom of the form wider, but unfortunately they look buggy in IE6. That is why I used a special CSS selector that is ignored in IE6, to target the rest of the browsers.
Now all that is left is the PHP code.
Step 4 – PHP
First lets take a look at the code in the beginning of demo.php.
demo.php
session_name("fancyform");
session_start();

$_SESSION['n1'] = rand(1,20); /* generate the first number */
$_SESSION['n2'] = rand(1,20); /* then the second */
$_SESSION['expect'] = $_SESSION['n1']+$_SESSION['n2']; /* the expected result */

/* the code below is used if JS has been disabled by the user */
$str='';
if($_SESSION['errStr']) /* if submit.php returns an error string in the session array */
{
 $str='<div class="error">'.$_SESSION['errStr'].'</div>';
 unset($_SESSION['errStr']); /* will be shown only once */
}

$success='';
if($_SESSION['sent'])
{
 $success='<h1>Thank you!</h1>'; /* the success message */

 $css='<style type="text/css">#contact-form{display:none;}</style>';
 /* a special CSS rule that hides our form */

 unset($_SESSION['sent']);
}
As you can see, we use the $_SESSION array to store the two random numbers and the expected result. This is later used in submit.php to confirm the captcha has been solved.
Another interesting moment is line 21 where we define a custom CSS class. This hides the form, so that the only thing shown is the success message in case the visitor has disabled JS.
submit.php
require "phpmailer/class.phpmailer.php";

session_name("fancyform"); /* starting the session */
session_start();

foreach($_POST as $k=>$v)
{
 /* if magic_quotes is enabled, strip the post array */
 if(ini_get('magic_quotes_gpc'))
 $_POST[$k]=stripslashes($_POST[$k]);

 $_POST[$k]=htmlspecialchars(strip_tags($_POST[$k]));
 /* escape the special chars */
}

$err = array();

/* some error checks */
if(!checkLen('name'))
 $err[]='The name field is too short or empty!';

if(!checkLen('email'))
 $err[]='The email field is too short or empty!';
else if(!checkEmail($_POST['email']))
 $err[]='Your email is not valid!';

if(!checkLen('subject'))
 $err[]='You have not selected a subject!';

if(!checkLen('message'))
 $err[]='The message field is too short or empty!';

/* compare the received captcha code to the one in the session array */
if((int)$_POST['captcha'] != $_SESSION['expect'])
 $err[]='The captcha code is wrong!';

/* if there are errors */
if(count($err))
{
 /* if the form was submitted via AJAX */
 if($_POST['ajax'])
 {
  echo '-1';
 }

 /* else fill the SESSION array and redirect back to the form */
 else if($_SERVER['HTTP_REFERER'])
 {
  $_SESSION['errStr'] = implode('<br />',$err);
  $_SESSION['post']=$_POST;

  header('Location: '.$_SERVER['HTTP_REFERER']);
 }

 exit;
}

/* the email body */
$msg=
'Name: '.$_POST['name'].'<br />
Email: '.$_POST['email'].'<br />
IP: '.$_SERVER['REMOTE_ADDR'].'<br /><br />

Message:<br /><br />

'.nl2br($_POST['message']).'

';

$mail = new PHPMailer(); /* using PHPMailer */
$mail->IsMail();

$mail->AddReplyTo($_POST['email'], $_POST['name']);
$mail->AddAddress($emailAddress);
$mail->SetFrom($_POST['email'], $_POST['name']);
$mail->Subject = "A new ".mb_strtolower($_POST['subject'])." from ".$_POST['name']." | contact form feedback";

$mail->MsgHTML($msg);

$mail->Send();

unset($_SESSION['post']); /* unsetting */

/* the form was successfully sent */
if($_POST['ajax'])
{
 echo '1';
}
else
{
 $_SESSION['sent']=1;

 if($_SERVER['HTTP_REFERER'])
  header('Location: '.$_SERVER['HTTP_REFERER']);

 exit;
}

/* some helpful functions */
function checkLen($str,$len=2)
{
 return isset($_POST[$str]) && mb_strlen(strip_tags($_POST[$str]),"utf-8") > $len;
}

function checkEmail($str)
{
 return preg_match("/^[\.A-z0-9_\-\+]+[@][A-z0-9_\-]+([.][A-z0-9_\-]+)+[A-z]{1,4}$/", $str);
}
Note how we check whether the $_POST['ajax'] variable has been set and act accordingly. As you remember, we set it back in script.js to indicate we were using AJAX to fetch the data.
The two $_SESSION variables errStr and post are used to share data between the form and submit.php in case JS is disabled. Here post contains the $_POST array we sent and is used to populate the fields of the form, once the user is redirected back.
With this our fancy contact form is finished!
Conclusion
Today we used two great jQuery plugins in conjunction to create a fancy looking contact form. The best thing is that it works in any browser and thanks to graceful degradation you don’t even need to have javascript enabled.
You might also like

Tags
accordion accordion menu animation navigation animation navigation menu carousel checkbox inputs css3 css3 menu css3 navigation date picker dialog drag drop drop down menu drop down navigation menu elastic navigation form form validation gallery glide navigation horizontal navigation menu hover effect image gallery image hover image lightbox image scroller image slideshow multi-level navigation menus rating select dependent select list slide image slider menu stylish form table tabs text effect text scroller tooltips tree menu vertical navigation menu