 Subscribe
 Follow Us
fance Checkboxes, Radio Buttons, Select Lists, Custom HTML Form Elements
 14 years ago
 14539
14539 3009
3009
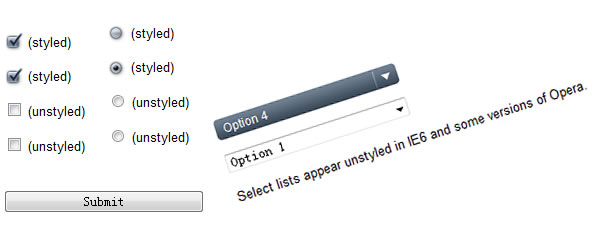
Have you ever wanted to use your own images for checkboxes, radio buttons or select lists? This script will let you do that. Easily. The unobtrusive script gracefully degrades, so if JavaScript is disabled, normal form input objects appear instead of your customized elements. This works flawlessly in Firefox, Safari, Internet Explorer 7, Opera and others. In Internet Explorer, the select lists are unstyled, but the checkboxes and radio buttons still look and function beautifully. It's this easy:
<input type="checkbox" class="styled" />
How does it work?
In a nutshell, the JavaScript looks for every form element with class="styled" on it; hides the real form element; sticks a span tag with a CSS class on it next to the element; and, finally, mouse events are added to the span that handles the visual stages form inputs go through when they are clicked.
To get the checkboxes, radio buttons and select boxes to work properly, you'll need to change three variables in the script: checkboxHeight, radioHeight and selectWidth on lines 21-23. If you use the images I created, you won't have to change the variables, but if you make your own, chances are you'll have to. The checkboxes and radio buttons to the right are linked to transparent PNG images for you to use freely if you'd like. The frist two variables are the height of a single stage of the checkbox and radio button, and the third is the width of the select box. You may need to spend a little time tinkering with the checkbox and radio button images so they don't twitch during different stages
    var checkboxHeight = "25";
    var radioHeight = "25";
    var selectWidth = "190";
The CSS
If you make your own images, you may need to change a few things in the cascading style sheet. In .checkbox and .radio, the height property should be one fourth of the height of the full size images. You also might have to change the width property in .select selector. You probably won't have to edit any other portions of the CSS, but regardless, this part is still straight forward.
.checkbox, .radio {
 width: 19px;
 height: 25px;
 padding: 0 5px 0 0;
 background: url(checkbox.gif) no-repeat;
 display: block;
 clear: left;
 float: left;
}
.radio {
 background: url(radio.gif) no-repeat;
}
.select {
 position: absolute;
 width: 158px; /* With the padding included, the width is 190 pixels: the actual width of the image. */
 height: 21px;
 padding: 0 24px 0 8px;
 color: #fff;
 font: 12px/21px arial,sans-serif;
 background: url(select.gif) no-repeat;
 overflow: hidden;
}
The XHTML
The script won't customize checkboxes, radio buttons or select lists unless you declare the styled class. Simply add class="styled" to any checkbox, radio button or option list and the JavaScript and CSS will take over from there.
Checkbox
<input type="checkbox" name="a" class="styled" />
Radio button
    <input type="radio" name="radio" class="styled" /> Yes
    <input type="radio" name="radio" class="styled" /> No
Select list
    <select name="d" class="styled">
      <option value="1">Option 1</option>
      <option value="2">Option 2</option>
      <option value="3">Option 3</option>
    </select>
You might also like

Tags
accordion accordion menu animation navigation animation navigation menu carousel checkbox inputs css3 css3 menu css3 navigation date picker dialog drag drop drop down menu drop down navigation menu elastic navigation form form validation gallery glide navigation horizontal navigation menu hover effect image gallery image hover image lightbox image scroller image slideshow multi-level navigation menus rating select dependent select list slide image slider menu stylish form table tabs text effect text scroller tooltips tree menu vertical navigation menu