 Subscribe
 Follow Us
Simple Interactive CSS Button with jQuery
 14 years ago
  9667
9667  2000
2000
 n/a
n/a
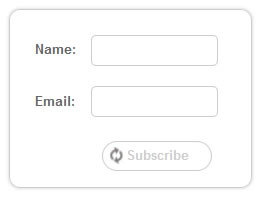
we will be creating a button that will replace the default submit button. It will be degrade gracefully, animated and easy to implement.
1. HTML
The following is a pretty stardard form structure. 2 text fields, and a submit button. The only thing you have to pay attention is the form name and button name. Button name must be same with the form name because the script will use the button's name (which is also the form name) to submit the form.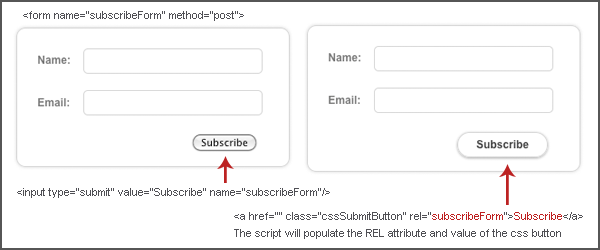
<form method="post" action="" name="subscribeForm">
 <fieldset>
  <label>Name: </label><input type="text" class="effect">
 </fieldset>

 <fieldset>
  <label>Email: </label><input type="text" class="effect">
 </fieldset>

 <div id="button">
  <input type="submit" value="Subscribe" name="subscribeForm"/>
 </div>
</form>
2. CSS
There are two things we have to style - the form layout and the css button.
body {
 font-family: arial;
 font-size:12px;
 margin:10px;
 text-align:center;
}

form {
 margin:0 auto;
 text-align:left;
 width:270px;
 border:1px solid #ccc;
 padding:15px;
 background:#fff;
 border-radius: 10px;
 -moz-border-radius: 10px;
 -webkit-border-radius: 10px;
 box-shadow: 0 0 4px #ccc;
 -webkit-box-shadow: 0 0 4px #ccc;
 -moz-box-shadow: 0 0 4px #ccc;
}

fieldset {
 overflow:hidden;
 border:0;
 height:30px;
 margin:3px 0;
}

 fieldset label {
  display:block;
  width:50px;
  float:left;
  font-weight:700;
  color:#666;
  line-height:2.2em;
 }

 fieldset input {
  float:left;
  border:1px solid #ccc;
  height: 20px;
  padding:3px;
  width:190px;
  font-size:12px;
 }

 /* form field */
 .effect {
  border-radius: 5px;
  -moz-border-radius: 5px;
  -webkit-border-radius: 5px;
 }

 #button {
  margin-top:10px;
  padding-right:20px;
  text-align:right;
 }

  #button input {
   margin:0 auto;
  }


 /* CSS BUTTON  START HERE */
 a.cssSubmitButton {
  font-size: 12px;
  background: #fff no-repeat 4px 5px;
  display: inline-block;
  padding: 5px 20px 6px;
  color: #333;
  border:1px solid #ccc;
  text-decoration: none;
  font-weight: bold;
  line-height: 1.2em;
  border-radius: 15px;
  -moz-border-radius: 15px;
  -webkit-border-radius: 15px;
  -moz-box-shadow: 0 1px 3px #999;
  -webkit-box-shadow: 0 1px 3px #999;
  position: relative;
  cursor: pointer;
  outline:none;
 }

 a.cssSubmitButton:visited {}

 /* hightlight the button on mouse over */
 a.cssSubmitButton:hover {
  border:1px solid #333;
 }

 /* the animation */
 .loading {
  background-image:url('load.gif') !important;
  color:#ccc !important;
  -moz-box-shadow: 0 0 0 #fff !important;
  -webkit-box-shadow: 0 0 0 #fff !important;
 }
3. Javascript
Alright, to make it easy to understand I will list down what it does:
- Inside the #button div, It grabs the value (which will be used as the button caption) and also the name of the button (form name) from the default submit button
- After all the important data are stored into variable, it removes the button
- And then, add the Anchor Tag with all the fancy CSS style to the #button div. The Anchor tag will have a REL attr which point to the form
- Add Click event to the CSS Submit button: When you click on the button, it will add the .loading class and then submit the form (grab the form name from the REL attribute)
That's basically it. Just have to remember you must give the form a name, and then put it in the submit button. After that, the jQuery script will populate all the information to the CSS button.
$(document).ready(function () {

 //Get the value and name from the default submit button
 var value = $('#button input').val();
 var name = $('#button input').attr('name');

 //Remove the button
 $('#button input').remove();

 //Append the CSS button
 $('#button').html('<a href="#" class="cssSubmitButton" rel=" + name + ">' + value + '</a>');

 //Click event for the CSS button
 $('#button a').live('click', function () {
  //Add loading animation
  $(this).addClass('loading');

  //submit the form
  $('form[name=' + $(this).attr('rel') + ']').submit();

  //You can add ajax code here

  return false;
 });

});
Okay, what if you want the Ajax instead? It will work better with Ajax call because you will able to see the animation. The code below demonstrate how you use Ajax call. Please note, the php script that called by jQuery is just a dummy php file which will sleep for 3 seconds and does absolutely nothing.
The difference between normal form submission and ajax submission is, you need to move the add loading class to beforeSend section and you will need to remove the loading class after everything is done.
 $('#button a').live('click', function () {

  //You can use default form submission or with the ajax call below
  //In this example, I'm using a dummy php call so that you can see the loading animation
  var link = $(this);

  $.ajax({
   url : 'load.php',
   data: '',
   type: 'GET',
   cache: 'false',
   beforeSend: function () {
    //Display the animation after the user click on the button
    link.addClass('loading');
   },
   success: function () {
    //Reset the button back to default
    link.removeClass('loading');
    //A notification to indicate the submission is done
    alert('Submitted');
   }
  });

 });
You might also like

Tags
accordion accordion menu animation navigation animation navigation menu carousel checkbox inputs css3 css3 menu css3 navigation date picker dialog drag drop drop down menu drop down navigation menu elastic navigation form form validation gallery glide navigation horizontal navigation menu hover effect image gallery image hover image lightbox image scroller image slideshow multi-level navigation menus rating select dependent select list slide image slider menu stylish form table tabs text effect text scroller tooltips tree menu vertical navigation menu