 Subscribe
 Follow Us
jQuery Smooth Animated Menu
 13 years ago
 22267
22267 4585
4585
Ever seen some excellent jQuery navigation that left you wanting to make one of your own? We’ll aim to do just that by building a menu and animate it with some smooth effects.
Step 1 – Set up the Structure
Before starting with any jQuery, we’ve got to build a quick menu structure with XHTML and load in the required project files. Make new XHTML, CSS, and javascript documents. I’ve chosen to name each of mine “animated-menu”. Make two folders in the root directory for images and javascript.
Nothing out of the ordinary here. Start by loading in the necessary libraries and external files in the head. I have chosen to load jQuery from the Google code archive online, while the easing plugin from above is placed into the “js” folder. The order of loading is important!
<!DOCTYPE html PUBLIC "-//W3C//DTD XHTML 1.0 Transitional//EN"
    "http://www.w3.org/TR/xhtml1/DTD/xhtml1-transitional.dtd">

<html xmlns="http://www.w3.org/1999/xhtml" xml:lang="en" lang="en">
<head>
    <meta http-equiv="Content-Type" content="text/html; charset=utf-8"/>
    <title>Smooth Animated jQuery Menu</title>

    <link rel="stylesheet" href="animated-menu.css"/>

    <script src="http://jqueryjs.googlecode.com/files/jquery-1.3.js" type="text/javascript"></script>
    <script src="js/jquery.easing.1.3.js" type="text/javascript"></script>
    <script src="animated-menu.js" type="text/javascript"></script>
</head>
Then copy in this menu structure into the body:
<body>
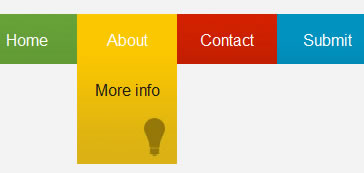
<p>Rollover a menu item to expand it.</p>
<ul>
<li class="green">
<p><a href="#">Home</a></p>
<p class="subtext">The front page</p>
</li>
<li class="yellow">
<p><a href="#">About</a></p>
<p class="subtext">More info</p>
</li>
<li class="red">
<p><a href="#">Contact</a></p>
<p class="subtext">Get in touch</p>
</li>
<li class="blue">
<p><a href="#">Submit</a></p>
<p class="subtext">Send us your stuff!</p>
</li>
<li class="purple">
<p><a href="#">Terms</a></p>
<p class="subtext">Legal things</p>
</li>
</ul>
</body>
</html>
Menu items have a class assigned to it that will designate the color of the block. Within each menu block is a title and subtitle that will be hidden by default.
Step 3 – Style with CSS
Now that the menu structure is in place we’ll add some basic styles to neaten up and arrange the menu horizontally. Overflow must be set to overflow for each list item. This will ensure that the subtitle for each item will not display until the height expands to fit.
body{
    font-family:"Lucida Grande", arial, sans-serif;
    background:#F3F3F3;
}

ul{
    margin:0;
    padding:0;
}

li{
    width:100px;
    height:50px;
    float:left;
    color:#191919;
    text-align:center;
    overflow:hidden;
}

a{
    color:#FFF;
    text-decoration:none;
}

p{
    padding:0px 5px;
}

    .subtext{
        padding-top:15px;
    }

/*Menu Color Classes*/
.green{background:#6AA63B;}
.yellow{background:#FBC700;}
.red{background:#D52100;}
.purple{background:#5122B4;}
.blue{background:#0292C0;}
Step 4 – Animate with jQuery
All of our jQuery code will go into the javascript file created earlier. It will be called “animated-menu.js” if you’ve been following my model.
$(document).ready(function(){

    //When mouse rolls over
    $("li").mouseover(function(){
        $(this).stop().animate({height:'150px'},{queue:false, duration:600, easing: 'easeOutBounce'})
    });

    //When mouse is removed
    $("li").mouseout(function(){
        $(this).stop().animate({height:'50px'},{queue:false, duration:600, easing: 'easeOutBounce'})
    });

});
There are two actions in the code above. When the mouse moves over a menu item, that item starts an animation where it expands to 150px tall over 0.6 seconds. The easing applied through the plugin is ‘easeOutBounce’ which causes the box to “bounce” a little as it reaches the end of the animation (“out”). When the mouse is moved off the animation to the starting size is triggered.
If you are using this within the context of a larger site, simply substitute the element selected (currently “li”) for the mouse events to the necessary selector.
The stop() method is chained before the animate in order to prevent a buffer from building where the animation will loop repeatedly if the mouse is moved around quickly over it. An article on Learning jQuery covers this solution in greater depth.
Step 5- Add Some Flair
I’ve added background images to each of the menu items in the live version and source files to illustrate some design possibilities
You might also like


Tags
accordion accordion menu animation navigation animation navigation menu carousel checkbox inputs css3 css3 menu css3 navigation date picker dialog drag drop drop down menu drop down navigation menu elastic navigation form form validation gallery glide navigation horizontal navigation menu hover effect image gallery image hover image lightbox image scroller image slideshow multi-level navigation menus rating select dependent select list slide image slider menu stylish form table tabs text effect text scroller tooltips tree menu vertical navigation menu