 Subscribe
 Follow Us
Nice jQuery and CSS Floating social toolbar
 12 years ago
 23878
23878 3629
3629
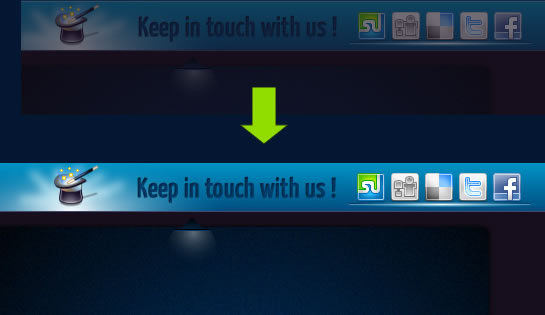
we’re going to show you how to make a fancy floating bar using jQuery and JavaScript, as the one you see when scrolling down on this page. From creating the PHP file to customizing the CSS, we will guide you across the several steps before you can complete this fancy floating bar ready to be implemented on your website and where you can place several elements, including social icons, information and more. Some other good examples of floating bars can be found at Meebo and Wibiya. Remember that among the main uses you can give to this great floating bar we can list:
- Social information
- Advertising
- Highlight important information (promos, etc.)
- Contact information
- Polls / feedback
The first thing that we need to do is the HTML. For start we must create the demo page and then save it as demo.php so we can continue with the implementation of the jQuery library.
<html xmlns="http://www.w3.org/1999/xhtml">
<head>
<meta http-equiv="Content-Type" content="text/html; charset=utf-8" />
<title>Floating bar by tutorialshock</title>
<script type="text/javascript" src="http://code.jquery.com/jquery-1.4.3.js"></script>
</head>
<body>
</body>
</html>
Configure the CSS
/*This is the main container, it's 100 % width so it can always expand horizontally to the totality of the screen.*/
div.scr_esp_down{
width:100%;
height:51px;
/* This is the 1 pixel background image that expands horizontally */
background: url(images/toolbar_make.jpg) repeat-x ;
position:fixed;
top:0;
left:0;
/* We place it in front of the rest*/
z-index:9999;
/* We start the opacity from 10%*/
opacity:0.10;
filter:alpha(opacity=10);
/* We initialize the container as hidden, then we use this operator because we need to reserve the area that the floating bar is going to occupy once it’s shown*/
visibility:hidden;
}

/* This div contains the image with the floating bar’s information such as the icons, main message and more. We initialize it on the horizontal center of the page*/

div.scr_esp_down div{
width:100%;
height:51px;
background:url(images/IS_toolbar_img.jpg) no-repeat top center ;
}

/*This class applies for the tooltip that is going to show on the 2nd demo’s roll over, on this case we use display none due to the fact that we no longer need to save space for this

image*/
img.img_animate{
display:none;
}
Now the remaining HTML
<div id="toolbar" align="center" class="scr_esp_down">
<div>
</div>
<img src="images/tooltip_2.jpg" border="0" class="img_animate" />
</div>
/* This div sets a fixed height to the page so the scroll gets visible */
<div style="height:3000px;">
</div>
Finally the JS part, which does the magic
/* This function avoids having conflicts with other jQuery scripts, we suggest you to always use it.*/

var $jx= jQuery.noConflict();

/* On this validation we identify the browser to assign it the superior value of the vertical scroll, because you must remember that every browser plays by its own rules*/
$jx(window).scroll(function () {
    if (whichBrs()=='chrome')
    {
/* Identifies the superior position of the scroll in Chrome*/
        $scroll_final=document.body.scrollTop;
    }
    if (whichBrs()=='Internet Explorer' || whichBrs()=='Firefox' )
    {
/* Identifies the superior position of the scroll in Firefox and Internet Explorer*/
        $scroll_final=document.documentElement.scrollTop;
    }

/* If you need to add additional browsers then you have to research which function establishes the top position on each one of them*/

/* On this part we identify the main container*/
    var toolbarid=document.getElementById('toolbar');
 /* If the superior value of the scroll goes below 300, it means that the toolbar must not be shown and it will only be displayed once this value has been passed */
    if ($scroll_final < 300)
    {
        toolbarid.style.visibility='hidden';
    }
   /* Here’s where the fade in animation begins*/

/* On this part we check the top value of the scroll and then we make 3 different opacity ranges to recreate the fade in effect. if you wish a softer effect you can simply add some

extra ranges*/
if ($scroll_final > 300 && $scroll_final  <600 )
    {
        toolbarid.style.opacity='0.20';
        toolbarid.style.filter='alpha(opacity=20)';
        toolbarid.style.visibility='visible';
    }
    if ($scroll_final >600 && $scroll_final <1000 )
    {
        toolbarid.style.opacity='0.40';
        toolbarid.style.filter='alpha(opacity=40)';
        toolbarid.style.visibility='visible';
    }

    if ($scroll_final >=1000)
    {
        toolbarid.style.opacity='1.00';
        toolbarid.style.filter='alpha(opacity=100)';
        toolbarid.style.visibility='visible';
    }
}
);

var $bt= jQuery.noConflict();
var time=0;

/*Coming next is the code that handles the tooltip*/

$bt(document).ready(function() {

/* We utilize the slideToggle function from jQuery to animate the tooltip, you can try another types of speeds and animation by visiting  http://api.jquery.com/category/effects/ */

    $bt("#toolbar").stop(true,true).mouseover(function () {

    /* This part displays the tooltip*/

    if (time==0)
        {
            $bt(".img_animate").slideToggle("slow");
            time=1;
        }
    });

    /* And this part hides the tooltip*/

    $bt(".img_animate").click(function () {
        if (time==1)
        {
            $bt(".img_animate").slideToggle("slow");
            time=0;
        }
    });
});

/* Here’s where we make the tooltip to turn invisible once we click outside the tooltip’s image*/

$(document).bind('click', function(e){
    var $clicked = $(e.target);
    if (!($clicked.is('.img_animate') || $clicked.parents().is('.img_animate'))) {
        $bt(".img_animate").stop(true, true);
        time=0;
        $bt(".img_animate").hide();
    }
});

/* Identifies which browser is being utilized */

function whichBrs() {
    var agt=navigator.userAgent.toLowerCase();
    if (agt.indexOf("opera") != -1) return 'Opera';
    if (agt.indexOf("staroffice") != -1) return 'Star Office';
    if (agt.indexOf("webtv") != -1) return 'WebTV';
    if (agt.indexOf("beonex") != -1) return 'Beonex';
    if (agt.indexOf("chimera") != -1) return 'Chimera';
    if (agt.indexOf("netpositive") != -1) return 'NetPositive';
    if (agt.indexOf("phoenix") != -1) return 'Phoenix';
    if (agt.indexOf("firefox") != -1) return 'Firefox';
    if (agt.indexOf("chrome") != -1) return 'chrome';
    if (agt.indexOf("safari") != -1) return 'Safari';
    if (agt.indexOf("skipstone") != -1) return 'SkipStone';
    if (agt.indexOf("msie") != -1) return 'Internet Explorer';
    if (agt.indexOf("netscape") != -1) return 'Netscape';
    if (agt.indexOf("mozilla/5.0") != -1) return 'Mozilla';
    if (agt.indexOf('/') != -1) {
        if (agt.substr(0,agt.indexOf('/')) != 'mozilla') {
        return navigator.userAgent.substr(0,agt.indexOf('/'));}
    else return 'Netscape';} else if (agt.indexOf(' ') != -1)
    return navigator.userAgent.substr(0,agt.indexOf(' '));
    else return navigator.userAgent;
}
And there you have it, a fancy floating bar made in a short time, let us know how it went to see if you have any doubts, the important thing is to remember that you can utilize this nice floating bar in several ways, including advertising, providing additional information or showing social icons and stuff
The article source:http://www.webdesignshock.com/social-toolbar/
You might also like


Tags
accordion accordion menu animation navigation animation navigation menu carousel checkbox inputs css3 css3 menu css3 navigation date picker dialog drag drop drop down menu drop down navigation menu elastic navigation form form validation gallery glide navigation horizontal navigation menu hover effect image gallery image hover image lightbox image scroller image slideshow multi-level navigation menus rating select dependent select list slide image slider menu stylish form table tabs text effect text scroller tooltips tree menu vertical navigation menu