 Subscribe
 Follow Us
Simple CSS vertical menus
 13 years ago
 24984
24984 3509
3509
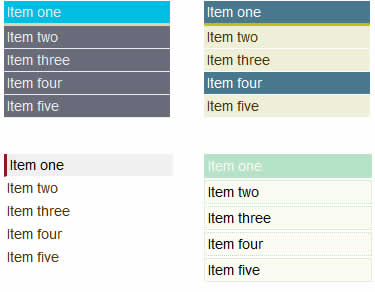
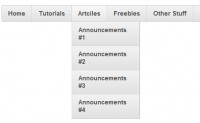
Our menus are actually HTML unordered list elements <ul> styled using CSS, giving them background color, margin, padding and other CSS attributives.
The process of creating this menus can be separated in two main directives:
The HTML file
Create the HTML document containing main directives like HTML HEAD BODY and also including your menu mock up made up with a list like this example:
<div id="menu1">
<ul>
<li><a href="item-one.html" id="current">Menu item one</a></li>
<li><a href="menu-item-two.html">Menu item two</a></li>
<li><a href="#">Item three</a></li>
<li><a href="services.html">Services</a></li>
<li><a href="contact.html">Contact</a></li>
</ul>
</div>
What the above code those is it creates a box element entitled a DIV identified by its ID="menu" witch in turn contains an unordered list <ul> of elements <li>.
Every list element is considered a menu item that contains a link to a page on your website <a href="contact.html">Contact</a>.
The CSS styling
Now that we have our basic HTML file containing our menu we need to style that menu so it can fit with our website.
This is the CSS code used for styling the first menu:
In this portion we style the main DIV containing the menu, everything that represents our menu resides in this box.
For the purpose of this tutorial we are floating the menus left so they can stay aligned next to each other
#menu1 {
width: 200px;
float:left;
}
In this portion we style the actual list, containing the list items. This is the place were we decide on our font-type, size, margin, padding and of course the list style. We are using list-style-type:none; so our list items wont display anything in front of them.
#menu1 ul
{
font-family: Arial, Helvetica, sans-serif;
list-style-type:none;
margin:0;
padding:0;
}
In this portion we apply a CSS property to our List elements that makes our menu look the same on Internet Explorer and other browsers.
#menu1 li
{
display: inline;
/* for IE5 and IE6 */
}
In this portion we style the LINK that is reside inside the list element. The reason we are not styling the LI element is that by styling the LINK (a href) we can make the clickable menu area spread along the whole list element, using display: block;
#menu1 a
{
color: #fff;
text-decoration: none;
font-size: 14px;
display: block;
padding: 3px;
width: 160px;
background-color: #686C7A;
border-bottom: 1px solid #eee;
}
In this portion we style visited and active state of our links (menu items, a href).
#menu1 a:link, #menu1 a:visited
{
color: #EEE;
text-decoration: none;
}
In this portion we style the hover state of our links (menu items). The attributes we use here are applied to the a menu item when we move our mouse cursor over it.
#menu1 li a#current
{
border-bottom: 3px solid #DAD6B7;
background: #00BEE4;
}
All you need to do now is append the desired CSS styling to your own website CSS files and insert the HTML menu code in your HTML files.
You might also like
Tags
accordion accordion menu animation navigation animation navigation menu carousel checkbox inputs css3 css3 menu css3 navigation date picker dialog drag drop drop down menu drop down navigation menu elastic navigation form form validation gallery glide navigation horizontal navigation menu hover effect image gallery image hover image lightbox image scroller image slideshow multi-level navigation menus rating select dependent select list slide image slider menu stylish form table tabs text effect text scroller tooltips tree menu vertical navigation menu