 Subscribe
 Follow Us
jQuery good Dropdown Menu Tooltips
 12 years ago
 31546
31546 5358
5358
Within the jQuery library it’s possible to create some fantastic effects. These can enhance the overall user experience dramatically and often work hand-in-hand with new CSS3 and HTML5 techniques. As the field of web design has evolved, prominent new techniques have evolved as well.
Below I’ve gone into depth over the process for creating a fantastic navigation menu with tooltips. Each is dynamically generated to hold a small bit of information about the currently targeted link. We’re working with the newest jQuery 1.6.x library and jQuery colortips from Tutorialzine.
There are three (3) major steps to breaking down our code. The first is raw HTML which displays our demo page mockup and how to implement a similar navigation system on your own website. Second we must utilize CSS styles to create our tooltip boxes and pointers. And lastly we must integrate with jQuery and the colortips library to figure out how we should call each tooltip.
Step 1 – Basic HTML
Any standard web document will contain HTML code. This is the basis for all webpages online dynamic and static. Below I’ve included a very blank HTML5 document. I’ve added some bits into the header to include external JavaScript and CSS files, which we’ll need later on.
If you are familiar with basic HTML elements this code shouldn’t look all too foreign. Even if you aren’t a web developer the code below should seem fairly straightforward.
<!DOCTYPE html>
<html xmlns=”http://www.w3.org/1999/xhtml”>
<head>
<meta http-equiv=”Content-Type” content=”text/html; charset=utf-8″ />
<title>jQuery Tooltip Drop-down Menu</title>
<link rel=”stylesheet” type=”text/css” media=”all” href=”css/ct1.css” />
<link rel=”stylesheet” type=”text/css” media=”all” href=”css/global.css” />
<script type=”text/javascript” src=”http://ajax.googleapis.com/ajax/libs/jquery/1.6.1/jquery.min.js”></script>
<script type=”text/javascript” src=”js/ct1.jquery.js”></script>
</head>
First we set up our heading and include a few scripts. cs1.css contains styles for our tooltips while global.css is only necessary for styling the demo page. If you’re implementing this system onto your own website then you’ll probably be working with your own CSS styles. Therefore you really only need the first ct1.css file to ensure proper tooltip renders.
Underneath here we can see two more JavaScript files. The first leads directly to Google’s online host repo for jQuery scripts and pulls the latest release 1.6.1. We don’t need to worry about bandwidth in this scenario and Google owns powerful servers which can provide plenty of external resources! Keep this address in mind if you’re planning to build with jQuery in future projects.
Beneath this we have included a secondary library script. The file is called ct1.jquery.js to signify colortips 1.0 is built off the jQuery library. I’ve downloaded this script directly from the Tutorialzine post which explains some basic usage.
I’ve gone through and customized a bit of the CSS so tooltips now display towards the bottom of our navigation menus. Otherwise it would be much too difficult running a horizontal menu and having popups all along your header. But the original JavaScript code is fairly un-tampered with and comes working out-of-the-box.
The Body/Core HTML
Now we can examine a bit deeper into our HTML code. After the heading in our demo we can see the real meat and potatoes in action. I’ve removed some JavaScript for now as we’ll come back to this later in the article.
Below is a stripped version of the demo page for our tooltip menu. It’s a standard HTML list with hyperlinks for artificial pages on a non-existent website.
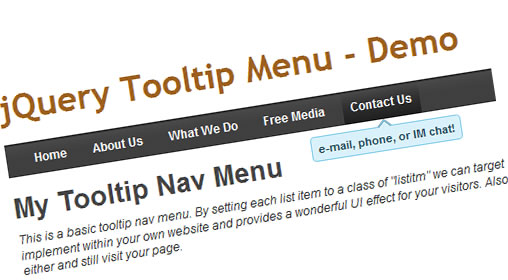
<h1>jQuery Tooltip Menu – Demo</h1>
<div>
<ul class=”clearfix”>
<li class=”listitm”><a href=”#” title=”latest site news”>Home</a></li>
<li class=”listitm”><a href=”#” title=”about the company and staff”>About Us</a></li>
<li class=”listitm”><a href=”#” title=”our services, work, portfolio, clientel”>What We Do</a></li>
<li class=”listitm”><a href=”#” title=”free videos and images for download”>Free Media</a></li>
<li class=”listitm”><a href=”#” title=”e-mail, phone, or IM chat!”>Contact Us</a></li>
</ul>
</div>

<h2>My Tooltip Nav Menu
I have removed most body text for the convenience of saving space, since we are really focused on the navigation area. Inside a div ID of ‘n’ houses our unordered list. Each list item is given the class “listitm” which is how we’ll target the links using a jQuery selector later.
Notice though how each hyperlink reference also includes a title description. These descriptions are used to replace the average tooltip set by default in each browser with our new jQuery tooltips. Any link without a title reference won’t display anything and degrades gracefully with JavaScript disabled.
Step 2 – Routine CSS
Moving forward we can now cover a few highlights into our CSS code. There is a lot to go over, and not all of it is required material you must understand. The core document from colortips is a requirement and offers you the choice of many different styles from blue, yellow, red, green, and a few others.
I’ve added a small bit of code below targeting each .pointyTip element. Anything with a class of “pointyTip” will contain our dynamic tooltip, which is entirely generated through jQuery.
However, the default from Tutorialzine has each tooltip arrow at the bottom of our boxes, meaning tooltips hover above the links. I’ve added the rotation code below so positioning has changed and moved beneath each navigation link.
/* rotate tooltip nub 180 degrees */
    -moz-transform: rotate(180deg);  /* FF3.5+ */
    -o-transform: rotate(180deg);  /* Opera 10.5 */
    -webkit-transform: rotate(180deg);  /* Saf3.1+, Chrome */
    -ms-transform: rotate(180deg);  /* IE9 */
    transform: rotate(180deg);
The majority of these properties are based solely to work through CSS3 techniques. Browsers running from IE6-IE8 will most likely run into a few rendering issues. However in the few tests I’ve run the majority seems to hold up and work well! Sadly Microsoft isn’t the most developer-friendly company, so we’ll have to work with the best results.
Lower in the ct1.css file you’ll find repeating classes based on different color schemes. These all work off the same rules where you can change the external class of a link into any of the 6 represented colors: black, white, yellow, blue, red, or green.
Additionally you’re able to update the colors with new schemas such as orange, purple, or another favorite color. Keep in mind you’ll need to add a few lines of CSS into the document and account for border colors, backgrounds, and fonts.
The global CSS file contains some fundamental resets and clearfix styles. The most significant aspect results from setting up our lists and navigation div holding each menu item in place. I’ve included this area below so you can get a sense of how I’ve set up floats within list items.
/* @group nav */
#n { display: block; background: #919191; height: 33px; background: url('navbg.gif') repeat-x; margin-bottom: 15px; }

#n ul { padding-left: 20px; }
#n ul li { float: left; display: block; list-style: none; margin-right: 10px; font-family: Arial, Helvetica, sans-serif; font-size: 12px; font-weight: bold; }

#n ul li a { display: block; line-height: 33px; color: #fff; height: 33px; padding: 0 8px; text-decoration: none; }
#n ul li a:hover { background: url('navbg1.gif') repeat-x; text-decoration: none; }
Step 3 – The Final jQuery
Since we’ve already included both jQuery and colortips 1.0 library the stage is set to create dynamic tooltips. Luckily jQuery makes including custom JavaScript simple as pie, so you can really add this anywhere in the HTML document.
The JavaScript code below is all we need to finalize our tooltips. I’ve included this directly after our opening body tag. However you may place this theoretically anywhere in the code such as our header or before closing the body element.
Note the code below should be wrapped in script tags.
$(document).ready(function() {
    // select all nav items with class 'listitm' and display any links with a title attribute
    // color is set default at blue
    // options include: red, blue, green, yellow, white, black
    $('li.listitm > a[title]').colorTip({color:'blue'});
});
Right away we’re calling a document.ready() selector to let jQuery know we’re holding off on dynamic content until our whole HTML document has loaded. After this is complete a function is called connected to a colorTip function. This is defined in greater detail inside the ct1.jquery.js file. The code is all mathematical and serves little purpose for a designer to understand – but if you are curious take a peek under the hood and poke around for a while.
Inside our new function I’ve outlined a couple comments which include options for changing colors. By selecting all list items under the class “listitm” we have developed a laser-targeted system for applying tooltips specifically onto the navigation links. This will keep all other links standard unless they’re housed inside a list item.
You may change this container to be anything you wish. Ultimately this should reflect your HTML code, but keep in mind that without a container you’re simply targeting all hyperlinks with a title attribute. You could apply this style, though you’ll be noticing tooltips everywhere which will become quite annoying after some time.
The article source:http://designm.ag/tutorials/building-an-elegant-tooltip-dropdown-menu-powered-jquery/
You might also like


Tags
accordion accordion menu animation navigation animation navigation menu carousel checkbox inputs css3 css3 menu css3 navigation date picker dialog drag drop drop down menu drop down navigation menu elastic navigation form form validation gallery glide navigation horizontal navigation menu hover effect image gallery image hover image lightbox image scroller image slideshow multi-level navigation menus rating select dependent select list slide image slider menu stylish form table tabs text effect text scroller tooltips tree menu vertical navigation menu