 Subscribe
 Follow Us
jQuery Simple Lava Lamp Menu
 13 years ago
  13360
13360  2355
2355
 n/a
n/a

Lava Lamp Menu is one of the favourite menu that has been using by some websites. It has a jQuery plugin for it, we're not reinventing the wheel, but it will be good to know how it works, how to customize it and make a unique one.
1. HTML
In HTML section, I always want to keep it nice and clean, well, at least easy to understand. It's recommended to use UL list for menu. In this Lava menu tutorial, we will need some extra html elements after the list to make the floating bubble. Also, you need to set the default selected item, This is how the HTML looks like:
<div id="lava">

 <ul>
  <li><a href="#">home</a></li>
  <li><a href="#">lava lamp menu</a></li>
  <li><a href="#">queness.com</a></li>
  <li class="selected"><a href="#">jQuery</a></li>
 </ul>

 <!-- If you want to make it even simpler, you can append these html using jQuery -->
 <div id="box"><div class="head"></div></div>

</div>
2. CSS
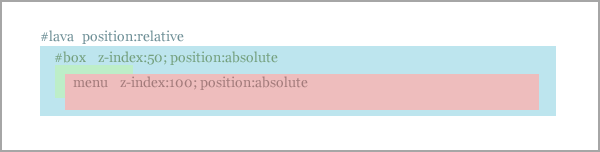
When you want to make some animation, position absolute and relative are the key thing. If we want to set the absolute position within a container, we need to make sure the parent item is set to position relative, otherwise, the children item will be positioned according to the window screen. Of course, z-index can only work if position absolute is defined. Now, please refer to the image below, it's basically the idea of lava lamp menu.
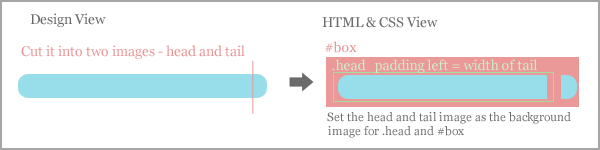
For the floating #box, if you want to style it up with rounded corner, this is how to do it. You need to draw the box, make it long, and then slice it out, so you have two pieces of images, head and tail. Tail image is set as the background of #box and position it to right hand side of #box. And head image need to set it as the background for head class, and extra padding (width of the tail) to make sure the tail is not covered by the head image.
Lastly, *drumroll*, you just make a expandable rounded box. Why called it expandable? because the jQuery will resize the width of the head class so that it will fit to list item. You might want to further playing around with the CSS to tweak the #box. And you can adjust it in the following section of the CSS:
- height, padding-right and margin-left in #box
- height, and padding-left of the .head class
 body {
  font-family:georgia;
  font-size:14px;
 }
 a {
  text-decoration:none;
  color:#333;
 }

 #lava {
  /* you must set it to relative, so that you can use absolute position for children elements */
  position:relative;
  text-align:center;
  width:583px;
  height:40px;
 }

 #lava ul {
  /* remove the list style and spaces*/
  margin:0;
  padding:0;
  list-style:none;
  display:inline;

  /* position absolute so that z-index can be defined */
  position:absolute;

  /* center the menu, depend on the width of you menu*/
  left:110px;
  top:0;

  /* should be higher than #box */
  z-index:100;

 }

 #lava ul li {

  /* give some spaces between the list items */
  margin:0 15px;

  /* display the list item in single row */
  float:left;
 }

 #lava #box {

  /* position absolute so that z-index can be defined and able to move this item using javascript */
  position:absolute;
  left:0;
  top:0;

  /* should be lower than the list menu */
  z-index:50;

  /* image of the right rounded corner */
  background:#ccc;
  height:20px;

  /* add padding 8px so that the tail would appear */
  padding-right:8px;

  /* self-adjust negative margin to make sure the box display in the center of the item */
  margin-left:-10px;
 }

 #lava #box .head {
  /* image of the left rounded corner */
  background:#eee;
  height:20px;

  /* self-adjust left padding to make sure the box display in the center of the item */
  padding-left:10px;
 }
3. Javascript
As long as we have the CSS ready, jQuery will move the floating box to the correct position and react to the mouse events. To make it even easier to understand, I break it into two sections
This is what jQuery will do once the page is loaded:
- Once the javascript load, it search for the default selected item,
- and then, it grabs its position and its width and set it to the floating box
This is what jQuery will do with the mouse hover and mouseout event:
- It grabs the mouse hovered item's position and width,
- and then, set it to the floating box with the animate method and the animation transition with certain duration (you can change the duration)
- If the mouse out of the menu, it grabs the default selected item's positon and width, and move the floating box back to the original position
- And, if user clicked on the item, it will be the default selected item
 $(document).ready(function () {

  //transitions
  //for more transition, goto http://gsgd.co.uk/sandbox/jquery/easing/
  var style = 'easeOutElastic';

  //Retrieve the selected item position and width
  var default_left = Math.round($('#lava li.selected').offset().left - $('#lava').offset().left);
  var default_width = $('#lava li.selected').width();

  //Set the floating bar position and width
  $('#box').css({left: default_left});
  $('#box .head').css({width: default_width});

  //if mouseover the menu item
  $('#lava li').hover(function () {

   //Get the position and width of the menu item
   left = Math.round($(this).offset().left - $('#lava').offset().left);
   width = $(this).width();

   //Set the floating bar position, width and transition
   $('#box').stop(false, true).animate({left: left},{duration:1000, easing: style});
   $('#box .head').stop(false, true).animate({width:width},{duration:1000, easing: style});

  //if user click on the menu
  }).click(function () {

   //reset the selected item
   $('#lava li').removeClass('selected');

   //select the current item
   $(this).addClass('selected');

  });

  //If the mouse leave the menu, reset the floating bar to the selected item
  $('#lava').mouseleave(function () {

   //Retrieve the selected item position and width
   default_left = Math.round($('#lava li.selected').offset().left - $('#lava').offset().left);
   default_width = $('#lava li.selected').width();

   //Set the floating bar position, width and transition
   $('#box').stop(false, true).animate({left: default_left},{duration:1500, easing: style});
   $('#box .head').stop(false, true).animate({width:default_width},{duration:1500, easing: style});

  });

 });
You might also like


Tags
accordion accordion menu animation navigation animation navigation menu carousel checkbox inputs css3 css3 menu css3 navigation date picker dialog drag drop drop down menu drop down navigation menu elastic navigation form form validation gallery glide navigation horizontal navigation menu hover effect image gallery image hover image lightbox image scroller image slideshow multi-level navigation menus rating select dependent select list slide image slider menu stylish form table tabs text effect text scroller tooltips tree menu vertical navigation menu