 Subscribe
 Follow Us
jQuery Advanced keypress navigation
 13 years ago
  11621
11621  1510
1510
 n/a
n/a

The script is (a bit) advanced because of the extra functionality when the user combines the mouse hover and keypresses.
HTML
The HTML that I came up with isn't that hard to understand: Simply a division with an ID, containing an unorderd list with links.
<div id="menu">
   <ul>
      <li><a href="http://www.marcofolio.net/">Marcofolio.net</a></li>
      <li><a href="http://feeds2.feedburner.com/marcofolio">Marcofolio RSS feed</a></li>
      <!-- more items could be added -->
   </ul>
</div>
The only thing we need to remember here is the menu-ID that we're going to use later.
CSS
All CSS stuff is pretty basic, no fancy-stuff going on. However, there is one CSS class that you should remember:
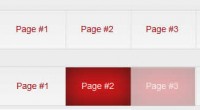
.itemhover { background-color:#b7b7b7 !important; color:#232323 !important; }
The itemhover class is added to highlight the selected item from the menu. The background-color and color are set to !important to make sure that color is displayed.
Keypress
Now it's time to get our hand dirty and get down to the coding part with jQuery. First things first; We'll need to store the current selected item from the menu, including the URL where that menu item links to. So, we'll declare two variables at the top of the script:
var currentSelection = 0;
var currentUrl = '';
After loading jQuery from Google, we'll need to add a keylistener to the whole page. I've added comments to the script to make it clear.
google.load("jquery", "1.3.1");
google.setOnLoadCallback(function()
{
   // Register keypress events on the whole document
   $(document).keypress(function(e) {
      switch(e.keyCode) {
         // User pressed "up" arrow
         case 38:
            navigate('up');
         break;
         // User pressed "down" arrow
         case 40:
            navigate('down');
         break;
         // User pressed "enter"
         case 13:
            if(currentUrl != '') {
               [removed] = currentUrl;
            }
         break;
      }
   });
});
As you can see, this part requests the keyCode whenever the user hits any key on the keyboard. When the user hits "Enter (or Return)", the script checks if the currentUrl has been loaded with an URL. If so, the location of the window follows that URL.
Both the Up and Down arrow call a (non-existing) function called navigate with one parameter: The direction. Let's see what we should do inside that function.
function navigate(direction) {
   // Check if any of the menu items is selected
   if($("#menu ul li .itemhover").size() == 0) {
      currentSelection = -1;
   }

   if(direction == 'up' && currentSelection != -1) {
      if(currentSelection != 0) {
         currentSelection--;
      }
   } else if (direction == 'down') {
      if(currentSelection != $("#menu ul li").size() -1) {
         currentSelection++;
      }
   }
   setSelected(currentSelection);
}
The function first checks if there already is a list item with the class itemhover. If there isn't any, the currentSelection is set to -1 (0 is the first list item).
On the first go, the user can only use the Down arrow (Up arrow doesn't have any use at this point). If the Down arrow is used, it first checks if the current selected item isn't already at the bottom of the list (by checking the size). If it isn't, the currentSelection is raised by 1.
Almost the same counts for the Up arrow. When pressed, it first checks if it isn't at the top of the list (index: 0).
The end of the function calls another function called setSelected. It expects one parameter: The index of the currently selected item. This function is very small, but does a lot.
function setSelected(menuitem) {
   $("#menu ul li a").removeClass("itemhover");
   $("#menu ul li a").eq(menuitem).addClass("itemhover");
   currentUrl = $("#menu ul li a").eq(menuitem).attr("href");
The first line removes all classes inside the list called itemhover. The second line adds the class to the selected menuitem (the parameter from this function). This is the class that we created in the CSS part above, remember? The last line sets the currentUrl parameter by retrieving the href from the selected menu item. By setting the currentUrl, the Enter (or Return) keypress now works too!
Now we already have a wonderful menu that reacts to the keypresses from the user (Up, Down and Enter). But what about the mouse movements?
Mouse movements
We could do this the easy way by adding a :hover to the CSS file. This way, when the user hovers an item, it gets highlighted. But what will happen if the user combines the two? When hovering the third item with the mouse and pressing on the Down key, it would highlight the first item.
To make this also work perfectly with the mouse, we'll enhance the script with some more stuff. First, we'll need to let the menu item "know" at what index there are positioned. This is really simple to achieve, but essential to make this work. When the user hovers the third item, there is no way the item itself would know it is the third. But by adding data, it does:
// Add data to let the hover know which index they have
for(var i = 0; i < $("#menu ul li a").size(); i++) {
   $("#menu ul li a").eq(i).data("number", i);
}
As you can see, this part loops through all the menu items and adds the index of that item (called number) to the item itself. We'll need that data when hovering with the mouse.
So, let's add a hover-listener to the menu:
// Simulate the "hover" effect with the mouse
$("#menu ul li a").hover(
   function () {
      currentSelection = $(this).data("number");
      setSelected(currentSelection);
   }, function() {
      $("#menu ul li a").removeClass("itemhover");
      currentUrl = '';
   }
);
The first parameter from hover is a function when hovering the menu item. Once again, the currentSelection is set by retrieving the number that we just placed inside the data. This way, the script "knows" which item needs to be highlighted and can use the arrow keys after selecting an item with the mouse!
The second function (on mouse leave) isn't that spectacular: It removes all itemhover classes from the menu and clears the currentUrl.
That's about it!
You might also like


Tags
accordion accordion menu animation navigation animation navigation menu carousel checkbox inputs css3 css3 menu css3 navigation date picker dialog drag drop drop down menu drop down navigation menu elastic navigation form form validation gallery glide navigation horizontal navigation menu hover effect image gallery image hover image lightbox image scroller image slideshow multi-level navigation menus rating select dependent select list slide image slider menu stylish form table tabs text effect text scroller tooltips tree menu vertical navigation menu