 Subscribe
 Follow Us
jQuery Photo filter lightbox Gallery plugin
 12 years ago
 46258
46258 12468
12468
we'll show you how to create a minimalistic jQuery photo gallery. You can use it to present your latest works or as a photo album. You can sort projects / photos via categories menu. The gallery is cross-browser compatible so it’ll be easy for you to adapt in your project.
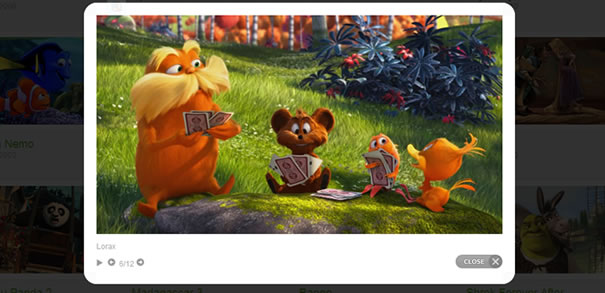
For this tutorial I’ve used two free jQuery libraries: Quicksand and PrettyPhoto. You can see the result that I’ve achived by combining this two jQuery plugins by clicking the preview button below. You can use the jQuery gallery in your own projects, just download the package for having access to the files. Let’s see now how the jQuery Photo Gallery was done.
HTML CODE
First create an unorded list that will contains the categories. For each category make sure will add a class with a unique name.
<ul class="portfolio-categ filter">
      <li>categories:</li>
      <li class="all active"><a href="#">All</a></li>
            <li class="cat-item-1"><a href="#" title="Category 1">Category 1</a>
</li>
    <li class="cat-item-2"><a href="#" title="Category 2">Category 2</a>
</li>
    <li class="cat-item-3"><a href="#" title="Category 3">Category 3</a>
</li>
    <li class="cat-item-4"><a href="#" title="Category 4">Category 4</a>
</li>
        </ul>
Now create a second list for the items you would like to show. An object will look like this.
<li class="portfolio-item2" data-id="id-0" data-type="cat-item-4">
                    <div>
                   <span class="image-block">
                    <a class="image-zoom" href="images/big/pic1.jpg" rel="prettyPhoto[ gallery ]" title="Wall-E"><img width="225" height="140" src="images/thumbs/p1.jpg" alt="Wall-E" title="Wall-E" />
                    </a>
                    </span>
                   <div class="home-portfolio-text">
                    <h2 class="post-title-portfolio"><a href="#" rel="bookmark" title="Wall-E">Wall-E</a></h2>
                    <p class="post-subtitle-portfolio">released: 2008</p>
                    </div>

                    </div>
                    </li>
There are 3 important things here that you have to take care: data-id – must be unique, data-type – include the item in a category by typing a class name for a specific category, rel=”prettyPhoto[ gallery ]“ – used to open a large photo when the thumb image is clicked.
The CSS code for an item is pretty simple:
.image-block{ display:block;position: relative;}
.image-block img{border: 1px solid #d5d5d5; border-radius: 4px 4px 4px 4px;background:#FFFFFF;padding:10px;}
.image-block img:hover{border: 1px solid #A9CF54;box-shadow:0 0 5px #A9CF54;}
.portfolio-area li{float: left;margin: 0 12px 20px 0;overflow: hidden;width: 245px;padding:5px;}
.home-portfolio-text{margin-top:10px;}
Now let’s add the jQuery code for the Quicksand filter categories.
// Clone applications to get a second collection
    var $data = $(".portfolio-area").clone();

    //NOTE: Only filter on the main portfolio page, not on the subcategory pages
    $('.portfolio-categ li').click(function(e) {
        $(".filter li").removeClass("active");
        // Use the last category class as the category to filter by. This means that multiple categories are not supported (yet)
        var filterClass=$(this).attr('class').split(' ').slice(-1)[0];

        if (filterClass == 'all') {
            var $filteredData = $data.find('.portfolio-item2');
        } else {
            var $filteredData = $data.find('.portfolio-item2[data-type=' + filterClass + ']');
        }
        $(".portfolio-area").quicksand($filteredData, {
            duration: 600,
            adjustHeight: 'auto'
        }, function () {

                lightboxPhoto();
                        });
        $(this).addClass("active");
        return false;
    });
Here’s the code for the prettyPhoto big image preview.
jQuery("a[rel^='prettyPhoto']").prettyPhoto({
            animationSpeed:'fast',
            slideshow:5000,
            theme:'light_rounded',
            show_title:false,
            overlay_gallery: false
        });

    }
The article source:http://www.flashuser.net/tutorials/jquery-photo-gallery.html
You might also like


Tags
accordion accordion menu animation navigation animation navigation menu carousel checkbox inputs css3 css3 menu css3 navigation date picker dialog drag drop drop down menu drop down navigation menu elastic navigation form form validation gallery glide navigation horizontal navigation menu hover effect image gallery image hover image lightbox image scroller image slideshow multi-level navigation menus rating select dependent select list slide image slider menu stylish form table tabs text effect text scroller tooltips tree menu vertical navigation menu