 Subscribe
 Follow Us
Drop-down Navigation Menu Using HTML5, CSS3 and jQuery
 13 years ago
  17559
17559  3599
3599
 n/a
n/a
we’ll take a look and see what we can achieve with HTML5 and CSS3 when it comes to the staple of current web sites: the humble drop-down navigation menu. We’ll also use jQuery to handle the effects and add the finishing touches for us.
HTML5 brings to the spec a dedicated <nav> element that should be used as the container for any major navigation structure, such as the main vertical or horizontal site navigation menus, or an in-page table of contents for example. IE unfortunately doesn’t support this new element yet, but there is a simple fix we can use, of which I’m sure you’re all aware.
Using CSS3 we can do away with what would have required the use of several background images and possibly an additional wrapping container or two and rely (almost) purely on some of the new style properties, such as rounded corners and drop-shadows for example, that are available to supporting browsers. Again, not all browsers (cough, IE!) support these new rules, but we can very easily provide fall-back solutions for the browsers that can’t handle our styles.
The Underlying Page
Begin the coding by creating the following page in your favourite code editor:
<!DOCTYPE html>
<html lang="en">
 <head>
  <meta charset="utf-8">
  <title>HTML5, CSS3 and jQuery Navigation menu</title>
  <link rel="stylesheet" href="css/nav.css">
  <!--[if IE]>
   <script src="http://html5shiv.googlecode.com/svn/trunk/html5.js"></script>
  <![endif]-->
 </head>
 <body class="no-js">
  <nav id="topNav">
          <ul>
               <li><a href="#" title="Nav Link 1">Nav Link 1</a></li>
    <li>
                 <a href="#" title="Nav Link 1">Nav Link 2
     <ul>
                     <li><a href="#" title="Sub Nav Link 1">Sub Nav Link 1</a></li>
      <li><a href="#" title="Sub Nav Link 2">Sub Nav Link 2</a></li>
      <li><a href="#" title="Sub Nav Link 3">Sub Nav Link 3</a></li>
      <li><a href="#" title="Sub Nav Link 4">Sub Nav Link 4</a></li>
      <li class="last"><a href="#" title="Sub Nav Link 5">Sub Nav Link 5</a></li>
                    </ul>
    </li>
    <li><a href="#" title="Nav Link 1">Nav Link 3</a></li>
    <li><a href="#" title="Nav Link 1">Nav Link 4</a></li>
    <li><a href="#" title="Nav Link 1">Nav Link 5</a></li>
   </ul>
  </nav>
  <script src="js/jquery.js"></script>
  <script src="js/modernizr.js"></script>
 </body>
</html>
Save this as nav.html in the nav folder. We start out with the minimal HTML5 doctype, which allows us to specify the type of document in a quarter of the code we used to use. We also specify the default language and the character encoding; although the document will still validate without these two things, it’s good practice to include them and the page will trigger validator warnings if the default language isn’t specified. We then link to a style sheet (we’ll create this next) and use a conditional comment that targets IE to load Remy Sharp’s excellent html5.js script if required.
In the body of the page we have the <nav> element as the container for a traditional list of links, and we’ve thrown in a sub-menu for good measure too. The element doesn’t magically create a navigation menu for us, and it doesn’t include any new menuitem elements or anything like that so an unordered list is still an appropriate choice. The <nav> element is just a semantic container for our menu, which describes its function within the document, to replace the generic &div> element which states nothing inherently about its purpose on the page.
At the end of the body we link to our script files jQuery and Modernizr. We’ll use jQuery a little later on when we come to add the behaviour for the menu, but Modernizr will do its thing straight away, detecting the capabilities of the browser in use and adding a series of class names to the HTML element, which we can use to add our CSS3 so that it is only applied to browsers that can make use of them. We’ve also added the class name no-js to the <body> of the page; we’ll remove it later if JavaScript is enabled so we can also use it to add styles that should only be applied when JavaScript is disabled.
Some Basic Styling
Now let’s add some basic styling; create the following style-sheet:
/* JS disabled styles */
.no-js nav li:hover ul { display:block; }
/* base nav styles */
nav { display:block; margin:0 auto 20px; border:1px solid #222; position:relative; background-color:#6a6a6a; font:16px Tahoma, Sans-serif; }
nav ul { padding:0; margin:0; }
nav li { position:relative; float:left; list-style-type:none; }
nav ul:after { content:"."; display:block; height:0; clear:both; visibility:hidden; }
nav li a { display:block; padding:10px 20px; border-left:1px solid #999; border-right:1px solid #222; color:#eee; text-decoration:none; }
nav li a:focus { outline:none; text-decoration:underline; }
nav li:first-child a { border-left:none; }
nav li.last a { border-right:none; }
nav a span { display:block; float:right; margin-left:5px; }
nav ul ul { display:none; width:100%; position:absolute; left:0; background:#6a6a6a; }
nav ul ul li { float:none; }
nav ul ul a { padding:5px 10px; border-left:none; border-right:none; font-size:14px; }
nav ul ul a:hover { background-color:#555; }
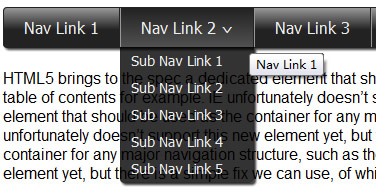
Save this file in the css directory as nav.css. The first rule is purely for when JavaScript is disabled, and allows the hidden submenu to be displayed on hover purely with CSS. The rest of the code defines a set of base styles that format the <nav> menu in the way that we want without adding anything too decorative. Note that we’re using the :after pseudo-selector to clear the floated list items; normally this would be added using a class name to that it could be applied to the containers of any floated elements on the page. At this point our page should look like this:
CSS3
Next we can add our CSS3:
/* CSS3 */
.borderradius nav { -moz-border-radius:4px; -webkit-border-radius:4px; border-radius:4px; }
.cssgradients nav { background-image:-moz-linear-gradient(0% 22px 90deg, #222, #999); background-image:-webkit-gradient(linear, 0% 0%, 0% 70%, from(#999), to(#222)); }
.boxshadow.rgba nav { -moz-box-shadow:2px 2px 2px rgba(0,0,0,.75); -webkit-box-shadow:2px 2px 2px rgba(0,0,0,.75); box-shadow:2px 2px 2px rgba(0,0,0,.75); }
.cssgradients nav li:hover { background-image:-moz-linear-gradient(0% 100px 90deg, #999, #222); background-image:-webkit-gradient(linear, 0% 0%, 0% 100%, from(#222), to(#555)); }
.borderradius nav ul ul { -moz-border-radius-bottomleft:4px; -moz-border-radius-bottomright:4px; -webkit-border-bottom-left-radius:4px; -webkit-border-bottom-right-radius:4px; border-bottom-left-radius:4px; border-bottom-right-radius:4px; }
.boxshadow.rgba nav ul ul { background-color:rgba(0,0,0,0.8); -moz-box-shadow:2px 2px 2px rgba(0,0,0,.8); -webkit-box-shadow:2px 2px 2px rgba(0,0,0,.8); box-shadow:2px 2px 2px rgba(0,0,0,.8); }
.rgba nav ul ul li { border-left:1px solid rgba(0,0,0,0.1); border-right:1px solid rgba(0,0,0,0.1); }
.rgba nav ul ul a:hover { background-color:rgba(85,85,85,.9); }
.borderradius.rgba nav ul ul li.last { border-left:1px solid rgba(0,0,0,0.1); border-bottom:1px solid rgba(0,0,0,0.1); -moz-border-radius-bottomleft:4px; -moz-border-radius-bottomright:4px; -webkit-border-bottom-left-radius:4px; -webkit-border-bottom-right-radius:4px; border-bottom-left-radius:4px; border-bottom-right-radius:4px; }
.csstransforms ul a span { -moz-transform:rotate(-180deg);-webkit-transform:rotate(-180deg); }
Using the classes added to the <html> element by Modernizr we can easily and safely add the CSS3 styles that we want. We use the border-radius style to give the <nav> element rounded corners; We need to give Mozilla and Webkit prefixed style declarations as well as the standard border-radius styles for browsers that support them, such as Opera. We need to do this with most of our CSS3 styles.
As well as corner-rounding of the <nav> we also give it a gradient and a drop shadow. The gradient styles are fairly complex and are different for Mozilla and Webkit based browsers, which are the only browsers currently implementing them. Both browsers use the background-image property. In Firefox we use -moz-linear-gradient to add a linear gradient. It requires values which correspond to the starting point of the gradient (0%), the point at which the first color blends into the second color (22px), the angle of the gradient axis (90deg), the first color (#999) and the second color (#222).
We can get the same gradient in Safari or Chrome using -webkit-gradient and the syntax is subtly different; we specify that it should be a linear gradient and then provide two points which tell the browser where the gradient should start and end. The values in the example correspond to left, top and right values of 0% and 70% for the bottom, which gives us the same style as that used in Firefox. Lastly we specify the colors of the gradient.
When we apply the drop-shadow we combine it with the Modernizr class for RGBA as well as boxshadow so that our shadow can be transparent. The properties for Mozilla and webkit are the same, and we also supply the actual box-shadow property for supporting browsers. The values we specify for this rule are the left offset (2px), the top offset (2px), the amount of blurring (2px) and lastly the color of the shadow (0,0,0). The color is where we use RGBA, which allows us to set the opacity to 75% (.75).
Another interesting style we use is transform to rotate some text 180 degrees; when we write the script in a moment, you’ll see that we add a sub menu indicator in the form of a caret sign to any list items that contain a submenu – this style will rotate the character to that it is pointing down, which means that in supporting browsers we don’t even need to use an image for this feature.
In supporting browsers we can make our elements look pretty hot without using a single image, which means our pages will load much quicker with far fewer HTTP requests. However, not all browsers will support the CSS3 styling, notably any version of IE, so we still need to define our fallback styles. Add the following code to the style sheet:
/* fallbacks */
.no-cssgradients nav, .no-js nav { padding-bottom:4px; border:none; background:url(../fallback/navBG.gif) repeat-x 0 0; }
.no-borderradius nav ul, .no-js nav ul { background:url(../fallback/navRight.gif) no-repeat 100% 0; }
.no-borderradius nav ul ul, .no-js nav ul ul { background:none; }
.no-borderradius nav li, .no-js nav li { height:44px; }
.no-cssgradients nav li:hover, .no-js nav li:hover { background:url(../fallback/navOverBG.gif) repeat-x 0 0; }
.no-borderradius nav li li, .no-js nav li li { height:auto; width:98%; left:-2px; }
.no-borderradius nav li:first-child, .no-js nav li:first-child { background:url(../fallback/navLeft.gif) no-repeat 0 0; }
.no-borderradius nav li:first-child:hover, .no-js nav li:first-child:hover { background:url(../fallback/navOverLeft.gif) no-repeat 0 0; }
.no-borderradius nav li li:first-child, .no-js nav li li:first-child { background:none; }
.no-rgba nav ul ul, .no-js nav ul ul { left:1px; padding-left:2px; background:url(../fallback/subnavBG.png) no-repeat 100% 100%; }
.no-rgba nav ul ul a, .no-js nav ul ul a { left:3px; }
.no-rgba nav ul ul a:hover { background:url(../fallback/subOverBG.png) repeat 0 0; }
.no-csstransforms ul a span { height:7px; width:12px; margin-top:8px; text-indent:-5000px; overflow:hidden; background:url(../fallback/indicator.png) no-repeat 0 0; }
.no-borderradius ul ul li.last { margin-bottom:10px; }
.no-cssgradients.boxshadow nav { box-shadow:none; }
Modernizr will also add class names showing which CSS3 features are not available to the browser, so we can easily supply alternative rules, which make use of image-based fallbacks where features are not supported as well as any styles we may need as a result of using the images.
You’ll notice that we also use selectors that target our no-js class here too; this is because when JavaScript is disabled, Modernizr will not run and will not add the class names we need to the document, so our non-CSS3 fallbacks also become our non-js fallbacks as well.
Adding the Script
Now let’s add some script. The first thing we need to do is remove the no-js class from the body of the page when JavaScript is not disabled. We want to do this as soon in the page rendering process as possible to avoid a flicker when the styles are changed. Directly after the opening body tag add the following code:
<script>
 var el = document.getElementsByTagName("body")[0];
 el.className = "";
</script>
All we do is get the <body> element by tag name and set its className property to an empty string. Normally we would use jQuery to do that for us, but because jQuery won’t have loaded when this script is executed we can’t use it. We could load jQuery before this of course, but we’d then take a massive performance hit. Our script is only 2 lines of code so it won’t cause a significant delay, and because it will be executed before the browser has even processed the mark-up for the <nav> element, there will be no flash of unstyled content.
Now that the class has been removed from the body our CSS submenus will no longer work so we can add this behaviour back in with jQuery and enhance it a little at the same time. At the end of the document, directly after the script reference for Modernizr add the following code:
<script>
 (function($){

  //cache nav
  var nav = $("#topNav");

  //add indicators and hovers to submenu parents
  nav.find("li").each(function() {
   if ($(this).find("ul").length > 0) {

    $("<span>").text("^").appendTo($(this).children(":first"));

    //show subnav on hover
    $(this).mouseenter(function() {
     $(this).find("ul").stop(true, true).slideDown();
    });

    //hide submenus on exit
    $(this).mouseleave(function() {
     $(this).find("ul").stop(true, true).slideUp();
    });
   }
  });
 })(jQuery);
</script>
The script is relatively straight-forward; we wrap our code within a closure and pass in the jQuery object safely name-spaced to the dollar sign, just in case another library is in use when the code is put into production. We then cache a reference to the <nav> element so that we can refer to it without selecting it from the document repeatedly. We then process each list item within the menu.
For each matching element we check it to see if it contains any nested <ul> elements and if it does we add a new <span> element to the list item. This will become our submenu indicator. When a submenu is found we also attach mouseenter() and mouseleave() event helpers to the list item that contains the menu. All these helpers do is show and hide the submenu by sliding it down or up respectively. Note the use of the stop() method which helps to prevent the opening and closing animations queuing up if the mouse pointer is repeatedly moved onto and off of the target list items.
At this point we should be in quite a nice place with regard to most situations; in any browser that supports HTML5 our menu should look relatively similar regardless of whether CSS3 is supported or not, and whether scripting is enabled or not. However, IE presents us with a problem; when JS is enabled, the htmlshiv.js script makes IE understand the <nav> element and our non-css3 styles are picked up and implemented – all very well and good (we still have some issues with IE7, as among other things our auto-clearing :after rules are not understood or applied, but we’ll come to the in a little while).
However, the problems start when IE is used with scripting disabled – in this situation, the html5shiv.js script is not executed and IE doesn’t understand the <nav> element. None of our selectors that include nav in them will be implemented! It’s not the end of the world though; we can provide an alternative style sheet that is only used when the browser has JS disabled and is IE. Directly after the script that removes the no-js class from the <body> element add the following:
<noscript>
<!--[if IE]>
 <link rel="stylesheet" href="css/ie.css">
<![endif]-->
</noscript>
A simple solution indeed. We now need to create the new styles sheet; add the following rules to a new document in your code editor:
/* ie styles for when js disabled */
ul { display:block; padding:0; margin:0; background:url(../fallback/navRightIE.gif) no-repeat 100% 0; font:16px Tahoma, Sans-serif; }
ul:after { content:"."; display:block; height:0; clear:both; visibility:hidden; }
li { height:44px; position:relative; float:left; list-style-type:none; background:url(../fallback/navBG.gif) repeat-x 0 0; }
li.last a { border-right:none; }
li:hover { background:url(../fallback/navOverBG.gif) repeat-x 0 0; }
li:first-child { background:url(../fallback/navLeftIE.gif) no-repeat 0 0; }
li:first-child a { border-left:none; }
li:first-child:hover { background:url(../fallback/navOverLeft.gif) no-repeat 0 0; }
li a { display:block; padding:10px 20px; border-left:1px solid #999; border-right:1px solid #222; color:#eee; text-decoration:none; }
li li { width:auto; clear:left; }
li li:first-child { background:none; }
li li:hover { background-image:none; }
ul li li a:hover { border-right:none; }
ul ul { display:none; padding-left:2px; position:absolute; left:2px; background:url(../fallback/subnavBG.png) no-repeat 100% 100%; }
ul li:hover ul { display:block; }
li li { height:auto; width:98%; left:-2px; }
ul ul a:hover { background:url(../fallback/subOverBG.png) repeat 0 0; }
ul a span { height:7px; width:12px; margin-top:8px; text-indent:-5000px; overflow:hidden; background:url(../fallback/indicator.png) no-repeat 0 0; }
ul ul li { background:none; }
ul ul li.last { margin-bottom:10px; }
ul ul li a { padding:5px 10px; border-left:0; left:3px; font-size:14px; white-space:pre; }
IE7 will still create problems for us, even with scripting enabled, but we can fix that easily enough using another conditional comment to target IE7 specifically, and supplying a new style sheet just for IE7 which fixes the layout problems; something like this is all we need:
* styles to fix IE7 */
ul { display:inline-block; }
ul li a span { position:absolute; right:5px; top:10px; }
ul ul li a { border-right:none; padding:5px 10px; }
.content { clear:both; }
Save this in the css folder as ie7.css and add a new conditional comment to the <head of the page:
<!--[if IE 7]>
 <link rel="stylesheet" href="css/ie.css">
  <link rel="stylesheet" href="css/ie7.css">
<![endif]-->
There we go; a navigation menu built and styled with the latest elements and styles with fallbacks and fixes for older browsers.
You might also like


Tags
accordion accordion menu animation navigation animation navigation menu carousel checkbox inputs css3 css3 menu css3 navigation date picker dialog drag drop drop down menu drop down navigation menu elastic navigation form form validation gallery glide navigation horizontal navigation menu hover effect image gallery image hover image lightbox image scroller image slideshow multi-level navigation menus rating select dependent select list slide image slider menu stylish form table tabs text effect text scroller tooltips tree menu vertical navigation menu