jQuery Super Cool Vertical Scroll Menu
 13 years ago
  35225
35225  4764
4764
 n/a
n/a

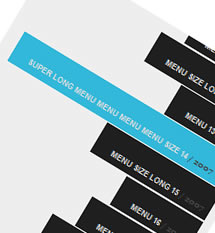
Create a vertical scroll menu that scroll automatically according to your mouse axis-Y movement.
1. Get mouse axis
The following code will return the X and Y Axis values for your mouse pointer.
<script>
$(document).mousemove(function(e) {
$('#mouse_axis').html("X Axis : " + e.pageX + " | Y Axis " + e.pageY);
});
</script>

<div id="mouse_axis"></div>
2. Get objects offset
The following code will get the offset Top and Left for an object.
<script>
$(document).ready(function() {
$('#offset').html("Top : " + $('#sidebar').offset().top + " |Left "
+ $('#sidebar').offset().left);
});
</script>

<div id="offset"></div>

<br/>
<br/>
<br/>
<div id="Sidebar">A Empty DIV named sidebar</div>
3. Get the total of selected elements by the selector.
It will return the total of selected elements.
$('#menu li').length;
2 main DIVs #sidebar and #menu:
#sidebar : its overflow property is set to hidden. Overflow set to hidden will truncate/hide #menu's extra length and display the #menu according to the width and height of the #sidebar.
#menu : its position property is set to relative. So that if top property set to 0, #menu will snap to the top of #sidebar. So, even with no javascript, you can test the menu with random negative numbers, for example -30px, -100px or -500px. You will able to see the menu is going up. So, jQuery's job is to generate this negative values. To dynamicly generate these values, we will use the mouse-Y, because we want to scroll it up and down. It's quite complicated to explain, but we will walk through it in javascript section.
1. HTML
As usual, we always keep the HTML code as simple as possible. It's good to not mix javascript with html code to increase readibility and tidiness.
<div id="sidebar">
<ul id="menu">
<li><a href="#">MENU 1 <span> / 2007</span></a></li>
<li><a href="#">MENU SIZE 2 <span> / 2007</span></a></li>
<li><a href="#">MENU SIZE LONG 3 <span> / 2007</span></a></li>
<li><a href="#">MENU 4 <span> / 2007</span></a></li>
<li><a href="#">MENU SIZE 5 <span> / 2007</span></a></li>
<li><a href="#">MENU SIZE LONG 6 <span> / 2007</span></a></li>
......
......
......
</ul>
</div>
2. CSS
I have played with this CSS for quite a while to achieve the effect I want and tested it with IE as well. I was having this IE problem, where the position:relative and overflow:hidden just won't work the way it should. Fortunately, I found the solution through this website - solution to position relative and overflow in IE. Bingo, it displays exactly the same now.
#sidebar has to set as overflow:hidden to make sure the extra length in the menu is hidden. And the rest is just basic styling for the menu.
body {
padding:0;
margin:0 20px;
}

#sidebar {
height:400px;
overflow:hidden;
position:relative;
background-color:#eee;
}

#menu {
width:100%;
list-style:none;
padding:0;
margin:0;
top:0;
position:relative;
height:100%;
width:300px;
}

#menu li {
padding:10px 0;
text-align:right;
display:block;
cursor:hand;
cursor:pointer;
}

#menu li a {
background:url() repeat #1f1f1f;
color:#ddd;
font-family:helvetica, arial, verdana;
font-size:9px;
font-weight:900;
display:inline;
padding:20px 8px 5px 20px;
text-decoration:none;
}

#menu li span {
font-family:georgia, arial;
font-size:9px;
color:#464646;
}
3. Javascript
In javascript section, I have separated all the configurable variables on the top of the script. It'll be easier to convert it to a plugin.
The most important part of this script is the last section - generate the top value based on the mouse Y value to allow user to scroll through the entire menu, and won't be affected by the offset of the sidebar as well. The mathematic equation I'm using, it's not the perfect one, but it works. If you have better suggestions, please drop me a message. : )
$(document).ready(function() {

 //Background color, mouseover and mouseout
 var colorOver = '#31b8da';
 var colorOut = '#1f1f1f';

 //Padding, mouseover
 var padLeft = '20px';
 var padRight = '20px'

 //Default Padding
 var defpadLeft = $('#menu li a').css('paddingLeft');
 var defpadRight = $('#menu li a').css('paddingRight');

 //Animate the LI on mouse over, mouse out
 $('#menu li').click(function () {
  //Make LI clickable
  [removed] = $(this).find('a').attr('href');

 }).mouseover(function (){

  //mouse over LI and look for A element for transition
  $(this).find('a')
  .animate( { paddingLeft: padLeft, paddingRight: padRight}, { queue:false, duration:100 } )
  .animate( { backgroundColor: colorOver }, { queue:false, duration:200 });

 }).mouseout(function () {

  //mouse oout LI and look for A element and discard the mouse over transition
  $(this).find('a')
  .animate( { paddingLeft: defpadLeft, paddingRight: defpadRight}, { queue:false, duration:100 } )
  .animate( { backgroundColor: colorOut }, { queue:false, duration:200 });
 });

 //Scroll the menu on mouse move above the #sidebar layer
 $('#sidebar').mousemove(function(e) {

  //Sidebar Offset, Top value
  var s_top = parseInt($('#sidebar').offset().top);

  //Sidebar Offset, Bottom value
  var s_bottom = parseInt($('#sidebar').height() + s_top);

  //Roughly calculate the height of the menu by multiply height of a single LI with the total of LIs
  var mheight = parseInt($('#menu li').height() * $('#menu li').length);

  //I used this coordinate and offset values for debuggin
  $('#debugging_mouse_axis').html("X Axis : " + e.pageX + " | Y Axis " + e.pageY);
  $('#debugging_status').html(Math.round(((s_top - e.pageY)/100) * mheight / 2));

  //Calculate the top value
  //This equation is not the perfect, but it 's very close
  var top_value = Math.round(( (s_top - e.pageY) /100) * mheight / 2)

  //Animate the #menu by chaging the top value
  $('#menu').animate({top: top_value}, { queue:false, duration:500});
 });


});

Conclusion
You might also like
Tags
accordion accordion menu animation navigation animation navigation menu carousel checkbox inputs css3 css3 menu css3 navigation date picker dialog drag drop drop down menu drop down navigation menu elastic navigation form form validation gallery glide navigation horizontal navigation menu hover effect image gallery image hover image lightbox image scroller image slideshow multi-level navigation menus rating select dependent select list slide image slider menu stylish form table tabs text effect text scroller tooltips tree menu vertical navigation menu

 Subscribe
 Follow Us
