 Subscribe
 Follow Us
jQuery HTML Form Validation Solution
 13 years ago
 7194
7194 2055
2055
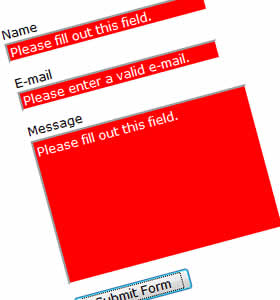
First we’ll start with the HTML and CSS. The script will add a class called “needsfilled” to any fields that don’t pass the validation, so you’ll want to specify how you’d like it to look, and make it stand out so that the user knows something went wrong! Be sure to have included the latest version of jQuery and the script file itself in your header.
#error {
 color:red;
 font-size:10px;
 display:none;
}
.needsfilled {
 background:red;
 color:white;
}
<form action="mail.php" id="theform" name="theform" method="post">
    <p><label for="name">Name</label><br /><input id="name" type="text" value="" name="name" /></p>
    <p><label for="email">E-mail</label><br /><input id="email" type="text" value="" name="email" /></p>
    <p><label for="message">Message</label><br /><textarea id="message" rows="7" cols="30"  name="message"></textarea></p>
    <p><input class="submit" type="submit" name="submit" value="Submit Form" /></p>
    <p id="error">There were errors on the form, please make sure all fields are fill out correctly.</p>
</form>
Please take note of any ID’s used (theform, email, etc.) because you’ll need those ID’s to stay consistent from within the javascript. The HTML and CSS is pretty self-explanatory, so we’ll move onto the javascript. All of this code will be placed within a $(document).ready(function(){}); so that it’s all loaded when the DOM is loaded.
// Place ID's of all required fields here.
required = ["name", "email", "message"];
// If using an ID other than #email or #error then replace it here
email = $("#email");
errornotice = $("#error");
// The text to show up within a field when it is incorrect
emptyerror = "Please fill out this field.";
emailerror = "Please enter a valid e-mail.";
First we will setup our variables. Just follow the comments so that you know what goes where. If you are using the same ID’s as this tutorial, then all you really have to change is the list of fields that are required, just follow the format used so that the array isn’t broken.
$("#theform").submit(function(){
 //Validate required fields
 for (i=0;i<required.length;i++) {
  var input = $('#'+required[i]);
  if ((input.val() == "") || (input.val() == emptyerror)) {
   input.addClass("needsfilled");
   input.val(emptyerror);
   errornotice.fadeIn(750);
  } else {
   input.removeClass("needsfilled");
  }
 }
Now for an explanation on the code, taking it line by line. $(”#theform”).submit(function() tells the page to execute the following script whenever someone hits the submit button in the form with ID ‘theform’. Next, we create a ‘for’ loop that will run through as many variables as you defined in the ‘required’ array earlier. The next ‘if’ statement will check to see if the current input field is empty, or if it is equal to the text that we set to appear if the field is empty. If either of these cases are true, then it adds the class ‘needsfilled’ to the empty input, replaces its value with the value of ‘emptyerror’, and then fades in ‘errornotice’ alerting the user that something went wrong. If the case is false, then we make sure to remove the class ‘needsfilled’ from the input because that is what we will use later on to see if the form is safe to be submitted.
// Validate the e-mail.
if (!/^([a-zA-Z0-9_\.\-])+\@(([a-zA-Z0-9\-])+\.)+([a-zA-Z0-9]{2,4})+$/.test(email.val())) {
    email.addClass("needsfilled");
    email.val(emailerror);
}
Just about every form is going to ask for an e-mail address, so I felt it was necessary to include this bit. This is a regular expression which is filtering the value of the ‘email’ input. It is making sure that the e-mail adress follows the format of “email@domain.something”. NetTUTS has many awesome explanations of regular expressions if you would like more information on them. After this ‘if’ statement is where you would also place any other validation that you’d like, such as checking a URL string for proper formatting.
 //if any inputs on the page have the class 'needsfilled' the form will not submit
 if ($(":input").hasClass("needsfilled")) {
  return false;
 } else {
  errornotice.hide();
  return true;
 }
});
With the above code, we are closing the $(”#theform”).submit(function() at the end. The first if statement is going to be checking to see if ANY inputs on the page have the class ‘needsfilled’. If it does, then ‘return false’ tells the form to not submit.
// Clears any fields in the form when the user clicks on them
$(":input").focus(function(){
   if ($(this).hasClass("needsfilled") ) {
  $(this).val("");
  $(this).removeClass("needsfilled");
   }
});
This block is just a little bit of user experience improvement. If a user clicks on an input field that did not pass the validation, then the value will clear so that the user can immediately start typing without having to delete our message.
You might also like

Tags
accordion accordion menu animation navigation animation navigation menu carousel checkbox inputs css3 css3 menu css3 navigation date picker dialog drag drop drop down menu drop down navigation menu elastic navigation form form validation gallery glide navigation horizontal navigation menu hover effect image gallery image hover image lightbox image scroller image slideshow multi-level navigation menus rating select dependent select list slide image slider menu stylish form table tabs text effect text scroller tooltips tree menu vertical navigation menu