 Subscribe
 Follow Us
jQuery quickie: Slot machine navigation
 14 years ago
 14697
14697 2908
2908
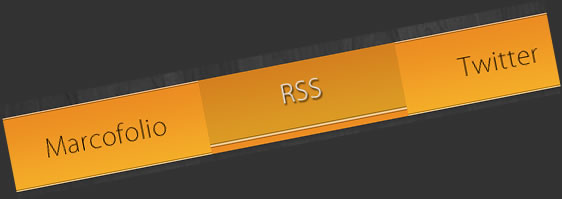
Navigation is one of the things you'll see on every website. I wanted to give this part a little bit extra life, and when I saw a movie yesterday that included slot machines, it suddenly hit me. Using jQuery and some basic CSS and HTML, we could add some sweet slot machine style animation to a normally boring kind of navigation. So, for today, we'll be creating a slot machine style navigation that you could use on your website.
Already wondering how it works? Check out how you can create this slot machine yourself. Of course, this could easily be transported to be used with social media buttons (instead of the main navigation of your site).
HTML
As usual, we want to keep our HTML as short and clean as possible. We'll simply use an unordered list that'll contain links. We'll style it later on with CSS.
<ul id="jquerynav" class="navigation">
   <li><a href="#" class="marcofolio">Marcofolio.net</a></li>
   <li><a href="#" class="rss">RSS</a></li>
   <li><a href="#" class="twitter">Twitter</a></li>
   <li><a href="#" class="jquery">jQuery</a></li>
</ul>
Take note of the different class and id attributes we need to use. All the links have a different class, since we'll need to reference it from the CSS.
This is all the HTML we need to make this example work. Now to add some style using CSS.
CSS
Although the CSS isn't very spectacular, there is something that is the actual key to make this technique work. Let's take a look at the first part.
.navigation { list-style:none; width:800px; height:75px; }
.navigation li { display:inline; text-indent:-9999px; }
.navigation li a { display:block; float:left; width:200px; height:75px;
   background-image:url("../images/buttons.png"); }
Nothing really much going on over here. Just some links that are placed in a horizontal row with a fixed with and height. But it's the last line that is very important: The background-image is set.
Since we didn't set the background-repeat or background-position properties, the bottons.png image will be placed on a 0, 0 (top left) position and will be repeated all over. We'll be using CSS sprites for this technique.
Now you'll see why all the links have different classes. We need to set the background-position property, to show the correct button.
.navigation li a.marcofolio { background-position:0 0; }
.navigation li a.rss { background-position:-200px 0;  }
.navigation li a.twitter { background-position:-400px 0; }
.navigation li a.jquery { background-position:-600px 0; }
We now have the base of what we need to make the slot machine work. All the links are in place, and the background-position is all correct. Now to make some magic happen with jQuery.
jQuery
First things first: We need the Background-Position Animations plugin, since we need to animate the background-position property (by default, jQuery can't do this). We'll also use the jQuery Easing Plugin to use some custom animation. Ofcourse, we'll need the jQuery core to make this all work.
Before we handle the hover() function, we'll need to do some preperation. We need to capture the original X position of the button, since we'll need to animate back to that value later on. We'll also set the default Y position to 0 (top), which will be increased by the hover() action later on.
$("#jquerynav li a").each(function(){
   // Returns "##px" and "##px"
   var backgroundPositions = $(this).css('background-position').split(" ");

   // Retrieve the original X position
   $(this).data("originalXpos", backgroundPositions[0].slice(0, -2));

   // Set the new Y position to 0
   $(this).data("newYpos", 0);
});
Now that we have all that, we can finally go on with the core of this technique: the hover() event.
$("#jquerynav li a").hover(function(){
      $(this)
         .data("newYpos", $(this).data("newYpos") + 1)
         .stop()
         .animate({
            backgroundPosition: $(this).data("originalXpos") +
               "px " + $(this).data("newYpos") * 75 + "px"
         }, 600, "easeOutCirc");
   }, function(){
      $(this)
         .data("newYpos", $(this).data("newYpos") + 1)
         .stop()
         .animate({
            backgroundPosition: $(this).data("originalXpos") +
               "px " + $(this).data("newYpos") * 75 + "px"
         }, 400, "easeInCirc");
   });
Let's break it down a little bit. The newYpos value from the element is increased by one. By doing this (and using it later on with the animate function), we ensure the button will slide down forever, giving it the slot machine effect. Since the background image is repeated, we'll always see a copy of the same image over and over. We'll use the originalXpos to maintain the same character, so it will not look odd.
The onMouseOver (first function) is slightly faster than the onMouseOut (second function), but you can change that if you want. This also counts for the easing effect, which is now set to easeInCirc and easeOutCirc (both from the easing plugin).
That's about it! All the code your need to create a nifty looking slot machine navigation.
You might also like


Tags
accordion accordion menu animation navigation animation navigation menu carousel checkbox inputs css3 css3 menu css3 navigation date picker dialog drag drop drop down menu drop down navigation menu elastic navigation form form validation gallery glide navigation horizontal navigation menu hover effect image gallery image hover image lightbox image scroller image slideshow multi-level navigation menus rating select dependent select list slide image slider menu stylish form table tabs text effect text scroller tooltips tree menu vertical navigation menu