 Subscribe
 Follow Us
Apple-style Slideshow Gallery With jQuery
 13 years ago
 16867
16867 3937
3937

We are making an Apple-like slideshow gallery, similar to the one they use on their website to showcase their products. It will be entirely front-end based, no PHP or databases required.
So go ahead and download the example source code and continue with the first step.
Step 1 – XHTML
There is no need for a database nor a PHP back-end for this gallery. This means that it is really easy to incorporate into an existing site – you just have to change a few lines of html code.
Lets take a closer look at the XHTML markup:
demo.html
<div id="main"> <div id="gallery"> <div id="slides"> <div class="slide"><img src="img/sample_slides/macbook.jpg" width="920" height="400" /></div> <div class="slide"><img src="img/sample_slides/iphone.jpg" width="920" height="400" /></div> <div class="slide"><img src="img/sample_slides/imac.jpg" width="920" height="400" /></div> </div> <div id="menu"> <ul> <li class="fbar"> </li><li class="menuItem"><a href=""><img src="img/sample_slides/thumb_macbook.png" /></a></li><li class="menuItem"><a href=""><img src="img/sample_slides/thumb_iphone.png" /></a></li><li class="menuItem"><a href=""><img src="img/sample_slides/thumb_imac.png" /></a></li> </ul> </div> </div> </div>
The idea is simple – there are two main container DIVs – the one with id=”menu” holds the thumbnails, and the other – “slides” holds the slides themselves.
To add a new slide, you’ll just have to add new elements to both containers. The slides are JPGs, and the thumbnails are transparent PNGs, but you can use any image type you want.
You can even put any kind of HTML in as well. For example you could make a certain slide into a hyperlink by just putting the image inside of an anchor tag.
That said, it is important to have the width and height attributes set up of the slide images – it is used by jQuery to determine the width of the sliding area, as you’ll see in a moment.
Also notice that the thumbnail LI elements. The first one is assigned a class name of fbar , used to only show a vertical dividing bar, and the others are assigned a menuItem class – used as the slideshow control buttons.
Now lets continue with the next step.

Step 2 – CSS
Lets see what lays hidden in our stylesheet. I’ve only included the styles that are directly used by the gallery. You can view the rest of the styles, used to show the demo, in demo.css.
demo.css
body,h1,h2,h3,p,quote,small,form,input,ul,li,ol,label{
 /* Page reset */
 margin:0px;
 padding:0px;
}

body{
 /* Setting default text color, background and a font stack */
 color:#444444;
 font-size:13px;
 background: #f2f2f2;
 font-family:Arial, Helvetica, sans-serif;
}

/* Gallery styles */

#gallery{
 /* CSS3 Box Shadow */
 -moz-box-shadow:0 0 3px #AAAAAA;
 -webkit-box-shadow:0 0 3px #AAAAAA;
 box-shadow:0 0 3px #AAAAAA;

 /* CSS3 Rounded Corners */

 -moz-border-radius-bottomleft:4px;
 -webkit-border-bottom-left-radius:4px;
 border-bottom-left-radius:4px;

 -moz-border-radius-bottomright:4px;
 -webkit-border-bottom-right-radius:4px;
 border-bottom-right-radius:4px;

 border:1px solid white;

 background:url(img/panel.jpg) repeat-x bottom center #ffffff;

 /* The width of the gallery */
 width:920px;
 overflow:hidden;
}

#slides{
 /* This is the slide area */
 height:400px;

 /* jQuery changes the width later on to the sum of the widths of all the slides. */
 width:920px;
 overflow:hidden;
}

.slide{
 float:left;
}

#menu{
 /* This is the container for the thumbnails */
 height:45px;
}

ul{
 margin:0px;
 padding:0px;
}

li{
 /* Every thumbnail is a li element */
 width:60px;
 display:inline-block;
 list-style:none;
 height:45px;
 overflow:hidden;
}

li.inact:hover{
 /* The inactive state, highlighted on mouse over */
 background:url(img/pic_bg.png) repeat;
}

li.act,li.act:hover{
 /* The active state of the thumb */
 background:url(img/active_bg.png) no-repeat;
}

li.act a{
 cursor:default;
}

.fbar{
 /* The left-most vertical bar, next to the first thumbnail */
 width:2px;
 background:url(img/divider.png) no-repeat right;
}

li a{
 display:block;
 background:url(img/divider.png) no-repeat right;
 height:35px;
 padding-top:10px;
}

a img{
 border:none;
}
We have used a number of CSS3 specific properties in this slideshow gallery:
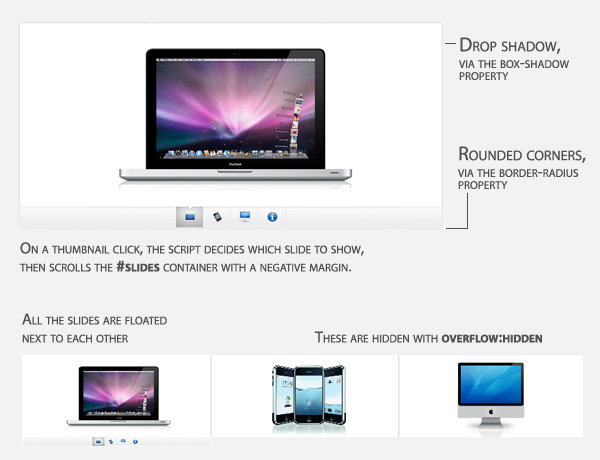
- box-shadow, which makes the gallery cast a light shadow around its edges. To use it, you have to provide offsets by X and Y (0 0 here), the blurring (3px in this example) and the color of the shadow;
- border-radius, which rounds the bottom corners of the gallery.
Unfortunately, these properties are only supported in Safari, Chrome and Firefox for now. However in the rest of the browsers you still have a completely functional gallery.
Now it is time for some jQuery magic.
Step 3 – jQuery
As I already mentioned, this gallery does not use any server-side code, so it is all up to the front end to make the slideshow tick.
script.js
$(document).ready(function(){
 /* This code is executed after the DOM has been completely loaded */

 var totWidth=0;
 var positions = new Array();

 $('#slides .slide').each(function(i){
  /* Loop through all the slides and store their accumulative widths in totWidth */
  positions[i]= totWidth;
  totWidth += $(this).width();

  /* The positions array contains each slide's commulutative offset from the left part of the container */

  if(!$(this).width())
  {
   alert("Please, fill in width & height for all your images!");
   return false;
  }
 });

 $('#slides').width(totWidth);

 /* Change the cotnainer div's width to the exact width of all the slides combined */

 $('#menu ul li a').click(function(e){

  /* On a thumbnail click */
  $('li.menuItem').removeClass('act').addClass('inact');
  $(this).parent().addClass('act');

  var pos = $(this).parent().prevAll('.menuItem').length;

  $('#slides').stop().animate({marginLeft:-positions[pos]+'px'},450);
  /* Start the sliding animation */

  e.preventDefault();
  /* Prevent the default action of the link */
 });

 $('#menu ul li.menuItem:first').addClass('act').siblings().addClass('inact');
 /* On page load, mark the first thumbnail as active */
});
The main idea behind this script is to loop through all the slides, sum up their widths and assign the sum to the slides container – the DIV with the id=”slides“. Because the slides are floated to the left and have enough room, they align next to each other.
Later, when you click a thumbnail, the script calculates which slide to show and scrolls the #slides div by assigning a negative margin via the animate method.
And with just 40 lines of code, the Apple-like slider gallery is finished!
You might also like


Tags
accordion accordion menu animation navigation animation navigation menu carousel checkbox inputs css3 css3 menu css3 navigation date picker dialog drag drop drop down menu drop down navigation menu elastic navigation form form validation gallery glide navigation horizontal navigation menu hover effect image gallery image hover image lightbox image scroller image slideshow multi-level navigation menus rating select dependent select list slide image slider menu stylish form table tabs text effect text scroller tooltips tree menu vertical navigation menu