 Subscribe
 Follow Us
Dropdown Navigation in CSS3 jQuery
 14 years ago
 30261
30261 6421
6421
we will learn how to enhance you WordPress in a whole new way. Multi-Level or Multi-Dimensional navigation menus can offer your theme and users 2 new things. One, add a nice new type of effect to enhance your theme. Two, allow the users to find things more easily. We will start off by making a HTML version, then making it compatible with WordPress.
Beginning the Script
At the beginning of every new project it’s good to have a good basic setup to work with. I prefer to have the basic elements every page needs, head and body, along with importing one stylesheet and the latest jQuery.
<!-- Title -->

<!-- Meta -->

<!-- Javascript -->
<script src=" jquery-latest.min.js" type="text/javascript"><!--mce:0--></script>

<!-- Styles -->

<!-- Content -->
Starting the Navigation
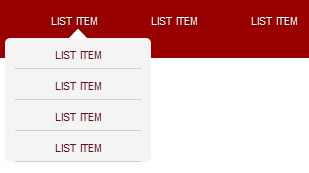
Before we dive into WordPress, in this tutorial or in any case, you want to make a working HTML version first. First, we are going to open up a header div width a unordered list inside of it that will end up being are navigation menu. You can give that unordered list a class or id but i am choosing not to for this tutorial. Next, fill the unordered list with about 4 list items (make sure the text is nested in anchor tags).
  <!-- Title -->

  <!-- Meta -->

  <!-- Javascript -->
  <script src=" jquery-latest.min.js" type="text/javascript"><!--mce:1--></script>

  <!-- Styles -->
<div id="header">
<ul>
 <li><a href="#">list item</a></li>
 <li><a href="#">list item</a></li>
 <li><a href="#">list item</a></li>
 <li><a href="#">list item</a></li>
</ul>
</div>
Styling the Top Level List
Now, let’s style that basic top level list. We want our list items aligned horizontally, and of course centered in the middle of the page. We will also give the header a nice subtitle gradient using CSS3.
/* Basic Reset */
* { margin: 0; padding:0; }
body {
 font: small-caps 14px Tahoma;
 position: relative;
}
a {
 text-decoration: none;
}

/* Header */
#header {
 background: -webkit-gradient(
  linear,
  left top,
  left bottom,
  color-stop(0, rgb(117,18,41)),
  color-stop(1, rgb(79,7,24))
 );
 height: 86px;
}
/* Top Level Menu */
#header ul {
 margin: 0 auto;
 width: 400px;
}

#header ul li {
 display: block;
 float: left;
 margin: 40px 0 0;
 width: 100px;
}

#header ul li a {
 color: #FFF;
 text-shadow: 1px 1px 1px rgba(0, 0, 0, 0.5);
}
Adding the Next Level
Here is where we separate this navigation menu from most; we will add another list of items under each current item so there are submenus when hovered. On the list items you want to have sub menus you will need to open a new unordered list before the parent closing list item, like so:
  <!-- Title -->

  <!-- Meta -->

  <!-- Javascript -->
  <script src=" jquery-latest.min.js" type="text/javascript"><!--mce:2--></script>

  <!-- Styles -->
<div id="header">
<ul>
 <li><a href="#">list item</a></li>
 <li><a href="#">list item</a></li>
 <li><a href="#">list item</a></li>
 <li><a href="#">list item</a></li>
 <li><a href="#">list item</a></li>
 <li><a href="#">list item</a></li>
 <li><a href="#">list item</a></li>
 <li><a href="#">list item</a></li>
 <li><a href="#">list item</a></li>
 <li><a href="#">list item</a></li>
</ul>
</div>
jQuery Animation Time
Now, time for the fun part! Before we style those sub level menus we want to be able to see the content they hold and be able to make them appear on hovering the parent. To do this, we will use jQuery’s .hover() function.
$(function(){

 //Hide SubLevel Menus
 $('#header ul li ul').hide();

 //OnHover Show SubLevel Menus
 $('#header ul li').hover(
  //OnHover
  function(){
   //Hide Other Menus
   $('#header ul li').not($('ul', this)).stop();

   //Add the Arrow
   $('ul li:first-child', this).before(
    '
 <li class="arrow">arrow</li>
'
   );

   //Remove the Border
   $('ul li.arrow', this).css('border-bottom', '0');

   // Show Hoved Menu
   $('ul', this).slideDown();
  },
  //OnOut
  function(){
   // Hide Other Menus
   $('ul', this).slideUp();

   //Remove the Arrow
   $('ul li.arrow', this).remove();
  }
 );

});
Styling the Sub Level Menus
Now, just add this bit of CSS to your CSS file to make your sub level menus look all nice and pretty. Its pretty straightforward.
/* Sub Level Nav */
#header ul li ul {
 background: #F4F4F4;
 border: 0px solid #000;
  -webkit-border-radius: 5px;
  -moz-border-radius: 5px;
 -webkit-box-shadow: 0px 0px 3px rgba(0, 0, 0, 0.5);
 margin: 10px 0 0 -46px;
 padding: 0 10px 0;
 position: relative;
 width: 126px;
}

#header ul li ul li {
 border-bottom: 1px solid #CCC;
 display: block;
 float: none;
 height: 14px;
 padding: 8px 0;
 text-align: center;
 width: 126px;
 margin: 0;
}

#header ul li ul li a {
 color: #620d20;
 text-shadow: none;
}

#header ul li ul li a:hover {
 color: #000;
}

#header ul li ul li:last-child:not(li.arrow) {
 border: 0;
}

/* Arrow */
.arrow {
 background: url(arrow.png) no-repeat;
 border: 0;
 display: none;
 position: absolute;
  top: -10px;
  left: 63px;
 height: 11px;
 width: 20px;
 text-indent: -9999px;
}
Making it Work with WordPress
The Admin Panel
The items for the menu are going to be pages, so when you create your pages the ones you want to be the top level menu items make them have no parent. The items you want under a main item and appear on hover give them the parent of said element. The field to give a page parent is located in the right sidebar during page creation.
The PHP
Now, making this work with WordPress is very easy. All you need to do is include the CSS and JavaScript with your current theme and then do the following with your header.php file.
<div id="header">
<ul>
<li><a href="<?php bloginfo('url'); ?>">Home</a></li>
</ul>
</div>
You might also like


Tags
accordion accordion menu animation navigation animation navigation menu carousel checkbox inputs css3 css3 menu css3 navigation date picker dialog drag drop drop down menu drop down navigation menu elastic navigation form form validation gallery glide navigation horizontal navigation menu hover effect image gallery image hover image lightbox image scroller image slideshow multi-level navigation menus rating select dependent select list slide image slider menu stylish form table tabs text effect text scroller tooltips tree menu vertical navigation menu