 Subscribe
 Follow Us
Smooth Horizontal Sliding Tab Navigation with jQuery
 13 years ago
 14213
14213 1745
1745
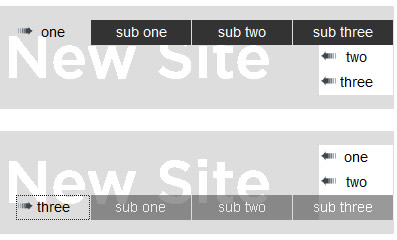
we'll show you how to create a navigation menu that slides horizontally. It begins with a set of "tabs" on the right side of a containing element. When clicked, a tab slides to the left to reveal a group of links. Click the tab again, and it slides back. While I've never had a need to build one of these for any of my own projects, quite a few people have asked if I would demonstrate how it might be done, so here goes.
The Styles
For the navigation items, I used a simple unordered list wrapped in a <div class="nav">. While the HTML structure is straightforward, the CSS is a little tricky, so I'll detail it here:
/* nav wrapper */
.tab-nav {
  position: relative;
  width: 610px;
  overflow: hidden;
  background: #ddd url(tab-slide.png) no-repeat 0 0;
}
/* nav */
.tab-nav ul {
  position: relative;
  float: left;
  width: 1600px;
  margin-left: 535px;
  padding-left: 0;
  list-style-type: none;
  background-color: #fff;
}
.tab-nav li {
  float: left;
  clear: left;
}
.tab-nav a {
  display: block;
  width: 74px;
  border-right: 1px solid #ddd;
  height: 25px;
  line-height: 24px;
  float: left;
  text-align: center;
  text-decoration: none;
  color: #000;
  background:  url(tab-slide.png) no-repeat 2px -194px;
}
.tab-nav a.expanded {
  background-position: 2px -244px;
}
/* second-level overrides */
.tab-nav ul ul {
  float: left;
  background-color: #333;
  width: auto;
  margin-left: 0;
}
.tab-nav li li {clear: none;}
.tab-nav li li a { color: #fff; width: 100px; background-image: none;}
Most of the relevant CSS here has to do with positioning the nav items. I set the top <ul>'s left margin to 75 pixels less than the wrapper's width so that the top-level links appear on the right side. The 1600px width for the <ul> gives the floated list items ample room to line up horizontally next to each other.
The wrapper's overflow declaration is significant, as it hides the list items when they're sticking out to the right, but the rest is "window dressing."
Sliding the Nav
With the nav looking the way I want it at its initial state, it's time to make it do something. I'll start with a simple setup, having each "tab" (top-level item) slide to the left on the first click to reveal its sub-nav items, and slide back to its initial position when it's clicked a second time.
For this basic behavior, everything can be done inside a click handler for the top-level links. Note: Since I'm using multiple navs for this tutorial, each with its own set of behavior, I'll be referring to them by ID, unlike in the CSS snippet above, where everything is styled by class. There is nothing special about the selectors or their naming here. Name your own elements and select them however you want.
The first thing to do is set a few variables. The $parentItem variable is the <li> parent of the clicked link. The slideAmt is the width of the nested <ul>, which is the next sibling of the link. And direction will eventually determine whether the parent <li> should be slid to the left or to the right.
var $topLinks1 = $('#tab-nav-1 > ul > li > a');
$topLinks1.click(function() {
  var $parentItem = $(this).parent(),
   slideAmt = $(this).next().width(),
   direction;
  // code continues
});
Notice the use of $(this). Inside the click handler, this refers to the clicked DOM element. By wrapping this in $(), we can call jQuery methods on it.
To get the sliding motion to occur, we can animate either the left property or the marginLeft property. Here, I'll animate marginLeft. So, the next thing to do is determine the direction of the animation based on the current value of marginLeft: If it's less than 0, direction is set to "+=", which increases it (back to 0); otherwise, direction is set to "-=". At the same time, an "expanded" class will be toggled so that the arrow background image can change directions.
var $topLinks1 = $('#tab-nav-1 > ul > li > a');
$topLinks1.click(function() {
  var $parentItem = $(this).parent(),
   slideAmt = $(this).next().width(),
   direction;
  if (parseInt($parentItem.css('marginLeft'), 10) <0) {
 direction = '+=';
 $(this).removeClass('expanded');
  } else {
 $(this).addClass('expanded');
 direction = '-=';
  }
  // code continues
});
Finally, we do the animation, plugging in the direction and slideAmt variables. The return false; line stops the default click action from occurring. Here is the finished code for the basic implementation:
var $topLinks1 = $('#tab-nav-1 > ul > li > a');
  $topLinks1.click(function() {
 var $parentItem = $(this).parent(),
  slideAmt = $(this).next().width(),
  direction;
 if (parseInt($parentItem.css('marginLeft'), 10) <0) {
   direction = '+=';
   $(this).removeClass('expanded');
 } else {
   $(this).addClass('expanded');
   direction = '-=';
 }
 $parentItem
   .animate({marginLeft: direction + slideAmt}, 400);
 return false;
  });
One at a Time
That's all well and good, but I don't really care for having more than one row of items expanded at a time. A couple simple modifications will fix that for us:
$(document).ready(function() {
  var $topLinks2 = $('#tab-nav-2 > ul > li > a');
  $topLinks2.click(function() {
 var $parentItem = $(this).parent(),
  slideAmt = $(this).next().width(),
  direction;
 $topLinks2.removeClass('expanded');
 if (parseInt($parentItem.css('marginLeft'), 10) <0) {
   direction = '+=';
 } else {
   $(this).addClass('expanded');
   direction = '-=';
 }
 $parentItem
   .animate({marginLeft: direction + slideAmt}, 400)
  .siblings()
  .animate({marginLeft: '0'}, 150);
 return false;
  });
});
The links are stored in a variable first thing here. Whenever a link is clicked, all links have the "expanded" class removed. Of course, only one, at most, will have that class, but I'm lazy and it's easier to tell all of the links to remove the class than it is to hunt links that have the class first.
The same check is performed to set the direction of the animation. If the clicked link's parent <li> is going to be slid to the left, the link will also get the "expanded" class.
Finally, the clicked link's parent is animated in the direction and number of pixels specified by the variables. But here's the twist: all of that parent's siblings have their marginLeft property animated to 0. Again, I'm taking the lazy route, animating all of the siblings, even though one or none of them will need it.
Auto-Collapse
Now that the expanding and collapsing are happening the way I like it, I'll add one more little touch. If the user's mouse leaves the containing <div class="tab-nav">, and stays out for a full second, any expanded list will collapse.
$(document).ready(function() {
  var closeAll,
   $topLinks3 = $('#tab-nav-3 > ul > li > a');
  $('#tab-nav-3 ul ul').css('opacity', '0.5');
  $topLinks3.click(function() {
 var $parentItem = $(this).parent(),
  slideAmt = $(this).next().width(),
  direction;
 $topLinks3.removeClass('expanded');
 if (parseInt($parentItem.css('marginLeft'), 10) <0) {
   direction = '+=';
 } else {
   $(this).addClass('expanded');
   direction = '-=';
 }
 $parentItem
   .animate({marginLeft: direction + slideAmt}, 400)
  .siblings()
  .animate({marginLeft: '0'}, 150);
 return false;
  });
  $('#tab-nav-3')
  .mouseleave(function() {
 closeAll = setTimeout(function() {
   $topLinks3.removeClass('expanded')
  .parent().animate({marginLeft: '0'}, 150);
 }, 1000);
  })
  .mouseenter(function() {
 clearTimeout(closeAll);
  })
});
Line 2 declares a variable that will be used for the setTimeout(), which you can see tucked inside the .mouseleave() method near the bottom of the code. The setTimeout() function has two arguments: the first is an anonymous function that contains code for triggering the collapse of the list items, and the second is the number of milliseconds to wait (1,000 milliseconds) before the first argument (the anonymous function) is executed. The clearTimeout() inside the .mouseenter() method does what its name suggests: it clears the timeout. If the user mouses out of the nav area but then mouses back in before the 1000 milliseconds are up, the timer is stopped and the function will not be executed.
Note: The mouseenter(fn) and mouseleave(fn) shorthand methods are available as of jQuery 1.3. If you're still using jQuery 1.2.6, you can use .bind('mouseenter', fn) and .bind('mouseleave', fn) instead. Or, with just about any version of jQuery, you can use .hover(fn, fn).
There are many ways to do this sort of thing. Just tweak the CSS or change the animation for a completely different experience.
You might also like


Tags
accordion accordion menu animation navigation animation navigation menu carousel checkbox inputs css3 css3 menu css3 navigation date picker dialog drag drop drop down menu drop down navigation menu elastic navigation form form validation gallery glide navigation horizontal navigation menu hover effect image gallery image hover image lightbox image scroller image slideshow multi-level navigation menus rating select dependent select list slide image slider menu stylish form table tabs text effect text scroller tooltips tree menu vertical navigation menu