 Subscribe
 Follow Us
jQuery and CSS3 Simple Tooltip
 13 years ago
 53794
53794 11476
11476

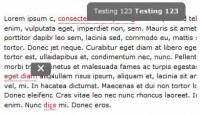
There are a lot of tooltip plugins out there, but not many of them explain what exactly goes on in the logic of a tooltip. I would like to share how I’ve created mine today, and am also open to any critiques and suggestions for those jQuery ninjas out there. Lets take a look.
The Markup – HTML
I wanted to keep the markup as simple as possible but at the same time flexible enough to accommodate various scenarios you would run into. The main link will have the class name of “tip_trigger” to initiate the tooltip, and a class of “tip” to hold the tooltip content within.
<a href="#" class="tip_trigger">Your Link Key Word <span class="tip">This will show up in the tooltip</span></a>
The Styles – CSS
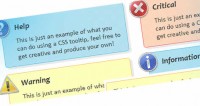
The styling is incredibly simple, and I would like to encourage you to get creative with this for your own projects. The tooltip is hidden by default, then triggered by jQuery to show it on hover. We give it an absolute position and a z-index of 1000 to make sure it stays at the top layer of your elements.
.tip {
    color: #fff;
    background:#1d1d1d;
    display:none; /*--Hides by default--*/
    padding:10px;
    position:absolute;    z-index:1000;
    -webkit-border-radius: 3px;
    -moz-border-radius: 3px;
    border-radius: 3px;
}
The Magic – jQuery
For those who are not familiar with jQuery, do check out their site first and get an overview of how it works. I’ve shared a few tricks that I have picked up along the way, you can check those out as well.
Initial Step – Call the jQuery file
You can choose to download the file from the jQuery site, or you can use this one hosted on Google.
<script type="text/javascript" src="http://ajax.googleapis.com/ajax/libs/jquery/1.4.2/jquery.js"></script>
Directly after the line where you called your jQuery, start a new <script> tag and start your code by using the $(document).ready event. This allows your jQuery code to run the instant the DOM is ready to be manipulated.
$(document).ready(function() {
    //Tooltips
    $(".tip_trigger").hover(function(){
        tip = $(this).find('.tip');
        tip.show(); //Show tooltip
    }, function() {
        tip.hide(); //Hide tooltip
    }).mousemove(function(e) {
        var mousex = e.pageX   20; //Get X coodrinates
        var mousey = e.pageY   20; //Get Y coordinates
        var tipWidth = tip.width(); //Find width of tooltip
        var tipHeight = tip.height(); //Find height of tooltip

        //Distance of element from the right edge of viewport
        var tipVisX = $(window).width() - (mousex   tipWidth);
        //Distance of element from the bottom of viewport
        var tipVisY = $(window).height() - (mousey   tipHeight);

        if ( tipVisX < 20 ) { //If tooltip exceeds the X coordinate of viewport
            mousex = e.pageX - tipWidth - 20;
        } if ( tipVisY < 20 ) { //If tooltip exceeds the Y coordinate of viewport
            mousey = e.pageY - tipHeight - 20;
        }
        //Absolute position the tooltip according to mouse position
        tip.css({  top: mousey, left: mousex });
    });
});
The Logic
- Cache location of
.tipselector
Set variabletipand cache the location of$(this).find('.tip'). This cached location will avoid multiple dom traversals. - Hover In and Hover Out
When hovering over the trigger, show the.tip,
on hover out hide the.tip - Mouse Over
When the mouse enters the trigger, start tracking the X and Y coordinates of your mouse using thee.pageXande.pageY. Note we add 20px to give it some breathing room from the pointer to the tooltip. - Set Variables
We also take in consideration for the case when the tooltip exceeds the X and Y coordinates of the viewport. When this happens we want to flip the position of the tooltip to the other side. To get the values of this new flipped position, we must get the height and width of our tooltip (tipWidthandtipHeight). To detect when the tooltip has exceeded the viewport, we must subtract the X and Y coordinate (the coordinates are added with the width and height of the tooltip) from the viewport width and height. - If Tooltip Exceeds Horizontal View
If the tooltip exceeds the horizontal view of the viewport, we flip the tooltip to the left side of the mouse. We calculate this by subtracting the tooltip width by the X coordinate of the mouse. - If Tooltip Exceeds Vertical View
If the tooltip exceeds the vertical view of the viewport, we flip the tooltip to the top of the mouse. We calculate this by subtracting the tooltip height by the Y coordinate of the mouse. - By Default…
If the tooltip does not exceed the vertical/horizontal view of the viewport (default), we position the tooltip on the bottom right of the mouse. CSS is injected to adjust the left and top positioning to follow the mouse.
Things to Keep Note of:
You will see there are two events being chained in this function. The .hover() and .mouseover(), take a look at the documentation for both if you are not familiar with the differences. You will also notice the if then else statement of tipVisX < 20 and tipVisY < 20. The 20px is used to take in consideration of the 10px (top + bottom / left + right) padding on the tooltip.
You might also like


Tags
accordion accordion menu animation navigation animation navigation menu carousel checkbox inputs css3 css3 menu css3 navigation date picker dialog drag drop drop down menu drop down navigation menu elastic navigation form form validation gallery glide navigation horizontal navigation menu hover effect image gallery image hover image lightbox image scroller image slideshow multi-level navigation menus rating select dependent select list slide image slider menu stylish form table tabs text effect text scroller tooltips tree menu vertical navigation menu