 Subscribe
 Follow Us
Mootools Elegant Menu Fly-out
 13 years ago
 9975
9975 1910
1910
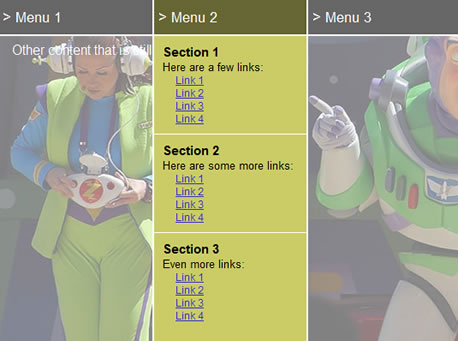
It’s a more elegant solution than regular fly-outs,Here is my version in JavaScript built with Mootools. Follow along as I describe the HTML, CSS, and JavaScript.
[Update: You can now try out and use the plugin version (MooTools | jQuery) of this tutorial if you want the effect without the work.]
The HTML
<div id="menu">
<ul>
<li class="first">
<h2><a href="#">> Menu 1</a></h2>
<ul>
<li class="first">
<h3>Section 1</h3>
<p>Here are a few links:</p>
<ul>
<li><a href="#">Link 1</a></li>
<li><a href="#">Link 2</a></li>
<li><a href="#">Link 3</a></li>
<li><a href="#">Link 4</a></li>
</ul>
</li>
<li>
<h3>Section 2</h3>
<p>Here are some more links:</p>
<ul>
<li><a href="#">Link 1</a></li>
<li><a href="#">Link 2</a></li>
<li><a href="#">Link 3</a></li>
<li><a href="#">Link 4</a></li>
</ul>
</li>
<li>
<h3>Section 3</h3>
<p>Even more links:</p>
<ul>
<li><a href="#">Link 1</a></li>
<li><a href="#">Link 2</a></li>
<li><a href="#">Link 3</a></li>
<li><a href="#">Link 4</a></li>
</ul>
</li>
</ul>
</li>
...
</ul>
<div id="menu_content">
<p>Other content that is still <a href="#">clickable</a>.</p>
</div>
</div>
The structure is a little more complex than in previous examples. Essentially, we have three nested lists. The first list contains each menu section. The second list contains the submenu and it’s sections. The third list contains links that will be the actual navigation. Finally, there is a div that contains content that will be visible when no link is hovered over.
The CSS
* {
  margin:0;
  padding:0;
}
#menu {
  width:720px;
  height:400px;
  overflow:hidden;
  margin:10px;
}
#menu ul {
  position:absolute;
  z-index:99;
}
#menu ul li {
  list-style:none;
  width:180px;
  float:left;
}
#menu ul li.first {
  border:0;
}
#menu ul li ul {
  overflow:hidden;
  width:178px;
  background-color:#cc6;
  border:solid #fff;
  border-width:0 2px;
  opacity: 0.75;
  -moz-opacity: 0.75;
  filter: alpha(opacity=75);
}
#menu ul li.first ul {
  width:180px;
  border-left:0;
}
#menu ul li ul li {
  padding:10px;
  border-top:solid 1px #fff;
  font-size:0.8em;
  font-family:Arial, sans-serif;
}
#menu ul li ul li.first {
  border:0;
}
#menu ul li ul li h3 {
  font-size:1.2em;
}
#menu ul li ul li ul {
  position:relative;
  border:0;
}
#menu ul li ul li ul li {
  font-size:0.9em;
  padding:0 0 0 15px;
  line-height:1.3em;
  border:0;
  background:url(bullet.gif) no-repeat left center;
}
#menu ul li h2 a {
  display:block;
  padding:10px 5px;
  font-family:Arial, sans-serif;
  text-decoration:none;
  font-size:0.7em;
  font-weight:normal;
  color:#fff;
  background-color:#666;
  border:solid 2px #fff;
  border-width:0 0 2px 2px;
}
#menu ul li.first h2 a {
  border-left:none;
}
#menu ul li.hover h2 a {
  background-color:#663;
}
#menu_content {
  background: url(menu.jpg) no-repeat center;
  height:100%;
  padding:3em 1em 1em 1em;
  color:#fff;
}
The CSS is also a bit complex because we have so many lists to style. What’s important is setting the display property of the first list to absolute so its children will drop over the div at the bottom. The z-index has to be set to a high number to account for a bug in Safari 3. Also, the image that you see is the background image of the last div #menu_content. Notice the opacity settings in #menu ul li ul. This ensures that the background image will at least be somewhat visible if JavaScript is disabled.
The JavaScript
var Menu = {
  start: function () {
    var menu = $('menu');
    var img_opacity = new Fx.Style('menu_content', 'opacity', {'wait': false, 'duration': 400});
    menu.getFirst().addEvents({
      'mouseenter': function () {
        img_opacity.start(0.5);
      },
      'mouseleave': function () {
        img_opacity.start(1);
      }
    });
    menu.getFirst().getChildren().each(function (el) {
      var second_list = el.getElement('ul');
      second_list.setStyles({
        'opacity': 0,
        'height': menu.getStyle('height').toInt() - menu.getFirst().offsetHeight
      });
      var fx = second_list.effect('opacity', {'wait': false, 'duration': 200});
      el.addEvents({
        'mouseenter': function () {
          fx.start(1);
          this.addClass('hover');
        },
        'mouseleave': function () {
          fx.start(0);
          this.removeClass('hover');
        }
      });
    });
  }
};
window.addEvent('domready', Menu.start);
Pretty simple in comparison to the rest, eh? All we do here is make an opacity effect for the div with the background image and set mouseenter and mouseleave events on the main list that trigger the effect. (I did it this way because I didn’t like how the image would fade in and out again when moving from one menu item to another.) Then we iterate through the list items of the first list and get all the second lists, set their opacity to 0 and height to extend to the bottom of the container, and create opacity effects that will be triggered on the mouseenter/mouseleave events of their parent li elements. The hover class is also added to the li element so it still looks selected when the mouse is moved into the fly-out submenu. Finally, add the start function to the domready event of the window that Mootools supplies us with.
Modifications
When changing the width of the container, each individual menu section’s width has to be calculated manually and must account for any margin, padding, or border widths. It does take a little tweaking to get everything to line up perfectly.
You might also like


Tags
accordion accordion menu animation navigation animation navigation menu carousel checkbox inputs css3 css3 menu css3 navigation date picker dialog drag drop drop down menu drop down navigation menu elastic navigation form form validation gallery glide navigation horizontal navigation menu hover effect image gallery image hover image lightbox image scroller image slideshow multi-level navigation menus rating select dependent select list slide image slider menu stylish form table tabs text effect text scroller tooltips tree menu vertical navigation menu