 Subscribe
 Follow Us
jQuery Like Google’s Christmas Doodle
 13 years ago
 13684
13684 2056
2056
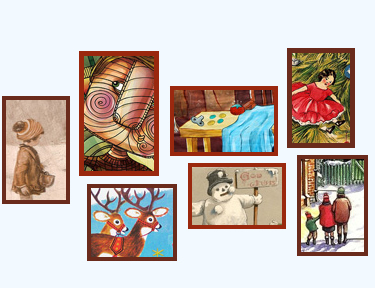
This holiday season, Google once again lifted up the Christmas spirits of those, who visited their homepage, with their animated logo, or doodle, as they call it. Now, with the holiday behind our back, we can put the calories from that lavish diner into good use, and try to get in shape for the following week. So lets try to recreate Google’s animated logo with the help of jQuery and a bit of CSS!
HTML
First, the markup. As most of the HTML is generated by jQuery, we only need to specify a holder div. This is what our page looks like:
<!DOCTYPE html>

<html>
<head>
<meta http-equiv="Content-Type" content="text/html; charset=utf-8" />
<title>Making Google's Christmas Doodle with jQuery | Tutorialzine Demo</title>

<link rel="stylesheet" type="text/css" href="css/styles.css" />

</head>
<body>

<div id="page"></div>

<script src="http://ajax.googleapis.com/ajax/libs/jquery/1.4.4/jquery.min.js"></script>
<script src="js/script.js"></script>

</body>
</html>
Stylehseets go to the top, script files to the bottom. The #page div is going to hold the generated markup of the doodle. You can see a generated example in the fragment below:
<a href="#" class="pic" style="top: 100px; left: 30px; width: 60px; height: 100px;
margin-top: 0px; margin-left: 0px; z-index: 0;">
 <img style="display:block;left:-10px;top:-30px;" src="img/1.jpg" />
</a>
<!-- More items -->
The top, left, width and height properties are passed to jQuery in the document.ready event. They are included as style attributes to the generated pic anchor. The a element also contains the image, which is partially hidden with oveflow:hidden. When we move the cursor above the .pic, it expands and reveals the rest of the image. This sounds simple, but this approach has a number of caveats that are not obvious at first:
- We cannot bind events in the usual way. When an image expands, it will cover the neighboring pictures and make them unreachable, which would be a major inconvenience. If you think about it in Google’s scale, this would mean a lot of unhappy people;
- The image has to appear fixed in one place during the duration of the animation. This means that we have to update its offset (by using the margin properties) on every step of the anchor’s animation. This would require animating two distinct elements at the same time with perfect synchronization, otherwise the images would jitter.
CSS
The CSS code is minimal, as we only need to style the #page div and the .pic anchors.
css/styles.css
#page{
 width:680px;
 height:300px;
 margin:60px auto 80px;
 position:relative;
}

.pic{
 position:absolute;
 overflow:hidden;
 border:4px solid #99280e;
 text-decoration:none;
 z-index:0;
}

.pic img{
 position:absolute;
 border:none;
}

.pic:nth-child(2n+1){
 border-color:#6A2B1C;
}

.pic:nth-child(3n+2){
 border-width:5px;
}
I am using the nth-child CSS3 selector to target specific elements and to apply darker and thicker borders. As this is mainly for presentational purposes, the script would still function correctly in older browsers with no CSS3 support.
jQuery
To make the code better organized (and shorter), we will create a JavaScript class for the expanding images, and create an object of this class for each one, while passing the width, height, source and other properties as parameters.
Lets start with the class definition:
js/script.js – Part 1
function pic(options){

 // All the properties of the options object
 // are copied to the current pic:

 $.extend(this,options);

 // Creating the markup of the pic,
 // and storing it in the elem property:

 this.elem = $('<a>',{
  className: 'pic',
  href: this.href,
  css : {
   top : this.top,
   left : this.left,
   width: this.width,
   height: this.height
  }
 });

 var borderWidth = 5;

 // The bottom and right properties are not passed
 // as arguments, so we need to calculate them.

 this.bottom = this.top+this.height+2*borderWidth;
 this.right = this.left+this.width+2*borderWidth;

 this.image = $('<img>',{
  css:{
   left : -this.img.offsetLeft,
   top : -this.img.offsetTop
  }
 });

 var self = this;

 // Appending the image to the body so we can get
 // its dimensions. After we do this, we remove it
 // and append it to the markup stored in this.elem:

 this.image.hide().appendTo('body').load(function(){

  self.img.width = self.image.width();
  self.img.height = self.image.height();
  self.elem.append(self.image.show());

 }).attr('src',this.img.src);

}
The pic function above is the constructor for our class. As you will see in a few moments, we are going to create a new object of this class for every expandable image on the page. When called, it creates the the markup you saw in the first step, and stores it in the this.elem property as a jQuery object. This means that we can use the elem property as a regular jQuery object, along with all the method the library gives us.
js/script.js – Part 2
// The prototype holds the class methods,
 // that are common for all objects.

 pic.prototype = {
  open : function(){
   if(this.opened){
    return false;
   }

   this.opened = true;

   // Firing our own expand method with a percentage of 100:
   this.expand(100);
  },
  close : function(){
   if(!this.opened && !this.focused){
    return false;
   }

   this.opened = this.focused = false;
   this.expand(0);
  },
  focus : function(){
   if(this.focused || this.opened){
    return false;
   }

   this.focused = true;

   //Expanding to 30%:
   this.expand(30);
  },

  near : function(x,y){
   // Checking whether the passed x and y coordinates are near the current image:
   return (x > this.left-15 && x < this.right+15 && y > this.top-15 && y < this.bottom+15);
  },

  over : function(x,y){
   // The same, but returning true only when directly above the image:
   return (x > this.left && x < this.right && y > this.top && y < this.bottom);
  },

  expand : function(animPercent){
   if(!this.animateObj){
    this.animateObj = {count:0};
   }

   // We use jQuery's animate method to
   // change the count property of the object:

   $(this.animateObj).stop().animate({
    count:animPercent
   },{
    duration:150,

    // The step funciton is executed on every animation frame.
    // With jQuery's proxy we pass the "this" of the function:
    step:$.proxy(this.stepAnimation,this)
   });
  },

  stepAnimation : function(p,fx){

   // P holds the current value of the count property,
   // between 0 and 100. Below we are turning it into percentage.

   p = p/100;

   // Changing the size and position of the image holder:

   this.elem.css({
    width : (this.img.width - this.width)*p + this.width ,
    height : (this.img.height - this.height)*p + this.height,
    marginTop : -this.img.offsetTop*p,
    marginLeft: -this.img.offsetLeft*p,
    zIndex: 100*p
   });

   // Moving the image so it appears as if fixed:

   this.image.css({
    marginLeft : p*this.img.offsetLeft,
    marginTop : p*this.img.offsetTop
   });
  }
 };
The prototype property holds the common methods that are used by all pic objects. open, close and focus are wrappers around the expand method, also defined in the prototype. This method takes a percentage as its only parameter, and expands the pic to the specified size (100 percent corresponds to the size of the completely shown image).
Take a closer look at jQuery’s animate method on line 52. Instead of calling it on a DOM element, we are using it to increment the count property of a plain JavaScript object, while executing the animation ourselves in the step function lower down. This way we are leaving it to jQuery to handle the timing, easing, queuing, and stopping the animation, and only telling us when to update the CSS properties of the pics. This solves problem with animating multiple elements at once.
As mentioned in the beginning we cannot bind events to the expandable pics. For this, we have two more interesting methods – near and over. These take the x/y coordinates of the mouse pointer and return a boolean expression indicating whether the mouse is near/over the current image. You will see how this is used below.
js/script.js – Part 3
$(document).ready(function(){

  var page = $('#page');

  // Creating the expanding images:

  var picArr = [
   new pic({
    top : 100, left : 30, width : 60,height : 100, href:'#',
    img : { src : 'img/1.jpg', offsetTop : 50, offsetLeft: 10}
   }),
   new pic({
    top : 55, left : 107, width : 70,height : 115, href:'#',
    img : { src : 'img/2.jpg', offsetTop : 30, offsetLeft: 46}
   }),

   /* More pics here */

  ];

  // Appending the images to the #page div:

  $.each(picArr,function(){
   page.append(this.elem);
  });

  // Setting up an event listener for the window.load event.
  // window.load is executed after all the images have been loaded.

  $(window).load(function(){

   page.mousemove(function(e){

    var left = (e.pageX - page.offset().left),
     top = (e.pageY - page.offset().top),
     pic = null;

    // On each mouse movement, loop through the pics
    // and check whether the cursor is above any of them.

    for(var i = 0;i < picArr.length;i++){
     pic = picArr[i];

     if(pic.near(left,top)){

      if(pic.over(left,top)){
       pic.open();
      }
      else pic.focus();
     }
     else pic.close();
    }

   }).mouseleave(function(){

    // When the mose leaves the #page div,
    // foce a close on all the images.

    for(var i = 0;i < picArr.length;i++){
     picArr[i].close();
    }

   });
  });
 });
In the code above we are filling the picArr array with pic objects, after which that we append them to the #page div. Later, in the window.load event, we bind a listener for the mousemove event, and check whether the current mouse position is above any of the images. If it is less than 15 pixels from an image, we focus it, and if it is directly above it, we run the open method which shows the full image.
Our Google-like Christmas Logo is complete!
You might also like


Tags
accordion accordion menu animation navigation animation navigation menu carousel checkbox inputs css3 css3 menu css3 navigation date picker dialog drag drop drop down menu drop down navigation menu elastic navigation form form validation gallery glide navigation horizontal navigation menu hover effect image gallery image hover image lightbox image scroller image slideshow multi-level navigation menus rating select dependent select list slide image slider menu stylish form table tabs text effect text scroller tooltips tree menu vertical navigation menu