 Subscribe
 Follow Us
Simple jQuery Image hover/fade effect
 13 years ago
 20875
20875 3298
3298
This is very useful simple Image hover/fade effect。
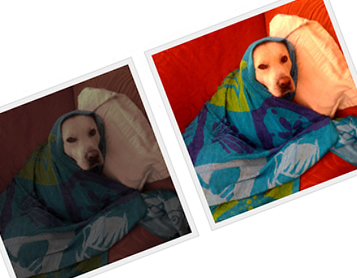
For this tutorial,you will need to make two images, one which is the normal state (ie. the image which will display on the page when the mouse isn’t hovered) and also a hover over state for when the mouse is. Here are the two images I am going to use (of my funky dog charlie)…
The img_off.jpg is what a user will see when the page is loaded. This image has been dimmed, but you can do whatever you want with it, for example, you could desaturate the image to have a grayscale to colour effect. The img_on.jpg is the original, as you can see both are 280px by 280px in size.
Right now we have these sorted, we will look at the code. First thing you need to do is display your image. The code below is a simple list containing one item. Inside this item, there is an image tag, which will be used to display the image in ‘normal state’. I have a hyperlink around the image tags, you will need to replace the hash (#) with the URL that you want the image to click through to. For this demo I have labelled the UL with a class of .img_list and the list item as .image_one. Finally, you will also see below that an empty span with the class of .rollover has been inserted between the A tags. This span essential, because this is what the jQuery uses to show the second ‘hover over’ image.
<ul class="img_list">
<li class="image_one">
<a href="#"><img src="images/img_off.jpg" alt="" width="280" height="280" /></a>
</li>
</ul>
Next, open your stylesheet and add the following…
ul.img_list {
    display:inline;
    float:left;
    height:280px;
    list-style-image:none;
    list-style-position:outside;
    list-style-type:none;
}

li.image_one a {
    display:block;
    width:280px;
    height:280px;
    position:relative;
}

li.image_one a .rollover {
    display:block;
    position:absolute;
    top:0;
    left:0;
    width:280px;
    height:280px;
    background:url(images/img_on.jpg);
}
The CSS above sets the ‘hover over’ image as the background image on the span contained within the list item .image_one. This span is then floated directly on top of the ‘normal state’ image using absolute positioning. So if you load up your page now, you will see that you have a list item that contains two images, but you will only be able to see the image img_on.jpg.
Now we have these two images in place, we will use jQuery to do the effect. The first thing you must do and this is super important, is to include jQuery between your header tags! Without this the effect won’t work. If you are new to jQuery, then it is the same as including any JS file on your page, just use the following line of code…
<script src="js/jquery-1.3.2.min.js" type="text/javascript></pre>
</p>
<p>The next block of code also needs to go between your header tags, and is  what does the effect when the mouse is hovered over the image. We need  to start of with the following line…
<pre class="brush: jscript;fontsize: 100; first-line: 1; ">$(document).ready(function(){
All this does is checks to see the page is loaded before performing the lines of code that come below it. Next you will need to add the following…
$(".rollover").css({'opacity':'0'});
This is fairly obvious as to what it does, it assigns anything with the class rollover to have an opacity of 0%. Basically it hides the element with that class, so in this case, it will hide the span inside the list item. This will mean that when the page is loaded, the user will be left with the dimmed image, which is how we want it to be.
Next we need the following code, which will check for when the mouse cursor is hovering over our image…
$('.img_list a').hover(
function() {
    $(this).find('.rollover').stop().fadeTo(500, 1);
},
function() {
    $(this).find('.rollover').stop().fadeTo(500, 0);
});
The functions above will only action when the mouse is hovered over any hyperlink within any item that has the class img_list assigned to them.
The first function deals with the over function, ie, when the mouse moves over the image, and once this occurs, the span which has previously been set to 0% opacity, is faded back in to show on screen. Now when the mouse moves off the images, the second function occurs, which sets this same span back to 0% opacity.
Here is the full block of code you should have in your header…
<script type="text/javascript">
$(document).ready(function(){
//Set opacity on each span to 0%
$(".rollover").css({'opacity':'0'});

$('.img_list a').hover(
    function() {
        $(this).find('.rollover').stop().fadeTo(500, 1);
    },
    function() {
        $(this).find('.rollover').stop().fadeTo(500, 0);
    }
)
});
</script>
You should now have a working fade effect when you hover over your image. You can customize the fade effect to be quicker or slower as you wish and you can also set to what opacity the image fading in shows at. It is really easy to change the settings on the fade, I will briefly show you below…
fadeTo(SPEED, OPACITY);
The SPEED setting can be either a string or a number. String values are predefined and can be either “slow”, “normal”, or “fast”. Numerical values are displayed in number of milliseconds to run the animation (e.g. 1000).
The OPACITY value has to be a number between 0 and 1. You can also use decimal point, for example, 0.50 would be the same as 50% opacity. Below are two links which will explain the Hover and Fade effects in a bit more detail…
Thats the end of the Tutorial.hope you like it
You might also like


Tags
accordion accordion menu animation navigation animation navigation menu carousel checkbox inputs css3 css3 menu css3 navigation date picker dialog drag drop drop down menu drop down navigation menu elastic navigation form form validation gallery glide navigation horizontal navigation menu hover effect image gallery image hover image lightbox image scroller image slideshow multi-level navigation menus rating select dependent select list slide image slider menu stylish form table tabs text effect text scroller tooltips tree menu vertical navigation menu