 Subscribe
 Follow Us
CSS Styled, Custom Retweet Buttons with jQuery
 12 years ago
 7306
7306 1759
1759
Retweet buttons are all over the internet now. They are a handy for giving visitors a quick way to share a post.
These all work great and are easily recognizable. Sometimes we have wanted to add a button that matches a site a little better. The topsy button has some customization, but not much. It just allows you to change color schemes.
Ideally, it would be possible to put together completely custom markup and styling for a button. That is the purpose of this plugin. It allows you to build your own button and style it however you like from the ground up. It is a simple jQuery plugin that can be called this easy:
$('#retweet').customRetweet();
It works by using two really handy APIs. It goes to topsy to get the tweet count of the url and then it goes to bit.ly to get a shortened link. It then puts together a bunch of variables you can use to build a custom markup and a custom retweet message. For example:
$('#retweet').customRetweet({
    template: '<a href="{{retweetURL}}">Retweet this Post!</a>',
    retweetTemplate: 'RT @{{account}} - {{title}} - {{shortURL}}'
});
This code would put the completed template code into the element with "retweet" as an id. When the created link was clicked, it would provide twitter with the text from the retweetTemplate variable.
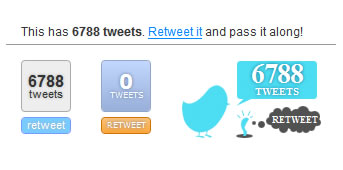
Unlike the standard buttons I link to above, this markup exists in the DOM so it is possible to style it directly with CSS. This makes essentially any look possible for these buttons. In the demo, you can see three simple styles designed by Lenny at Hey Monkey Design. (The last using a bird drawn by Pasquale D'Silva) These are free to be used on your site or adapted for your needs.
To explain how to use the plugin, I'll go into depth on how I made the second one.
Using the Plugin
The first thing to do is to set up a container for the button. This makes it easy to place and target when styling:
<div class="retweetbutton"></div>
Next, we'll need to set up the plugin so that we can have our desired markup added to the container. This is really easy to do -- just write the markup and sprinkle in the information you want using simple template tags:
$('.retweetbutton').customRetweet({
	template: '<a class="tweets" href="{{allTweetsURL}}">{{count}} tweets</a><a href="{{retweetURL}}" class="retweet">retweet</a>'
});
This javascript will go and fetch the information that is in the double-curly-braced tags and insert it into the markup. This means any markup can be used and the information can just be sprinkled in.
Finally, the last step is to set up the CSS. For this button I've decided to take advantage of some modern CSS and build it entirely without images.
.retweetbutton {
	width: 50px;
	text-align: center;
	text-transform: uppercase;
	font: 8px verdana,sans-serif;
}
	.retweetbutton a {
		position: relative;
		display: block;
		border-radius: 4px;
		-moz-border-radius: 4px;
		-webkit-border-radius: 4px;
		text-shadow: 0px 0px 3px #667ba2;
		-moz-text-shadow: 0px 0px 3px #667ba2;
		-webkit-text-shadow: 0px 0px 3px #667ba2;
		text-decoration: none;
		color: #fff;
	}
	.retweetbutton .tweets {
		border: 1px solid #92a6ca;
		background: #bed4fb;
		filter: progid:DXImageTransform.Microsoft.gradient(startColorstr='#c2d8fe', endColorstr='#98b0da');
		background: -webkit-gradient(linear, left top, left bottom, from(#c2d8fe), to(#98b0da));
		background: -moz-linear-gradient(top,  #c2d8fe,  #98b0da);
		height: 50px;
		line-height: 70px;
	}
		.retweetbutton .tweets strong{
			position: absolute;
			top: -15px;
			left: 0;
			width: 48px;
			font-size: 20px;
		}
	.retweetbutton .retweet {
		display: block;
		margin: 5px 0 0 0;
		border: 1px solid #d07300;
		background: #fbb45a;
		filter: progid:DXImageTransform.Microsoft.gradient(startColorstr='#fcc37c', endColorstr='#fba63b');
		background: -webkit-gradient(linear, left top, left bottom, from(#fcc37c), to(#fba63b));
		background: -moz-linear-gradient(top,  #fcc37c,  #fba63b);
		height: 15px;
		line-height: 16px;
	}
	.retweetbutton .retweet:hover {
		background: #fff;
		color: #bb6700;
		text-shadow: 0px 0px 2px #aaa;
		-moz-text-shadow: 0px 0px 2px #aaa;
		-webkit-text-shadow: 0px 0px 2px #aaa;
	}
Once this code is set -- the button will begin working. You'll notice that in the JS I only specified the template option.
Plugin Options
Many other options can be used with the plugin, but not all of them are required as they have sensible defaults. Here is a complete list of options available when setting this up:
settings = $.extend({
	// topsy settings
	topsyAPI: 'http://otter.topsy.com/stats.js?url=',
	// bit.ly settings
	shorten: true,
	bitlyLogin: 'customretweet',
	bitlyKey: 'R_be029e1ffd35d52dd502e1495752f0c2',
	bitlyAPI: 'http://api.bit.ly/v3/shorten?format=json&',
	// template values
	url: location.href,
	title: document.title,
	account: 'topsy',
	// templates
	retweetTemplate: 'RT @{{account}} | {{title}} | {{shortURL}}',
	template: 'Number of Tweets: {{count}} | <a href="#">All Tweets</a> | <a href="#">Retweet</a>'
}, settings);
The most important options are the template values and the templates. The template values are options you can send to the templates. By default it will use the page url and page title and retweet from the 'topsy' twitter account. The templates are the markup that the plugin will use to build the button and default retweet message.
The less important settings are the API values. By default this uses the topsy and bitly APIs. Currently no other APIs are supported, but this information is abstracted anyway. If you would like to use a different bit.ly API account it can be done through these settings.
The article source:http://www.gethifi.com/blog/a-jquery-plugin-for-custom-css-styled-retweet-buttons
You might also like


Tags
accordion accordion menu animation navigation animation navigation menu carousel checkbox inputs css3 css3 menu css3 navigation date picker dialog drag drop drop down menu drop down navigation menu elastic navigation form form validation gallery glide navigation horizontal navigation menu hover effect image gallery image hover image lightbox image scroller image slideshow multi-level navigation menus rating select dependent select list slide image slider menu stylish form table tabs text effect text scroller tooltips tree menu vertical navigation menu