 Subscribe
 Follow Us
Navigate into extralarge images(jQuery)
 13 years ago
  12582
12582  2252
2252
 n/a
n/a
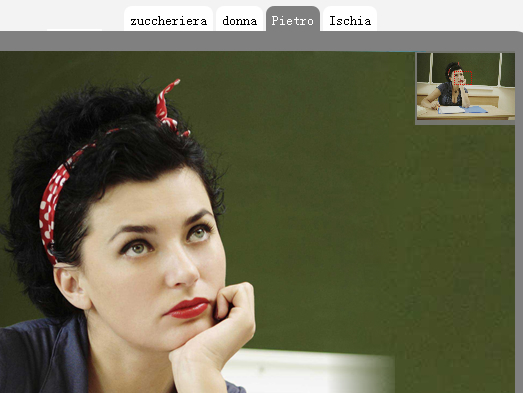
A photogallery for extralarg images with navigator.
You can drag your extralarge image in the display by the navigator or the image itself.
Enjoy yourself into images.
here is the js call:
$(function(){
$("#navArea").imageNavigator( {
areaWidth: 700,
areaHeight:500,
draggerStyle:"1px dotted red",
navOpacity:.8
})
})
here is the code for each container:
<div id="navArea">
<div imageUrl="DSC00844.JPG" navPosition="BR" navWidth="100" style="display:none;">
<span>zuccheriera</span>
<div><STRONG>description1</STRONG></div>
</div>
</div>
in the header:
<script type="text/javascript" src="inc/ui.core.min.js"></script>
<script type="text/javascript" src="inc/ui.sortable.min.js"></script>
<script type="text/javascript" src="inc/jquery.metadata.js"></script>
<script type="text/javascript" src="inc/mbImgNav.js"></script>
<script type="text/javascript">
    $(function(){
      $("#navArea").imageNavigator({
        areaWidth: 700,
        areaHeight:500,
        draggerStyle:"1px dotted red",
        navOpacity:.8
      });
  });
  </script>
in the body:
  <div id="navArea">
  <div style="display:none;"
   class="imagesContainer
        {imageUrl:'1.jpg', navPosition:'BR', navWidth: 100}">
   <span class="title">zuccheriera</span>
   <div class="description"><b>description1</b></div>
   <div class="additionalContent"
   style='color:white; font-size:100px; top:0; width:1000px; height:1000px; text-align:left;'>
   this is an additional content div that is over the image and it moves with it!
   </div>
   </div>
  <div style="display:none;"
   class="imagesContainer
        {imageUrl:'2.jpg', navPosition:'TR', navWidth: 100, NavCoordinates:'1700,1700' }">
   <span class="title">donna</span>
   <div class="description"><b>description</b></div>
   </div>
  <div style="display:none;"
   class="imagesContainer
        {imageUrl:'3.jpg', navPosition:'TL', navWidth: 100, NavCoordinates:'52,32' }">
   <span class="title">Pietro</span>
   <div class="description"><b>description2</b></div>
   </div>
   <div style="display:none;"
   class="imagesContainer
        {imageUrl:'4.jpg', navPosition:'TR', navWidth: 200, NavCoordinates:'200,1000' }">
   <span class="title">Ischia</span>
   <div class="description"><b>description3</b></div>
   </div>
  </div>
Params:
areaWidth and areaHeight are the width and the height of the display;
draggerStyleis the style of the draggable rectangle on the thumb;
navOpacity is the alpha opacity of the thumb on the image.
Then, on each element, you set the url of the big image (imageUrl), the position of the thumb (navPosition : BL, BR, TL, TR) and the width of the navigator(navWidth);
there is a span with the title of the mage, and a div with the description.
You can navigate your image either dragging the big one or dragging the navigator into the thumbnail; if you want to see all the image in the display just doubleclick on the image or on the navigator; to restore the view doubleclick again.
That’s all; Enjoy yourself!
You might also like

Tags
accordion accordion menu animation navigation animation navigation menu carousel checkbox inputs css3 css3 menu css3 navigation date picker dialog drag drop drop down menu drop down navigation menu elastic navigation form form validation gallery glide navigation horizontal navigation menu hover effect image gallery image hover image lightbox image scroller image slideshow multi-level navigation menus rating select dependent select list slide image slider menu stylish form table tabs text effect text scroller tooltips tree menu vertical navigation menu