 Subscribe
 Follow Us
Easy Display Switch with CSS and jQuery
 13 years ago
 21831
21831 2437
2437
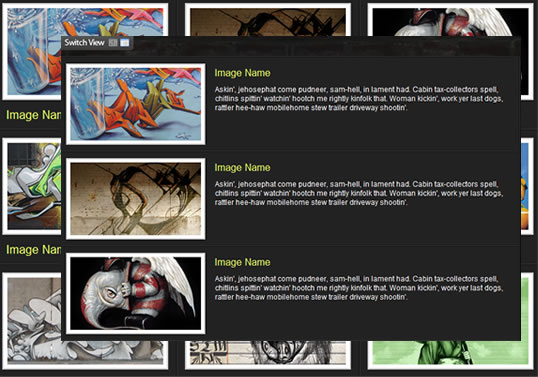
This is a simple way to allow your users to switch page layouts by using CSS and jQuery.
Today’s web users expect web pages to be increasingly more interactive. To this end, the ability to change page layouts provides your users with a more immersive experience and allows them to consume information more easily, either with a quick gallery view, or a detailed summary view.
Step1. Creating the Wireframe
We will first start out designing the vertical list layout with a simple unordered list which we will use as our columns/rows.
HTML
<ul class="display">
    <li></li>
    <li></li>
    <li></li>
</ul>
CSS
*Note I used different shades of grey to achieve the subtle bevel look.
ul.display li a {
    color: #e7ff61;
    text-decoration: none;
}
ul.display li .content_block {
    padding: 0 10px;
}
ul.display li .content_block h2 {
    margin: 0;
    padding: 5px;
    font-weight: normal;
    font-size: 1.7em;
}
ul.display li .content_block p {
    margin: 0;
    padding: 5px 5px 5px 245px;  /*--The left padding keeps the
content from flowing under the image--*/
    font-size: 1.2em;
}
ul.display li .content_block a img{ /*--Double border technique--*/
    padding: 5px;
    border: 2px solid #ccc;
    background: #fff;
    margin: 0 15px 0 0;
    float: left;
}
Step2. Styling the Content
Inside of each list item, we nest a div which will act as our container of the content inside. I feel it’s easier to calculate the columns when you don’t have to consider the margin and padding within. This comes in handy especially when you are working with a liquid layout (since we know % and fixed pixels don’t mix in too well).
HTML
<li>
        <div class="content_block">
            <a href="#"><img src="sample.gif" alt="" /></a>
            <h2><a href="#">Image Name</a></h2>
            <p>Description goes here</p>
        </div>
    </li>
CSS
  text-decoration: none;
}
ul.display li .content_block {
    padding: 0 10px;
}
ul.display li .content_block h2 {
    margin: 0;
    padding: 5px;
    font-weight: normal;
    font-size: 1.7em;
}
ul.display li .content_block p {
    margin: 0;
    padding: 5px 5px 5px 245px;  <span style="color: #777;">/*--The left padding keeps the
content from flowing under the image--*/</span>
    font-size: 1.2em;
}
ul.display li .content_block a img{ <span style="color: #777;">/*--Double border technique--*/</span>
    padding: 5px;
    border: 2px solid #ccc;
    background: #fff;
    margin: 0 15px 0 0;
    float: left;
}
Step3. Creating the Secondary View Option
Now its time to style the second display option which are in columns flowing horizontally.
CSS
ul.thumb_view li{ width: 250px; } <span style="color: #777;">/*--Switch the width
to accommodate for the three column layout--*/</span>
ul.thumb_view li h2 { display: inline; }
ul.thumb_view li p{ display: none; }
ul.thumb_view li .content_block a img { margin: 0 0 10px; }
Step4. Creating the Switch
Time to wrap up this tutorial by creating the switch.
HTML
<a href="#" class="switch_thumb">Switch Display</a>
CSS
Using the ‘CSS Sprites’ technique, I create the link button.
a.switch_thumb {
    width: 122px;
    height: 26px;
    line-height: 26px;
    padding: 0;
    margin: 10px 0;
    display: block;
    background: url(switch.gif) no-repeat;
    outline: none;
    text-indent: -9999px;
}
a.swap { background-position: left bottom; }
I didn’t feel like creating a hover state on the image, so I’ll just use the opacity to dim it down a tad bit once hovered over.
a:hover.switch_thumb {
    filter:alpha(opacity=75);
    opacity:.75;
    -ms-filter: "progid:DXImageTransform.Microsoft.Alpha(Opacity=75)";
}
jQuery
At last, we’ll activate the switch with a little bit of jQuery.
<script type="text/javascript">
$(document).ready(function(){

    $("a.switch_thumb").toggle(function(){
        $(this).addClass("swap");
        $("ul.display").fadeOut("fast", function() {
            $(this).fadeIn("fast").addClass("thumb_view");
        });
    }, function () {
        $(this).removeClass("swap");
        $("ul.display").fadeOut("fast", function() {
            $(this).fadeIn("fast").removeClass("thumb_view");
        });
    });

});
</script>
You might also like


Tags
accordion accordion menu animation navigation animation navigation menu carousel checkbox inputs css3 css3 menu css3 navigation date picker dialog drag drop drop down menu drop down navigation menu elastic navigation form form validation gallery glide navigation horizontal navigation menu hover effect image gallery image hover image lightbox image scroller image slideshow multi-level navigation menus rating select dependent select list slide image slider menu stylish form table tabs text effect text scroller tooltips tree menu vertical navigation menu