 Subscribe
 Follow Us
animated menu with Sprites and jQuery
 13 years ago
 7988
7988 1862
1862
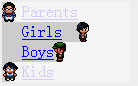
Sprites are widely used on big sites (Yahoo!, Google, Amazon and more) but rarely for “normal” projects. I think this is due to two questions that usually stop us when it comes to learn something new: “how difficult will be to learn this thing?” and “will I even use it?”. Well, I hope to help you with both questions by showing you how easy is to work with sprites/jQuery and how much this would help you to make a difference in your work, for instance by making a nice animated menu like this one:
Our goal
We want to build an animated menu based on sprites just like previous one. In particular, we will use animated elements to make a more attractive menu, but without using flash or another technology different from JavaScript (jQuery in particular), one image file (otherwise wouldn’t justify use ) and a calculator.
Simulating movement
t the sample menu we can see our tiny people running when you put the mouse pointer over their “action zone”. This is accomplished just like any animated image: switching from one image to another and repeating this cycle as long as our character must to run.
In this case we use 4 steps, each one with its respective image (actually we can use only 3 images since we need to repeat one of them during the cycle). Now, lets take this to the sprites world.
Locating an element over the sprite
Working with sprites means that we need to know where is every element related to our animation, but in terms of %.
To calculate this as an approximation, we need to know the image’s width and where our target starts. With this two numbers, we just need to apply simple math to get what we want.
Previous image is 183 pixels width and second step starts at pixel number 57. So, we should be using approximately 31.15% (57/183 = 0.3115) for every instance of second step (we will probably need to adjust this value a little).
By the way, take into account that you can use images as big as this one and even use some subsets (not recommended if you want to save bandwidth). I will leave this image that big so you can play with it.
Masking
Sprites is all about showing only what you need to show and this is done by masking or hiding what you don’t want to show. In other words, you need to know the size of every element in order to force it. In this case we can use a 13 x 20 pixels rectangle to show only one frame.
CSS + HTML
We can do the first part of our menu by using CSS+HTML and by “first part” I mean the static one. By using HTML we set the main structure, consisting of 3 div elements (one main container, one for masking and one for the animated element) and one a (hyperlink) element.
<div class="item">
        <div id="doctor" class="object"></div>
        <div id="doctormask" class="mask"></div>
        <a href="#">Parents</a>
</div>
<div class="item">
        <div id="girl" class="object"></div>
        <div id="girlmask" class="mask"></div>
        <a href="#">Geirls</a>
</div>
<div class="item">
        <div id="boy" class="object"></div>
        <div id="boymask" class="mask"></div>
        <a href="#">Boys</a>
</div>
<div class="item">
        <div id="kid" class="object"></div>
        <div id="kidmask" class="mask"></div>
        <a href="#">Kids</a>
</div>
CSS code let us set initial positions for every animated element and its respective mask. Also, each container is set according to our needs.
body {
        background:#eeeeee;
}

#parent {
        width:14px;
        height:20px;
        background:url(people.gif);
        background-position:0% 0%;
        border:none;
        position:absolute;
        z-index:10;
}

#parentmask {
        background:#ffffff;
        width:120px;
        height:20px;
        position:absolute;
        z-index:1;
        margin-left:8px;
}

#girl {
        width:16px;
        height:20px;
        background:url(people.gif);
        background-position:27.2% 0%;
        border:none;
        position:absolute;
        z-index:10;
}

#girlmask {
        background:#ffffff;
        width:120px;
        height:20px;
        position:absolute;
        z-index:1;
        margin-left:8px;
}

#boy {
        width:16px;
        height:20px;
        background:url(people.gif);
        background-position:53.8% 0%;
        border:none;
        position:absolute;
        z-index:10;
}

#boymask {
        background:#ffffff;
        width:120px;
        height:20px;
        position:absolute;
        z-index:1;
        margin-left:8px;
}

#kid {
        width:16px;
        height:20px;
        background:url(people.gif);
        background-position:79.9% 0%;
        border:none;
        position:absolute;
        z-index:10;
}

#kidmask {
        background:#ffffff;
        width:120px;
        height:20px;
        position:absolute;
        z-index:1;
        margin-left:8px;
}

.item {
        background:#cccccc;
        width:128px;
        height:20px;
}

.item a {
        margin-left:20px;
}
Lets take a look to the #boy element, which tell us that its size is 16×20 pixels, share its background image with the other elements (people.gif, otherwise there is no point to use sprites…) and that we want to show starts at 53.8% from the left side and at 0% starting at the top of the image. The same is valid for any other element.
As a result of this CSS+HTML code, we get something like this, which is nice, but pretty boring.
jQuery
First thing I did, was to create some control variables that allow me to map each element with its respective background position and to keep control of the animation process (lie! some variables were created as needed… but I’ll ignore this for educational purposes), and also a couple of utility functions.
var foot = [50,0,100,0];
var step = 12;
var sleeptime = 70;
var mapping = Array();
mapping["parent"] = { xr:20, xl:6.6, np:"0% 0%" };
mapping["girl"] = { xr:47.5, xl:33, np:"27.2% 0%" };
mapping["boy"] = { xr:74, xl:60.4, np:"53.8% 0%" };
mapping["kid"] = { xr:100, xl:87, np:"79.9% 0%" };

px = function(val){
        return String(val)+"px";
}

mpx = function(val){
        if(val == "auto")
                return 0;
        return Number(String(val).substring(0,String(val).length – 2));
}
Since we have all these figures horizontally aligned, we use “foot” as a common variable to set vertical position of each step while running. For instance, first step is at the middle of the image (50%) and second step is on top of the image (0%) moving from top to bottom.
“step” means that we will move our elements at a rate of 12 pixels and waiting 70 miliseconds (sleeptime). “px” and “mpx” are just to add or remove the string “px” of a given argument.
Now, the fun part: animating this menu, which is done by using the next code
$(document).ready(function(){

        $(".item").find(".mask").css("opacity","0.8");

        move = function(el,elmask){
                var newleft;
                if($(el).data("direction") == "R"){
                        if($(el).position().left >= $(el).parent().width()){
                                $(el).css("background-position", mapping[$(el).attr("id")].np);
                                $(el).data("isMoving",false);
                                return;
                        }
                        newleft = $(el).position().left + step;
                        newwidth = $(elmask).width() – step;
                        newwidth = (newwidth < 0)?0:newwidth;
                } else {
                        if($(el).position().left <= step){
                                $(el).css("background-position", mapping[$(el).attr("id")].np);
                                $(el).data("isMoving",false);
                                return;
                        }
                        newleft = $(el).position().left – step;
                        newwidth = $(elmask).width() + step;
                }
                if($(el).data("index") == 4)
                        $(el).data("index",0);
                var y = foot[($(el).data("index"))];
                $(el).data("index",($(el).data("index")+1))
                $(el).css("background-position",$(el).data("x")+"% "+y+"%").css("left",px(newleft));
                $(elmask).css("left",px(newleft)).css("width",px(newwidth));
                setTimeout(function(){ move(el,elmask); },sleeptime);
        }

        $(".item").each(function(){
                $(this).find(".object").data("isMoving",false);
        });

        $(".item").mouseenter(function(e){
                var obj = $(this).find(".object");
                eval($(this).find("a").attr("rel"))
                obj.data("x",mapping[obj.attr("id")].xr);
                obj.data("index",0);
                obj.data("direction","R");
                if(!obj.data("isMoving")){
                        obj.data("isMoving",true);
                        move(obj.get(0),$(this).find(".mask").get(0));
                }
        });

        $(".item").mouseleave(function(e){
                var obj = $(this).find(".object");
                eval($(this).find("a").attr("rel"))
                obj.data("x",mapping[obj.attr("id")].xl);
                obj.data("direction","L");
                if(!obj.data("isMoving")){
                        move(obj.get(0),$(this).find(".mask").get(0));
                }
        });
});
From top to bottom, we set each mask to have an opacity of 80% (0.8). Then we define the “move” function, which takes and element and its corresponding mask, and move then according to its information contained on jQuery “data” container.
Later, we set the “isMoving” to false for every element, since there is no initial movement.
“mouseenter” sets all context variables to indicate movement to the right and then calls “move” function. “mouseleave” do the opposite.
Note that there is two ways to stop movement: when direction has change and when an element reaches any boundary (starting or ending of the respective item element).
Done!
We are done!
You might also like


Tags
accordion accordion menu animation navigation animation navigation menu carousel checkbox inputs css3 css3 menu css3 navigation date picker dialog drag drop drop down menu drop down navigation menu elastic navigation form form validation gallery glide navigation horizontal navigation menu hover effect image gallery image hover image lightbox image scroller image slideshow multi-level navigation menus rating select dependent select list slide image slider menu stylish form table tabs text effect text scroller tooltips tree menu vertical navigation menu