 Subscribe
 Follow Us
dynamically highlighted columns pricing table
 13 years ago
 21032
21032 4481
4481
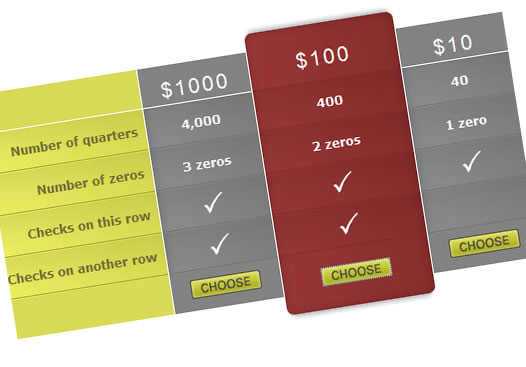
Like Crazy Egg's pricing table on their Pricing & Signup page. When you click on "Sign Up" for an option, that plan's column highlights, the other plans vanish, and a signup form takes their place. There is a number of impressive things happening within this small area. I wanted to try and recreate the behavior step by step, and share the power of combining CSS, JavaScript, and images in clever ways.
If you just clicked over to look at Crazy Egg's site, then clicked back, consider visiting there again when you're finished reading this tutorial. If you're as impressed with the way their site is put together as I am, you, or someone you know/work with, could probably benefit from Crazy Egg's amazing click tracking visualization tools. Their prices sure make it easy to get started, so give it a consideration while you're giving them traffic.
Getting Started
First I need a table, and I'll model my example off of Crazy Egg. I'll use a left column for the descriptions, a top row for headings, and a matrix of features in the body. We're going to make use of thead, tfoot, and tbody.
<table>
  <thead>
    <tr>
      <th>'s go here
    <tr>
  </thead>
  <tfoot>
    <tr>
      <td>'s go here
    </tr>
  </tfoot>
  <tbody>
    <tr>
      <td>'s go here
    </tr>
  </tbody>
</table>
Next Step: Add class
By default, all the table cells look alike. To establish that cells in each column are related, I need to add classes to all the <td> and <th> tags.
<table>
  <thead>
    <tr>
      <th class="desc">
      <th class="choiceA">
      <th class="choiceB">
      ...
    <tr>
  </thead>
  <tfoot>
    <tr>
      <td class="desc">
      <td class="choiceA">
      <td class="choiceB">
    </tr>
  </tfoot>
  <tbody>
    <tr>
      <td class="desc">
      <td class="choiceA">
      <td class="choiceB">
    </tr>
  </tbody>
</table>
Next Step: Establish what a selected state looks like
We'd like to indicate a selected column by adding class="on" to the appropriate cells. Since all cells already have a class name assigned, the on class name will added to the class attribute value with a space.
<table>
  ...
  <tbody>
  ...
    <tr>
      <td class="desc">
      <td class="choiceA on">
      <td class="choiceB">
    </tr>
   ...
  </tbody>
</table>
Next Step: Switching selected columns with JavaScript
When someone hits the "Choose" button in a particular column, we want that entire column to take on the selected state. We need a JavaScript for that.
In English, here's what we want to happen:
- When someone clicks "Choose" for choice A
- remove the class name of "on" from all other cells
- then, take every cell with the class for choice A
- and add " on" to it.
Here are the tools needed to do that:
- A javascript function called getElementsByClassName, which allows us to target elements based on their class value. (I'm using one written by Robert Nyman)
- A javascript function called addClassName (also via Robert Nyman, although the one I'm using he hasn't placed on his web site yet. This function will be used to add "on" as a class name to the selected columns.
- A javascript function called removeClassName, which is used to unselect cells by removing the "on" value from their class attributes (via Robert Nyman)
- A custom javascript function to tie the behavior together.
Attach the custom function to the "Choose" link's onclick event:
...
<tfoot>
  <tr>
    ...
    <td class="choiceA">
      <a href="#" onclick="activateThisColumn('choiceA');return false;">
        Choose
      </a>
    </td>
    <td class="choiceB">
      <a href="#" onclick="activateThisColumn('choiceB');return false;">
        Choose
      </a>
    </td>
    ...
  </tr>
</tfoot>
Next Step: Introducing Images
If we were just changing background colors, it wouldn't have nearly the same coolness as the Crazy Egg table, whose selected column seems to pop out, or extend beyond the boundaries of the table.
Next Step: Showing a form, hiding some table columns.
On Crazy Egg, when a column is selected, all the other columns disappear, the selected column moves to the left, and a form appears in the space to the right. The cancel button of the form then reshows all the other previously hidden columns.
First, I'll draw out the form that will exist outside the table.
The form will have to be absolutely positioned over table. So we'll introduce a container element to both the form and the table to be our relative positioned parent.
<div id="prices">

  <div id="formcontainer">
  ...
  </div>

  <table id="pricetable">
  ...
  </table>

</div>
Ooops! The form shouldn't show by default, and we need to have all other cells except the cells in the selected column and cells in the far left column. We'll make use of a new function, hasclass, that checks for class="side". We'll modify our JavaScript function "activateThisColumn" to only hide and show the appropriate cells.
function activateThisColumn(column) {
  var table = document.getElementById('pricetable');
  var form = document.getElementById('formcontainer');

  // first, remove the 'on' class from all other th's
  var ths = table.getElementsByTagName('th');
  for (var g=0; g<ths.length; g++) {
    removeClassName(ths[g], 'on');
    if (!hasclass(ths[g],'side')) {
      ths[g].style.display = 'none';
    }
  }
  // then, remove the 'on' class from all other td's
  var tds = table.getElementsByTagName('td');
  for (var m=0; m<tds.length; m++) {
    removeClassName(tds[m], 'on');
    if (!hasclass(tds[m],'side')) {
      tds[m].style.display = 'none';
    }
  }

  // now, add the class 'on' to the selected th
  var newths = getElementsByClassName(column, 'th', table);
  for (var h=0; h<newths.length; h++) {
    addClassName(newths[h], 'on');
    newths[h].style.display = '';
    // not all browsers like display = 'block' for cells
  }
    // and finally, add the class 'on' to the selected td
  var newtds = getElementsByClassName(column, 'td', table);
  for (var i=0; i<newtds.length; i++) {
    addClassName(newtds[i], 'on');
    newtds[i].style.display = '';
    // not all browsers like display = 'block' for cells
  }
  // show the form!
  form.style.display = 'block';
}
But we still need to hide the form and keep our selected columns when the form is cancelled. We'll add a function to the onclick event of the cancel button.
<input
  type="image"
  alt="Cancel"
  src="i/button_cancel.gif"
  onclick="hideTheForm();return false;" />
And the function says:
function hideTheForm() {
  // get the form
  var form = document.getElementById('formcontainer');
  // hide the form
  form.style.display = 'none';

  // now get the hidden table cells and show them again
  var table = document.getElementById('pricetable');
  var tds = table.getElementsByTagName('td');
  for (var i=0; i<tds.length; i++) {
    tds[i].style.display = '';
  }
  var ths = table.getElementsByTagName('th');
  for (var k=0; k<ths.length; k++) {
    ths[k].style.display = '';
  }
}
There's more going on with Crazy Egg's form than what I've mentioned in this article. Mainly, Crazy Egg invokes a JavaScript library to animate the form's appearance rather than switching from 'none' to 'block' and back again so bluntly. That extra step is beyond the scope of this article, but that kind of detail and work put into the form gives a clear indication that the folks at Crazy Egg really know what they are doing. (Also, IE has some display issues for my form, but those could easily be overcome with conditional comments.)
You might also like


Tags
accordion accordion menu animation navigation animation navigation menu carousel checkbox inputs css3 css3 menu css3 navigation date picker dialog drag drop drop down menu drop down navigation menu elastic navigation form form validation gallery glide navigation horizontal navigation menu hover effect image gallery image hover image lightbox image scroller image slideshow multi-level navigation menus rating select dependent select list slide image slider menu stylish form table tabs text effect text scroller tooltips tree menu vertical navigation menu