 Subscribe
 Follow Us
Very Cool CSS3 images Lightbox With jQuery
 13 years ago
 18164
18164 3496
3496
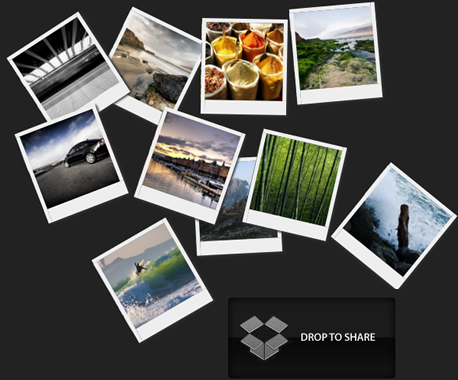
This is an awesome image gallery which leverages the latest CSS3 and jQuery techniques. The script will be able to scan a folder of images on your web server and build a complete drag and drop lighbox gallery around it.
It will be search-engine friendly and even be compatible with browsers which date back as far as IE6 (although some of the awesomeness is lost).
We are using jQuery, jQuery UI (for the drag and drop) and the fancybox jQuery plugin for the lightbox display in addition to PHP and CSS for interactivity and styling.
So lets start with it.
Step 1 – XHTML
The main idea is to have PHP as a back-end which will generate the necessary XHTML for each image. The generated code is later included in demo.php and completes the gallery XHTML front-end.
demo.php
<!-- The gallery container: -->
<div id="gallery">

<?php
/* PHP code, covered in detail in step 3 */
?>

<!-- The droppable share box -->
<div class="drop-box">
</div>

</div>

<div class="clear"></div>

<!-- This is later converted to the modal window with the url of the image: -->
<div id="modal" title="Share this picture">
<form>
<fieldset>
<label for="name">URL of the image</label>
<input type="text" name="url" id="url" class="text ui-widget-content ui-corner-all" onfocus="this.select()" />
</fieldset>
</form>

</div>
Nothing too fancy here. Notice the modal div – it is used to generate the modal window that is shown when the user drops a picture on the share box. But more on this later on.
Step 2 – PHP
As you remember, in step 1 we covered the XHTML part and mentioned that PHP is responsible for generating the markup that comprises the individual images. And here is how this is actually done:
demo.php
/* Configuration Start */
$thumb_directory = 'img/thumbs';
$orig_directory = 'img/original';
$stage_width=600;
$stage_height=400;
/* Configuration end */

$allowed_types=array('jpg','jpeg','gif','png');
$file_parts=array();
$ext='';
$title='';
$i=0;

/* Opening the thumbnail directory and looping through all the thumbs: */
$dir_handle = @opendir($thumb_directory) or die("There is an error with your image directory!");
$i=1;

while ($file = readdir($dir_handle))
{
 /* Skipping the system files: */
 if($file=='.' || $file == '..') continue;

 $file_parts = explode('.',$file);
 $ext = strtolower(array_pop($file_parts));

 /* Using the file name (withouth the extension) as a image title: */
 $title = implode('.',$file_parts);
 $title = htmlspecialchars($title);

 /* If the file extension is allowed: */
 if(in_array($ext,$allowed_types))
 {
  /* Generating random values for the position and rotation: */
  $left=rand(0,$stage_width);
  $top=rand(0,400);
  $rot = rand(-40,40);

  if($top>$stage_height-130 && $left > $stage_width-230)
  {
   /* Prevent the images from hiding the drop box */
   $top-=120+130;
   $left-=230;
  }

  /* Outputting each image: */
  echo '
  <div id="pic-'.($i++).'" class="pic" style="top:'.$top.'px;left:'.$left.'px;background:url('.$thumb_directory.'/'.$file.') no-repeat 50% 50%; -moz-transform:rotate('.$rot.'deg); -webkit-transform:rotate('.$rot.'deg);">

  <a class="fancybox" rel="fncbx" href="'.$orig_directory.'/'.$file.'" target="_blank">'.$title.'</a>

  </div>';
 }
}

/* Closing the directory */
closedir($dir_handle);
First, we open the thumbnail directory with opendir (using the @ modifier to prevent any possible errors from getting shown to the user) and looping through all the images.
In the loop, we skip the non-image files and generate some XHTML code for each image, which is directly printed to the screen.
As below in the CSS part, PHP handles the rotation and scattering of the images on the page. Each image is positioned at random X and Y coordinates, and rotated in an angle between -40 and 40 degrees (to prevent upside-down images). Those are generated with the use of the rand() PHP function and included as CSS styles in the picture’s style attribute.
There are two image folders used by the gallery – thumbs, which holds the 100×100 px thumbnails, and original, which holds the big versions of the images. It is important that the thumbnail and original image have the same name, otherwise the gallery won’t function properly.
The only thing left is to throw in some interactivity.
Step 3 – CSS
Now that we have all the markup in place, it is time to style it. First we need to include the CSS files in the head section of the page.
demo.php
<link rel="stylesheet" type="text/css" href="demo.css" />
<link rel="stylesheet" href="http://ajax.googleapis.com/ajax/libs/jqueryui/1.7.2/themes/ui-darkness/jquery-ui.css" type="text/css" media="all" />
<link rel="stylesheet" type="text/css" href="fancybox/jquery.fancybox-1.2.6.css">
After we’ve done that, we can start writing the styles.
demo.css
body{
 /* Styling the body */
 color:white;
 font-size:13px;
 background: #222222;
 font-family:Arial, Helvetica, sans-serif;
}

#gallery{
 /* The pics container */
 width:100%;
 height:580px;
 position:relative;
}

.pic, .pic a{
 /* Each picture and the hyperlink inside it */
 width:100px;
 height:100px;
 overflow:hidden;
}

.pic{
 /* Styles specific to the pic class */
 position:absolute;
 border:5px solid #EEEEEE;
 border-bottom:18px solid #eeeeee;

 /* CSS3 Box Shadow */
 -moz-box-shadow:2px 2px 3px #333333;
 -webkit-box-shadow:2px 2px 3px #333333;
 box-shadow:2px 2px 3px #333333;
}

.pic a{
 /* Specific styles for the hyperlinks */
 text-indent:-999px;
 display:block;
 /* Setting display to block enables advanced styling for links */
}

.drop-box{
 /* The share box */
 width:240px;
 height:130px;
 position:absolute;
 bottom:0;
 right:0;
 z-index:-1;

 background:url(img/drop_box.png) no-repeat;
}

.drop-box.active{
 /* The active style is in effect when there is a pic hovering above the box */
 background-position:bottom left;
}

label, input{
 /* The modal dialog URL field */
 display:block;
 padding:3px;
}

label{
 font-size:10px;
}

fieldset{
 border:0;
 margin-top:10px;
}

#url{
 /* The URL field */
 width:240px;
}
One of the classes above, probably needing additional clarification is the pic CSS class. This is used to style the images to look like polaroids. To achieve this, it basically puts a white border around each image.
Also used in the class is the box-shadow CSS3 property, which casts a shadow under each polaroid.
If you’ve looked around the demo of the gallery, you’ve noticed that the images are scattered on the page and rotated in a random fashion. This is done solely with CSS in the PHP side, as you will see in a moment.
Step 4 – jQuery
We now have a good looking CSS gallery on our hands. But that means nothing if we cant drag the pretty pictures around the screen and zoom them in a fancy lightbox display, does it?
This is where jQuery comes into play.
script.js
$(document).ready(function(){
 // Executed once all the page elements are loaded
 var preventClick=false;
 $(".pic a").bind("click",function(e){

  /* This function stops the drag from firing a click event and showing the lightbox */
  if(preventClick)
  {
   e.stopImmediatePropagation();
   e.preventDefault();
  }
 });

 $(".pic").draggable({

  /* Converting the images into draggable objects */
  containment: 'parent',
  start: function(e,ui){
   /* This will stop clicks from occuring while dragging */
   preventClick=true;
  },
  stop: function(e, ui) {
   /* Wait for 250 milliseconds before re-enabling the clicks */
   setTimeout(function(){ preventClick=false; }, 250);
  }
 });

 $('.pic').mousedown(function(e){
  /* Executed on image click */
  var maxZ = 0;

  /* Find the max z-index property: */
  $('.pic').each(function(){
   var thisZ = parseInt($(this).css('zIndex'))
   if(thisZ>maxZ) maxZ=thisZ;
  });

  /* Clicks can occur in the picture container (with class pic) and in the link inside it */
  if($(e.target).hasClass("pic"))
  {
   /* Show the clicked image on top of all the others: */
   $(e.target).css({zIndex:maxZ+1});
  }
  else $(e.target).closest('.pic').css({zIndex:maxZ+1});
 });

 /* Converting all the links to a fancybox gallery */
 $("a.fancybox").fancybox({
  zoomSpeedIn: 300,
  zoomSpeedOut: 300,
  overlayShow:false
 });

 /* Converting the share box into a droppable: */
 $('.drop-box').droppable({
  hoverClass: 'active',
  drop:function(event,ui){

   /* Fill the URL text field with the URL of the image. */
   /* The id of the image is appended as a hash #pic-123 */
   $('#url').val(location.href.replace(location.hash,'')+'#' + ui.draggable.attr('id'));
   $('#modal').dialog('open');
  }
 });

 /* Converts the div with id="modal" into a modal window  */
 $("#modal").dialog({
  bgiframe: true,
  modal: true,
  autoOpen:false,

  buttons: {
   Ok: function() {
    $(this).dialog('close');
   }
  }
 });

 if(location.hash.indexOf('#pic-')!=-1)
 {
  /* Checks whether a hash is present in the URL */
  /* and shows the respective image */
  $(location.hash+' a.fancybox').click();
 }
});
First we are binding a click function to the images, which prevents the lightbox from showing once we start dragging the pic around.
After this we make all the pictures draggable, and then we set up the lightbox.
Later we turn the “Drop to share” box into a droppable, which enables it to detect when a picture is hovered and dropped. This allows us to add a special hover style to the container, and to open the modal window on drop.
The modal window itself is a user interface component that comes with jQuery UI. It hides all the page elements under a semi-transparent overlay, and thus blocking them for the user. The only thing occupying the their attention is the message window, which in our case holds the text box with the URL of the image, as defined in the div with id of modal in step one.
Last, we have a few lines of code which check whether a hash of the type #pic-123 is present in the URL, which would cause the respective image to be shown in the lightbox on page load.
With this CSS3 lightbox gallery is complete! hope you like it.
You might also like

Tags
accordion accordion menu animation navigation animation navigation menu carousel checkbox inputs css3 css3 menu css3 navigation date picker dialog drag drop drop down menu drop down navigation menu elastic navigation form form validation gallery glide navigation horizontal navigation menu hover effect image gallery image hover image lightbox image scroller image slideshow multi-level navigation menus rating select dependent select list slide image slider menu stylish form table tabs text effect text scroller tooltips tree menu vertical navigation menu