 Subscribe
 Follow Us
Checkbox and Radio control with jQuery
 13 years ago
 11175
11175 3119
3119
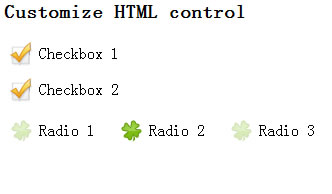
In web development/design, there’re a lot of time you want to customize HTML controls. Some controls are actually quite simple to implement. I will show you how to customize a checkbox/radiobox. It will be very simple, just need a few lines of jQuery and CSS.
Theory behind
As always, I try to find the easiest way to solve this problem. In normal HTML, if you create a Checkbox and a label link to it, whenever you click on the label
it will also check/uncheck the checkbox. So to customize the Checkbox control, all you need to do is hide the actual checkbox and customize the label.
Because you hide the checkbox already, so you won’t know if the box is checked or not, that’s where the jQuery comes in. You will use the jQuery to change
the class to the label so you will know if the check box is checked or not. Simple right?
Do it.
Right, start with a very basic html:
<html>
<head>
</head>
<body>
	<input id="CheckBox1" type="checkbox" class="CheckBoxClass">
	<label id="Label1" for="CheckBox1" class="CheckBoxLabelClass">Customize Checkbox 1</label>
</body>
</html>
Ok, now hide the checkbox using CSS:
<style>
	.CheckBoxClass{
		display: none;
	}
</style>
Now the checkbox’s gone. If you click on the label, the checkbox is still checked/unchecked, but you won’t see it though. Now if it’s checked, we want to
change the style of the label so we know it’s checked. Add a CSS for the selected label class. And the script to switch the class.
.LabelSelected{
	border: 1px dotted black;
}
<script type="text/javascript" src="jquery.js"></script>
<script type="text/javascript">
$(document).ready(function(){
	$(".CheckBoxClass").change(function(){
		if($(this).is(":checked")){
			$(this).next("label").addClass("LabelSelected");
		}else{
			$(this).next("label").removeClass("LabelSelected");
		}
	});
});
</script>
The same with radio button. However, when we check/uncheck a radio, it also effect other radio as well. So you will need to make sure it will clear the unchecked.
	$(".RadioClass").change(function(){
		if($(this).is(":checked")){
			$(".RadioSelected:not(:checked)").removeClass("RadioSelected");
			$(this).next("label").addClass("RadioSelected");
		}
	});
You could check the full code by download the example file.
The article source:http://www.hieu.co.uk/blog/index.php/2009/07/09/customize-html-control-with-jquery-checkbox-radio/
You might also like
Tags
accordion accordion menu animation navigation animation navigation menu carousel checkbox inputs css3 css3 menu css3 navigation date picker dialog drag drop drop down menu drop down navigation menu elastic navigation form form validation gallery glide navigation horizontal navigation menu hover effect image gallery image hover image lightbox image scroller image slideshow multi-level navigation menus rating select dependent select list slide image slider menu stylish form table tabs text effect text scroller tooltips tree menu vertical navigation menu