 Subscribe
 Follow Us
a jQuery Image Scroller
 14 years ago
  20346
20346  3623
3623
 n/a
n/a

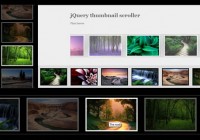
We’re going to be building an image scroller, making use of jQuery’s excellent animation features and generally having some fun with code. Image scrollers are of course nothing new; versions of them come out all the time. Many of them however are user-initiated; meaning that in order for the currently displayed content to change, the visitor must click a button or perform some other action. This scroller will be different in that it will be completely autonomous and will begin scrolling once the page loads.
Getting Started
Let’s create the underlying HTML page first of all; in a new page in your text editor add the following code:
<!DOCTYPE HTML PUBLIC "-//W3C//DTD HTML 4.01//EN" "http://www.w3.org/TR/html4/strict.dtd">
<html>
  <head>
    <link rel="stylesheet" type="text/css" href="imageScroller.css">
    <meta http-equiv="Content-Type" content="text/html; charset=utf-8">
    <title>imageScroller Image Carousel
  </head>
  <body>
    <div id="outerContainer">
      <div id="imageScroller">
   <div id="viewer" class="js-disabled">
     <a class="wrapper" href="http://www.apple.com" title="Apple"><img class="logo" id="apple" src="logos/apple.jpg" alt="Apple">
     <a class="wrapper" href="http://mozilla-europe.org/en/firefox" title="Firefox"><img class="logo" id="firefox" src="logos/firefox.jpg" alt="Firefox">
     <a class="wrapper" href="http://jquery.com" title="jQuery"><img class="logo" id="jquery" src="logos/jquery.jpg" alt="jQuery">
     <a class="wrapper" href="http://twitter.com" title="Twitter"><img class="logo" id="twitter" src="logos/twitter.jpg" alt="Twitter">
     <a class="wrapper" href="http://jqueryui.com" title="jQuery UI"><img class="logo" id="jqueryui" src="logos/jqueryui.jpg" alt="jQuery UI">
   </div>
      </div>
    </div>
    <script type="text/javascript" src="http://jqueryjs.googlecode.com/files/jquery-1.3.2.min.js">
    <script type="text/javascript">
 $(function() {

      });
    </script>
  </body>
</html>
Save this as imageScroller.html inside a new folder. We link to a custom stylesheet in the head of the page, which we’ll code in a little while, and we include a link to the hosted version of the latest release of jQuery at the bottom of the page. Loading scripts at the end of the body is a recognized technique for improving the performance of your page and should therefore be practiced wherever possible.
Our widget consists of a series of nested containers and a bunch of images wrapped in links. The images placed within the containers are hardcoded into the page for accessibility reasons. We won’t be retrieving the images dynamically; any images placed in the widget will automatically be scrolled (provided they are wrapped in a link with the appropriate class name).
The outer-most container will be used primarily for positional and display purposes, while the next container is used to decorate the widget with a background image. The outer container is also necessary for appending the controls to so that they appear above the content correctly in IE.
The inner-most container is the element that will be used to view the images through. This element is given the class js-disabled which will be used purely for visitors that have JavaScript disabled. We’ll use this class to shrink each of the images with CSS so that they are all viewable.
The images are all a uniform size, and the containers will be sized to accommodate them quite neatly. The image size is also used in the script that we’ll add; I’ll highlight specifically where these references occur but you should be aware that if you’d like to use images of a different size, the script and the size of the containers will need to be adjusted accordingly.
Styling the Widget
After the link to jQuery, we have a custom script element with the jQuery document.ready shortcut, waiting for us to add the code that will bring the widget to life. Before we do that however, let’s just add the CSS quickly. In another new file in your text editor, add the following selectors and style rules:
/* js-disabled class - set image sizes so they all fit in the viewer */
.js-disabled img { width:100px; height:100px; display:block; float:left; margin:30px 0 0; }

#outerContainer { width:542px; height:202px; margin:auto; position:relative; }
#imageScroller { width:542px; height:202px; position:relative; background:#000000 url(images/imageScrollerBG.png) no-repeat; }
#viewer { width:522px; height:182px; overflow:hidden; margin:auto; position:relative; top:10px; }
#imageScroller a:active, #imageScroller a:visited { color:#000000; }
#imageScroller a img { border:0; }
#controls { width:534px; height:47px; background:url(images/controlsBG.png) no-repeat; position:absolute; top:4px; left:4px; z-index:10; }
#controls a { width:37px; height:35px; position:absolute; top:3px; }
#controls a:active, #controls a:visited { color:#0d0d0d; }
#title { color:#ffffff; font-family:arial; font-size:100%; font-weight:bold; width:100%; text-align:center; margin-top:10px; }
#rtl { background:url(images/rtl.png) no-repeat; left:100px; }
#rtl:hover { background:url(images/rtl_over.png) no-repeat; left:99px; }
#ltr { background:url(images/ltr.png) no-repeat; right:100px; }
#ltr:hover { background:url(images/ltr_over.png) no-repeat; }
Bringing the Widget to Life
In the final stage of this tutorial we’ll add the jQuery-flavored JavaScript that will make the widget work and create the behavior that we desire. Within the empty anonymous function at the bottom of the HTML page add the following code:
//remove js-disabled class
$("#viewer").removeClass("js-disabled");

//create new container for images
$("
<div>").attr("id", "container").css({
  position:"absolute"
}).width($(".wrapper").length * 170).height(170).appendTo("div#viewer");

//add images to container
$(".wrapper").each(function() {
  $(this).appendTo("div#container");
});

//work out duration of anim based on number of images (1 second for each image)
var duration = $(".wrapper").length * 1000;

//store speed for later
var speed = (parseInt($("div#container").width()) + parseInt($("div#viewer").width())) / duration;

//set direction
var direction = "rtl";

//set initial position and class based on direction
(direction == "rtl") ? $("div#container").css("left", $("div#viewer").width()).addClass("rtl") : $("div#container").css("left", 0 - $("div#container").width()).addClass("ltr") ;
</div>
First of all we remove the js-disabled class from the viewer container. Next we create a new container to hold all of the images that are found within the widget. The main reason for this is so that instead of animating each image individually, resulting in a potentially large number of animations running simultaneously, we only have to animate one element – the container that we’re creating now.
The width of the new container is set to the number of images multiplied by the width of each image, which in this example is 170 pixels. This is one of the bits of code that I said earlier I would specifically mention, and is something that will need to be changed if we decide to use images of a different size. The height of the container is also specifically set to the height of each image.
It is useful later on in the script to know certain things about the nature of the animation, such as its speed, the duration it will last and the direction of travel, so we next set a series of variables to store this information in. The duration will equate to exactly one second per image, and is based again on the number of images found in the widget.
The speed is easy to work out, being of course the distance of travel divided by the duration of travel. For reference, in this example the exact speed of the animation will be 0.274 pixels-per-millisecond. The final variable, direction, is a simple string denoting that the animation will proceed from right-to-left, although we could easily change this to ltr if we wished.
Finally, we set the starting position of the new container; as the animation is currently set to rtl, we need to position the new image container so that its left edge is set to the right edge of the viewer. If we set the animation to ltr however, the element’s right edge will be aligned with the container’s left edge. We determine the direction using the JavaScript ternary conditional. As well as its position, we also give the new container a class name matching its direction, which we can test for at different points in the script.
Next we’ll need to define a new function to initiate and perpetuate the animation. There are several different times during the normal execution of the script that we’ll need to begin animating, so wrapping this functionality in a function that we can call when we need helps to reduce the amount of code. Add the following code:
//animator function
var animator = function(el, time, dir) {

  //which direction to scroll
  if(dir == "rtl") {

    //add direction class
    el.removeClass("ltr").addClass("rtl");

    //animate the el
    el.animate({ left:"-" + el.width() + "px" }, time, "linear", function() {

 //reset container position
 $(this).css({ left:$("div#imageScroller").width(), right:"" });

 //restart animation
 animator($(this), duration, "rtl");

 //hide controls if visible
 ($("div#controls").length > 0) ? $("div#controls").slideUp("slow").remove() : null ;

    });
  } else {

    //add direction class
    el.removeClass("rtl").addClass("ltr");

    //animate the el
    el.animate({ left:$("div#viewer").width() + "px" }, time, "linear", function() {

      //reset container position
      $(this).css({ left:0 - $("div#container").width() });

      //restart animation
      animator($(this), duration, "ltr");

      //hide controls if visible
      ($("div#controls").length > 0) ? $("div#controls").slideUp("slow").remove() : null ;
    });
  }
}
Adding Some Interaction
We’re now at the stage where we have the core functionality of the widget and can start adding the extra interactivity that will make it engaging. After the call to the animator function add the following code:
//pause on mouseover
$("a.wrapper").live("mouseover", function() {

  //stop anim
  $("div#container").stop(true);

  //show controls
($("div#controls").length == 0) ? $("
<div>").attr("id", "controls").appendTo("div#outerContainer").css({ opacity:0.7 }).slideDown("slow") : null ;
($("a#rtl").length == 0) ? $("<a>").attr({ id:"rtl", href:"#", title:"rtl" }).appendTo("#controls") : null ;
($("a#ltr").length == 0) ? $("</a><a>").attr({ id:"ltr", href:"#", title:"ltr" }).appendTo("#controls") : null ;

  //variable to hold trigger element
  var title = $(this).attr("title");

  //add p if doesn't exist, update it if it does
  ($("p#title").length == 0) ? $("

").attr("id", "title").text(title).appendTo("div#controls") : $("p#title").text(title) ;
});
</a></div>
<a>//add p if doesn't exist, update it if it does
($("p#title").length == 0) ? $("

").attr("id", "title").text($(this).attr("title")).appendTo("div#controls") : $("p#title").text(title) ;
</a>
<a>//restart on mouseout
$("a.wrapper").live("mouseout", function(e) {

  //hide controls if not hovering on them
  (e.relatedTarget == null) ? null : (e.relatedTarget.id != "controls") ? $("div#controls").slideUp("slow").remove() : null ;

  //work out total travel distance
  var totalDistance = parseInt($("div#container").width()) + parseInt($("div#viewer").width());

  //work out distance left to travel
  var distanceLeft = ($("div#container").hasClass("ltr")) ? totalDistance - (parseInt($("div#container").css("left")) + parseInt($("div#container").width())) : totalDistance - (parseInt($("div#viewer").width()) - (parseInt($("div#container").css("left")))) ;

  //new duration is distance left / speed)
  var newDuration = distanceLeft / speed;

  //restart anim
  animator($("div#container"), newDuration, $("div#container").attr("class"));

});
</a>
Changing Direction
<a>//handler for ltr button
$("#ltr").live("click", function() {

  //stop anim
  $("div#container").stop(true);

  //swap class names
  $("div#container").removeClass("rtl").addClass("ltr");

  //work out total travel distance
  var totalDistance = parseInt($("div#container").width()) + parseInt($("div#viewer").width());

   //work out remaining distance
  var distanceLeft = totalDistance - (parseInt($("div#container").css("left")) + parseInt($("div#container").width()));

  //new duration is distance left / speed)
  var newDuration = distanceLeft / speed;

  //restart anim
  animator($("div#container"), newDuration, "ltr");
});
</a>
<a>//handler for rtl button
$("#rtl").live("click", function() {

  //stop anim
  $("div#container").stop(true);

  //swap class names
  $("div#container").removeClass("ltr").addClass("rtl");

  //work out total travel distance
  var totalDistance = parseInt($("div#container").width()) + parseInt($("div#viewer").width());

  //work out remaining distance
  var distanceLeft = totalDistance - (parseInt($("div#viewer").width()) - (parseInt($("div#container").css("left"))));

  //new duration is distance left / speed)
  var newDuration = distanceLeft / speed;

  //restart anim
  animator($("div#container"), newDuration, "rtl");
});
</a>
You might also like
Tags
accordion accordion menu animation navigation animation navigation menu carousel checkbox inputs css3 css3 menu css3 navigation date picker dialog drag drop drop down menu drop down navigation menu elastic navigation form form validation gallery glide navigation horizontal navigation menu hover effect image gallery image hover image lightbox image scroller image slideshow multi-level navigation menus rating select dependent select list slide image slider menu stylish form table tabs text effect text scroller tooltips tree menu vertical navigation menu