 Subscribe
 Follow Us
Image Reveal using jQuery
 13 years ago
  14920
14920  1587
1587
 n/a
n/a
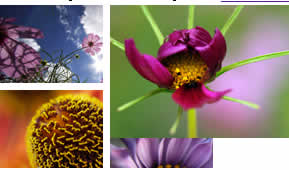
Yet another twist on my image manipulation kick, I tinkered around with making images larger again. This time, instead of actually enlarging the image, we are enlarging the ‘viewer’ to see more of it. So, we see a snippet of an image, then when we hover over it, the viewer expands so we see it all!
Step #1: The Setup
Our HTML is actually quite simple today, we are dealing with 4 absolutely positioned images in the body of our page:
<body>
    <span class="resize" id="pic1">
        <img src="images/flowers1.jpg" />
    </span>
    <span class="resize" id="pic2">
        <img src="images/flowers2.jpg" />
    </span>
    <span class="resize" id="pic3">
        <img src="images/flowers3.jpg" />
    </span>
    <span class="resize" id="pic4">
        <img src="images/flowers4.jpg" />
    </span>

</body>
You will notice the <img> tag is wrapped in a <span></span>, which is going to act as our viewer and will expand when we hover over it.
Step #2: Styles!
Now we need to set the viewer size and absolutely position the images with CSS. We place the style rules in between the <head></head> tags:
Step #3: jQuery Time!!
Now the power of this page, the script! We need to do a couple things before we jump into the .hover() function. We need to set up some variables to hold the current width & height of the span, so we have something to resize back to:
<!-- reference the required jquery.js file!! -->
<script type="text/javascript" src="jquery.js"></script>

<!-- the jQuery function -->
<script type="text/javascript">

$(document).ready(function(){

  //original span.resize values that we set in the CSS
  var oWidth = $('span.resize').width();
  var oHeight = $('span.resize').height();
Now that we have saved the original height & width of the span (which we set in the CSS) we can move on to the actual .hover() function:
  //hover over the span image to start the function
  $('span.resize').hover(function(){

      //this is the hover over function, bump up the
      //zindex and make the animation
      $(this)
        .stop()
        .css('z-index','99')
        .animate({
          width:$('span.resize img').width(),
          height:$('span.resize img').height()
        },1000);
    },

    //this is the hover out function, decrease the span
    //back to original size, decrease the z-index
    //back to normal
    function(){
      $(this)
        .stop()
        .animate({

          //take the span back to the original
          //size we set the variables for
          width:oWidth,
          height:oHeight
        },1000,

          //callback function to make css run AFTER shrink
          function(){
          $(this)
            .css('z-index','-1');
          });
    });
});

</script>
Closing Notes
So what have we learned today? Well, the concept between the expand & contract stays the same, but we added something different at the very end of the .hover() out function. It’s called a callback. By definition a callback is: ‘A function to be executed whenever the animation completes, executes once for each element animated against.’ Without the callback function at the end, the animation still works, but while the span is decreasing back to original width/height the other images around it jump in front, which is really annoying. If you want to see what I am talking about, here is the code for the hover out function:
function(){
  $(this)
    .stop()
    .animate({
      width:oWidth,
      height:oHeight
    },1000)
    .css('z-index','-1');
)};
You might also like


Tags
accordion accordion menu animation navigation animation navigation menu carousel checkbox inputs css3 css3 menu css3 navigation date picker dialog drag drop drop down menu drop down navigation menu elastic navigation form form validation gallery glide navigation horizontal navigation menu hover effect image gallery image hover image lightbox image scroller image slideshow multi-level navigation menus rating select dependent select list slide image slider menu stylish form table tabs text effect text scroller tooltips tree menu vertical navigation menu