 Subscribe
 Follow Us
Jquery And CSS3 Virtual Light Table With Draggable Photos
 13 years ago
 14671
14671 2419
2419
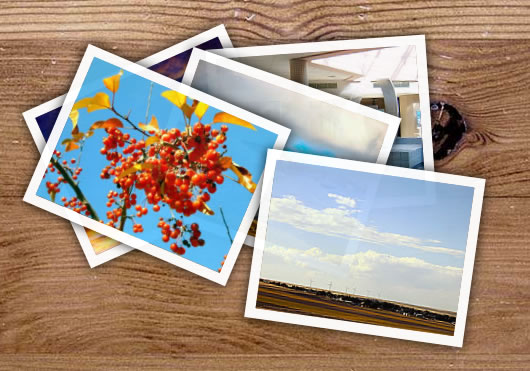
how to use CSS3 and jQuery to create a nice-looking virtual light table with draggable photos.
A traditional light table is a flat illuminated panel that you can place transparent slides on for viewing. Our "light table" is going to be an image of a wooden kitchen table, and the photos will be prints rather than transparencies, but the basic idea is the same!
The aim is to make our table and photos look as realistic as possible. Here's our desired feature list:
- A wooden table background image for the photos to sit on
- Each photo "floats" onto the table as it loads
- Each photo is given a random position and orientation to create a "scattered" effect
- The photos have a white border and drop shadow to add a 3D effect, and are ever-so-slightly transparent
- Once on the table, a photo can be dragged around by using the mouse
Ready? Let's go!
Step 1. The markup
First let's look at the HTML for our light table:
<body>

  <div id="wooden-table"><img src="images/wooden-table.jpg" alt="Wooden table image" /></div>

  <div id="description">
    <h1>Kitchen Table | <span style="font-weight: normal;">A "light table" with draggable photos using CSS3 and jQuery | © Elated.com | <a href="http://www.elated.com/articles/kitchen-table-slick-photo-light-table-css3-jquery/">Back to Tutorial</a></span></h1>
  </div>

  <div id="lighttable">
    <img src="slides/bird-marking.jpg" alt="Bird Marking" />
    <img src="slides/double-propellors.jpg" alt="Double Propellors" />
    <img src="slides/moody-listener-satellite-dish.jpg" alt="Moody Listener Satellite Dish" />
    <img src="slides/orange-hatches.jpg" alt="Orange Hatches" />
    <img src="slides/plane-nose-closeup.jpg" alt="Plane Nose Closeup" />
  </div>

</body>
As you can see, the markup is very straightforward. It consists of 3 parts:
- An
imgtag for the wooden table image, stored inside a#wooden-tablediv. In the final page, this image is actually displayed as a background image of the#lighttablediv. The reason for loading it via animgtag too is so that we can attach aloadevent to it to detect when the image has been loaded. (More on this later.) - The page title and description.
- The
#lighttabledivitself, containing the 5 photos that we want to display on the table.
Step 2. The CSS
Now let's look at the CSS. This styles everything from the page background through to the wooden light table and the photos themselves.
The page body
/* The page body */
html, body {
  background: #333;
  overflow: hidden;
  font-family: Helvetica, Arial, sans-serif;
}
This is given a dark grey background and a default font. overflow: hidden ensures that scrollbars don't appear. (We also set this on the html element, since IE needs this to prevent the scrollbars.)
The div holding the wooden table img tag
/* The div holding the wooden table img tag */
#wooden-table {
  position: absolute;
  left: -5000px;
}
This img tag is there purely so we can attach a jQuery load event to it to determine when the wooden table background image has loaded. Since we don't actually want to display the image here, we position it way to the left of the browser viewport, thereby making it effectively invisible.
The light table itself
/* The light table itself */
#lighttable {
  position: relative;
  width: 800px;
  height: 450px;
  background: #eee url(images/wooden-table.jpg);
  padding: 70px;
  margin: 0 auto;
  border: 20px solid #111;
  display: none;
}
This is set to position: relative so that the absolutely-positioned photos sit inside it. It's given a suitable width and height, as well as the wooden table background image mentioned above.
We add quite a lot of padding (70px) around the table. This ensures that the photos can't be dragged over the edges of the table. If the images were all upright then this could be set to zero; however, when rotating images using CSS3 transforms, there's no easy way to determine the size of the resulting (larger) bounding box (at least, as far as I know). Therefore we add 70 pixels of leeway to be on the safe side.
Finally we use margin: 0 auto to centre the table horizontally, and give it a nice thick dark border. Then we hide it with display: none. We'll fade it in with jQuery once the background wooden table image has loaded.
Since I'm sure you're wondering — yes, it is a photo of my kitchen table. :)
Photos on the light table
/* Photos on the light table */
#lighttable img {
  border: 10px solid #fff;
  box-shadow: 0 0 1em rgba(0, 0, 0, 0.9);
  -moz-box-shadow: 0 0 1em rgba(0, 0, 0, 0.9);
  -webkit-box-shadow: 0 0 1em rgba(0, 0, 0, 0.9);
  position: absolute;
  left: -9999px;
  top: -9999px;
}
Each photo is given a white border and a CSS3 drop shadow. We set the drop shadow using the standards approach (box-shadow), as well as the vendor-specific methods for Mozilla and WebKit browsers (-moz-box-shadow and -webkit-box-shadow respectively), to ensure that the drop shadows work across as many browsers as possible. At the time of writing, only Opera 10.5 uses the official standards approach.
Finally, we set position: absolute on the photo so we can position it easily, then move it way to the left and above the browser viewport, so that it's initially hidden as it loads.
Step 3. The JavaScript
Let the fun begin! The JavaScript code is the meat of the light table, and is responsible for:
- Loading the jQuery and jQuery UI libraries
- Fading in the light table when the background image has loaded
- Randomly positioning and rotating each photo
- Making the photos draggable
- "Floating" each photo down to the table as it loads
Let's take a look at the JavaScript a chunk at a time.
Loading the libraries
<script type="text/javascript" src="jquery.js"></script>
<script type="text/javascript" src="jquery-ui-1.8.2.custom.min.js"></script>
You first need to load the jQuery library and jQuery UI plugin. The jQuery UI plugin implements the draggable() method, which you'll use to make the photos draggable with the mouse.
If you haven't already done so, download the jQuery library and jQuery UI plugin, and place the 2 files in the same folder as your light table page. Update the filenames in the <script> tags above if necessary.
Setting up the light table
var newImageZIndex = 1;  // To make sure newly-loaded images land on top of images on the table
var loaded = false;      // Used to prevent initPhotos() running twice

// When the document is ready, fire up the table!
$( init );

// When the wooden table image has loaded, start bringing in the photos
function init() {
  var woodenTable = $('#wooden-table img');
  woodenTable.load( initPhotos );

  // Hack for browsers that don't fire load events for cached images
  if ( woodenTable.get(0).complete ) $(woodenTable).trigger("load");
}
The first chunk of code sets up various variables and event handlers to initialise the light table.
You'll use the newImageZIndex variable to give each photo a successively higher z-index property as it loads. This ensures that each newly-loaded photo always sits on top of any photos already on the table.
The loaded flag will be used to determine if the event handler to initialise the photos has already been called. This works around problems with certain browsers that fire the load event for the wooden table image twice.
If you've been following our other jQuery tutorials then you'll be familiar with the line:
$( init );
This tells jQuery to call the init() function once the document is ready — that is, when the DOM tree has been constructed. It's a good idea to wait until the document is ready before you run the main part of your JavaScript, since you know that all the elements in the page will be available to your code.
The init() function itself adds a load event handler, initPhotos(), to the wooden table image (the img tag that you created in the markup earlier). This means that, when the table image finishes loading, the initPhotos() function is called to start bringing in the photos. You do this to ensure that the photos don't start floating down onto an invisible table!
Unfortunately some browsers — notably Opera and IE7/8 — don't always fire a load event for images that are already in their cache. To work around this, the function inspects the complete property of the wooden table img object. complete is a DOM image property that is set to true if the image is fully loaded. If this is the case, the function triggers the load event to force initPhotos() to run.
woodenTable.get(0) retrieves the first DOM element in the set of elements stored in the woodenTable jQuery object — in other words, the wooden table img element.
Setting up the photos
The initPhotos() function forms the bulk of the JavaScript code. Its job is to fade in the table once its image has loaded, then go through each photo image in the #lighttable div and set it up as follows:
- It's positioned and rotated randomly within the table area
- It's made draggable
- It's initially hidden
- Once the photo image has loaded, it's made 50% bigger, then gradually faded in and reduced back to normal size, giving the impression of it floating down onto the table
Let's see how each chunk of this function works:
1. Fading in the table
function initPhotos() {

  // (Ensure this function doesn't run twice)
  if ( loaded ) return;
  loaded = true;

  // The table image has loaded, so bring in the table
  $('#lighttable').fadeIn('fast');
First the function uses the loaded variable to check that it hasn't been called already — this works around browsers that fire the load event more than once. Assuming this is the first time it's been called, it then calls the jQuery fadeIn() method on the #lighttable div. This causes the div — and the now-loaded table image inside it — to appear.
2. Randomly positioning and rotating the photos
// Process each photo in turn...
  $('#lighttable img').each( function(index) {

    // Set a random position and angle for this photo
    var left = Math.floor( Math.random() * 450 + 100 );
    var top = Math.floor( Math.random() * 100 + 100 );
    var angle = Math.floor( Math.random() * 60 - 30 );
    $(this).css( 'left', left+'px' );
    $(this).css( 'top', top+'px' );
    $(this).css( 'transform', 'rotate(' + angle + 'deg)' );
    $(this).css( '-moz-transform', 'rotate(' + angle + 'deg)' );
    $(this).css( '-webkit-transform', 'rotate(' + angle + 'deg)' );
    $(this).css( '-o-transform', 'rotate(' + angle + 'deg)' );
Next the function starts looping through each photo. To do this, it selects all images in the #lighttable div, then calls the jquery each() method on the images. each() works much like for..in in JavaScript and foreach in PHP, looping through each img element in the set. You pass each() a callback function, and that function is called for each image, setting the variable this to the current img element.
Within the loop function, we set a random position and rotation for the photo. We use the Math.random() function to generate these values, allowing plenty of padding around the outside of the table (in case we're working with very wide or long photos). For the rotation, we'll tilt the photo no more than 30 degrees clockwise or anticlockwise, so that the photo is still easy to view.
Once we've generated the values, we plug them into various CSS properties for the photo. left and top position the top left hand corner of the photo within the table, and we use the CSS3 transform property to rotate the photo. Since not all modern browsers support the standard transform property, we add vendor prefixes for the common Mozilla, WebKit and Opera browser engines.
Why have we written $(this).css(), rather than just this.css()? Well, this holds the raw DOM img element object. So in order to call a jQuery method on the image — in this case, css() — we first need to wrap the img element in a jQuery object by writing $(this). (Remember that you can create a jQuery object from a DOM element object by passing the element object to the $() function.)
3. Making the photos draggable
    // Make the photo draggable
    $(this).draggable( { containment: 'parent', stack: '#lighttable img', cursor: 'pointer' } );
Making objects draggable in the browser can be quite challenging, but fortunately the jQuery UI plugin makes it very easy, thanks to its draggable() method. All you need to do is call draggable() on the element(s) you want to make draggable. That's it!
We pass a few options to the draggable() method to control the dragging behaviour:
containment: 'parent'- This ensures that the images can't be dragged outside the parent element, in this case
#lighttable. (The 70px padding we added to#lighttablein the CSS ensures that the photos can't be dragged within 70 pixels of the edge, which gives us some leeway when it comes to rotated photos.) stack: '#lighttable img'- This very handy option lets you specify a set of elements that should be considered part of a stack along with the current element. The
draggable()method then ensures that, when the current element is dragged, itsz-indexproperty is set higher than all otherz-indexesin the stack. So by specifying all the images in#lighttableas the stack, we ensure that the currently-dragged photo is always brought to the front. cursor: 'pointer'- Turns the mouse cursor into a pointing hand when dragging.
4. Floating the photos onto the table
 // Hide the photo for now, in case it hasn't finished loading
    $(this).hide();

    // When the photo image has loaded...
    $(this).load( function() {

      // (Ensure this function doesn't run twice)
      if ( $(this).data('loaded') ) return;
      $(this).data('loaded', true);

      // Record the photo's true dimensions
      var imgWidth = $(this).width();
      var imgHeight = $(this).height();

      // Make the photo bigger, so it looks like it's high above the table
      $(this).css( 'width', imgWidth * 1.5 );
      $(this).css( 'height', imgHeight * 1.5 );

      // Make it completely transparent, ready for fading in
      $(this).css( 'opacity', 0 );

      // Make sure its z-index is higher than the photos already on the table
      $(this).css( 'z-index', newImageZIndex++ );

      // Gradually reduce the photo's dimensions to normal, fading it in as we go
      $(this).animate( { width: imgWidth, height: imgHeight, opacity: .95 }, 1200 );
    } );

    // Hack for browsers that don't fire load events for cached images
    if ( this.complete ) $(this).trigger("load");
The last chunk of the loop deals with floating each photo onto the table as it loads.
First the photo is hidden by calling the jQuery hide() method. This ensures that we don't see the image appear on the page while it's still loading.
Next, we attach a load event handler to the photo. This is triggered once the image has finished loading.
The event handler function first attaches a loaded data value to the image, and uses this flag to prevent the handler running more than once for this image (since some browsers trigger a load event more than once).
jQuery's data() method lets you attach arbitrary data to an element — very useful for storing and tracking additional information associated with the element.
Next, the handler stores the photo's existing width and height in the variables imgWidth and imgHeight, so that it can restore the photo to the correct dimensions once it's "landed" on the table.
Then the photo is increased to 1.5 times its width and height so that it looks like it's floating above the table, and it's also made transparent so it can be faded in. We also use the newImageZIndex variable to set the photo's z-index so that it's higher than any photos that have already been added to the table — this prevents the new photo disappearing behind existing photos on the table when it lands.
Now we're all set to float the photo down to the table. We do this by calling the very powerful jQuery animate() method, passing in the CSS properties that we'd like the final photo to have: the image's true width and height, and an opacity of .95. The last argument to animate() specifies how long we want the animation to last (1200 milliseconds). jQuery then does its stuff and gradually fades in the photo, reducing its width and height as it goes, until it ends up "landing" on the table with the correct width, height, and opacity value.
Finally, after setting up our event handler, we add the same hack that we used in the init() function to ensure that the load events are triggered even if the photos are cached.
That's it!
You might also like


Tags
accordion accordion menu animation navigation animation navigation menu carousel checkbox inputs css3 css3 menu css3 navigation date picker dialog drag drop drop down menu drop down navigation menu elastic navigation form form validation gallery glide navigation horizontal navigation menu hover effect image gallery image hover image lightbox image scroller image slideshow multi-level navigation menus rating select dependent select list slide image slider menu stylish form table tabs text effect text scroller tooltips tree menu vertical navigation menu